Hiya Joggles fans,
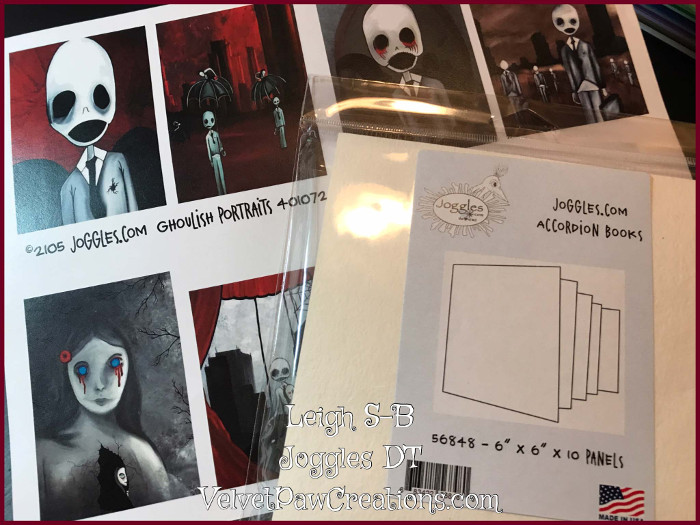
Leigh here and I’m back today to share a dark tale about broken hearts. I’m featuring Accordion Books in this tutorial. Joggles has a wonderful selection in various sizes and I chose to work with the 6 x 6 inch but I cut it nearly in half to fit my project. I was also thrilled when I found the Ghoulish Portraits collage sheet in my Joggles design team stash! Aren’t they delightfully macabre! I knew immediately I’d be using them to make a dark “photo album” and wrote a story around each creepy image. I then went in search of a poem that would fit my theme and found one by Leo Christopher that seemed tailor-made for my project!

…You found an old photo album bound in black ribbon in the attic…you are drawn by the feeling of sadness that seeps from between the pages…you untie the ribbon and read the words on the cover and are drawn deeper into the tale as you turn each page and become lost in their sorrow…
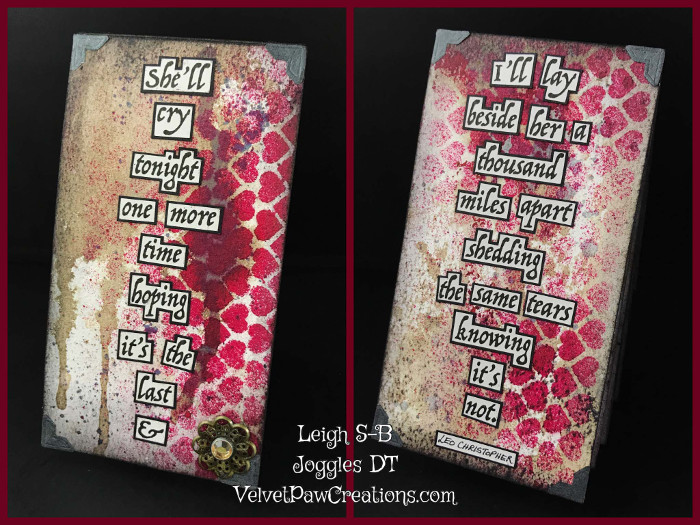
She’ll cry tonight
one more time
hoping it’s the last
&
I’ll lay beside her
a thousand miles apart
shedding the same tears
knowing it’s not.
by Leo Christopher

She sits alone
nothing to soothe her pain
not even sweet bird song
Her thoughts betray her
and dwell on the day
her Love broke her Heart
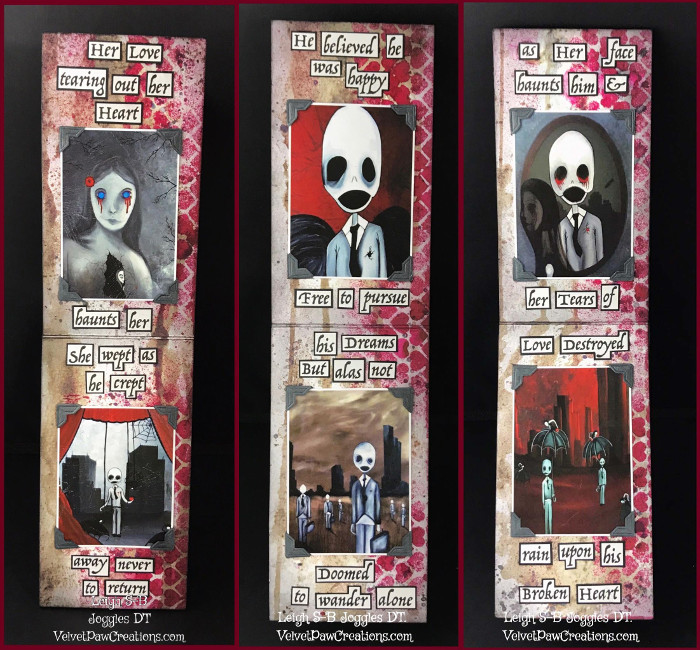
Her Love
tearing out her Heart
haunts her
she wept as
he crept away
never to return
He believed he was happy
Free to pursue his Dreams
But alas not
Doomed to wander alone
as Her face
haunts him &
her Tears of
Love Destroyed
rain upon his
Broken Heart
Here’s a tissue and a nice cup of tea…you’ll feel better once you see how much fun I had making this book ;0)
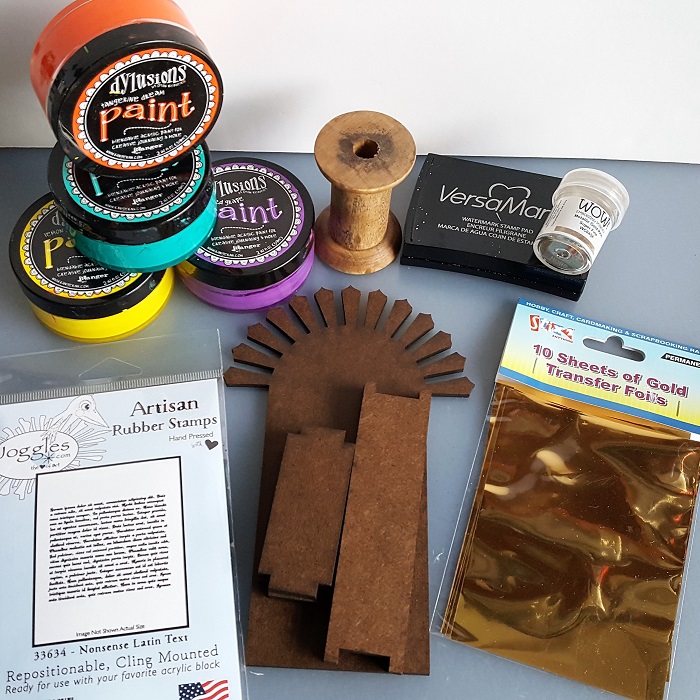
Supplies
Joggles Accordion Book – 6 x 6 inches – 10 panels
Joggles Collage Sheet – Ghoulish Portaits
Joggles Stencil – Punchinella Trio 1
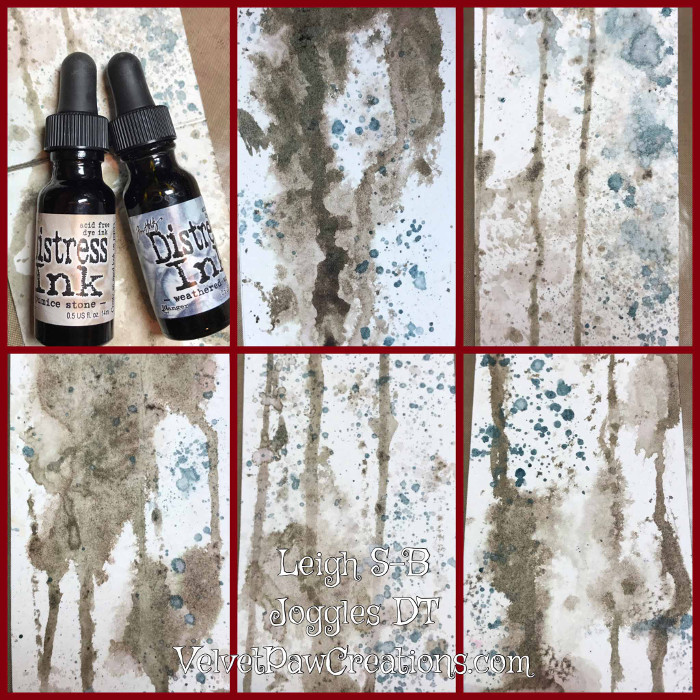
Tim Holtz Distress Inks Reinkers: Pumice Stone; Weathered Wood
Tim Holtz Distress Ink Pad – Black Soot
Ranger Inkssentials Ink Blending Tool
Dylusions Ink Spray – Cherry Pie
Scotch Quick Drying Tacky Glue – 2 oz. bottle
Inkssentials NonStick Craft sheet
Other: paper towel, black photo corners, computer printed text, white card stock; black card stock; black ribbon; metal flower embellishment; ruler; pencil; scissors; paint brush
Here is my process:
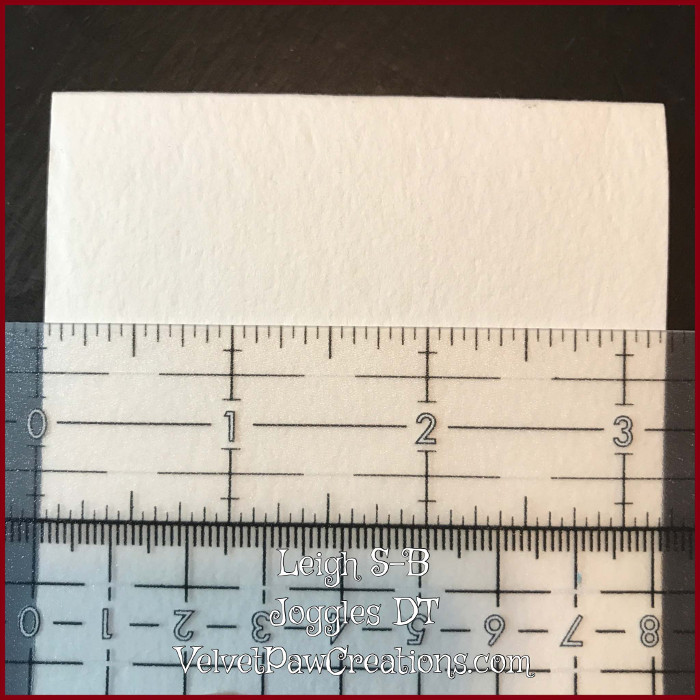
Cut the 6×6 inch accordion book to make a tall and narrow accordion book that measures 3.25 inches x 6 inches. I’ll be using the 2.75″ x 6″ book for another project, of course!
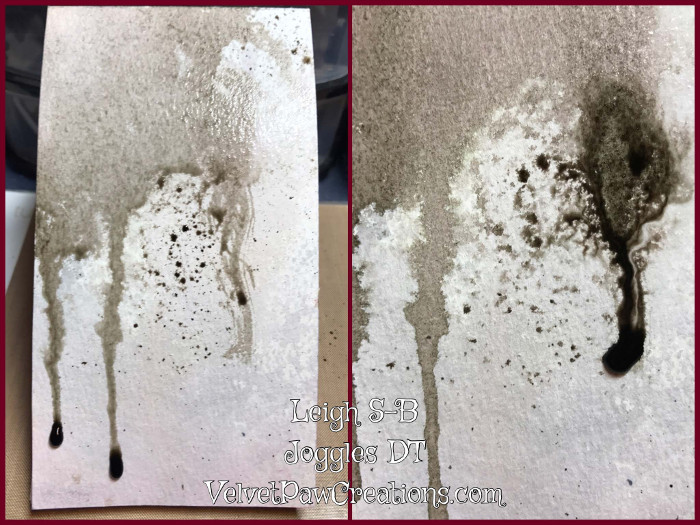
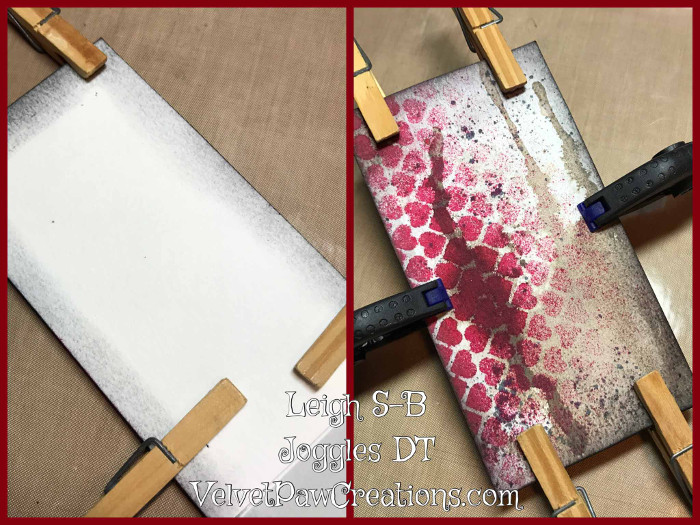
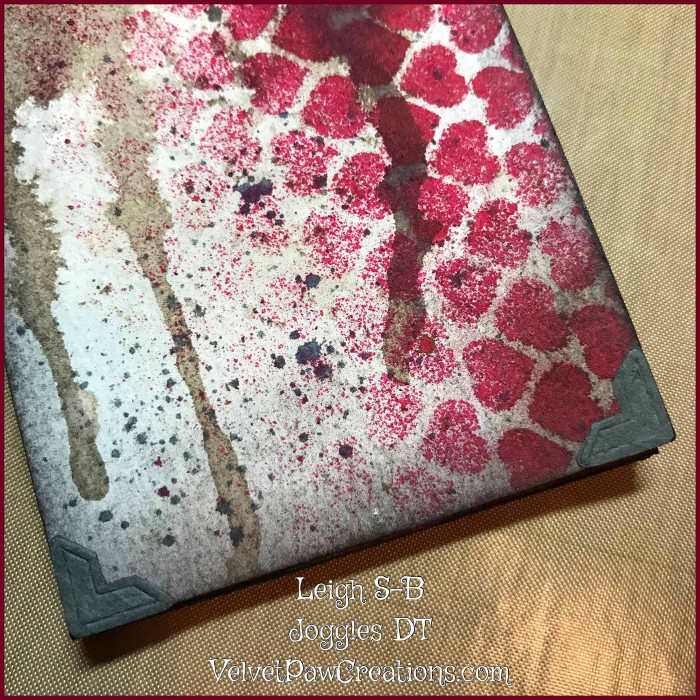
For this style book, you only need to decorate one side. Start off by smearing, dripping & splattering the pages with Pumice Stone Distress Ink. Prepare to have lots of messy fun so if you’ve got somewhere important to go over the next day or two you might want to consider wearing latex gloves ;0) I just played to my heart’s content. There are no rules so just do whatever you want. I splattered with undiluted re-inker and spritzed with water to make some of it run. I also mixed water in with re-inker on my craft sheet and splattered and dripped diluted ink to create the wonderfully distressed pages.
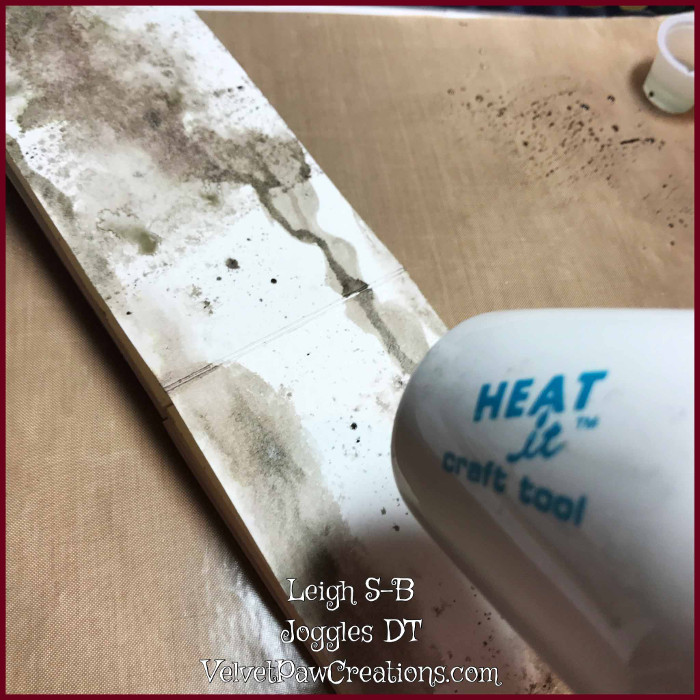
Apply Pumice Stone to all the pages, mopping up with paper towel and drying with a heat tool as needed while working on each page.
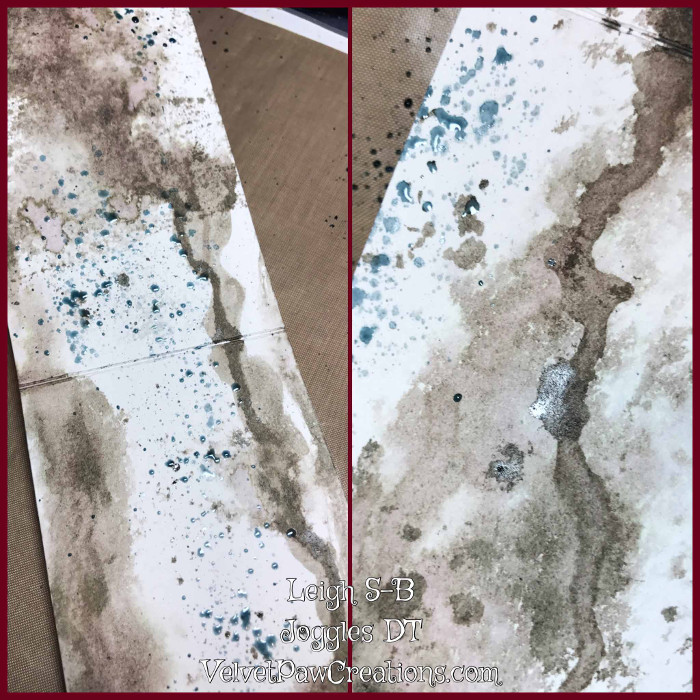
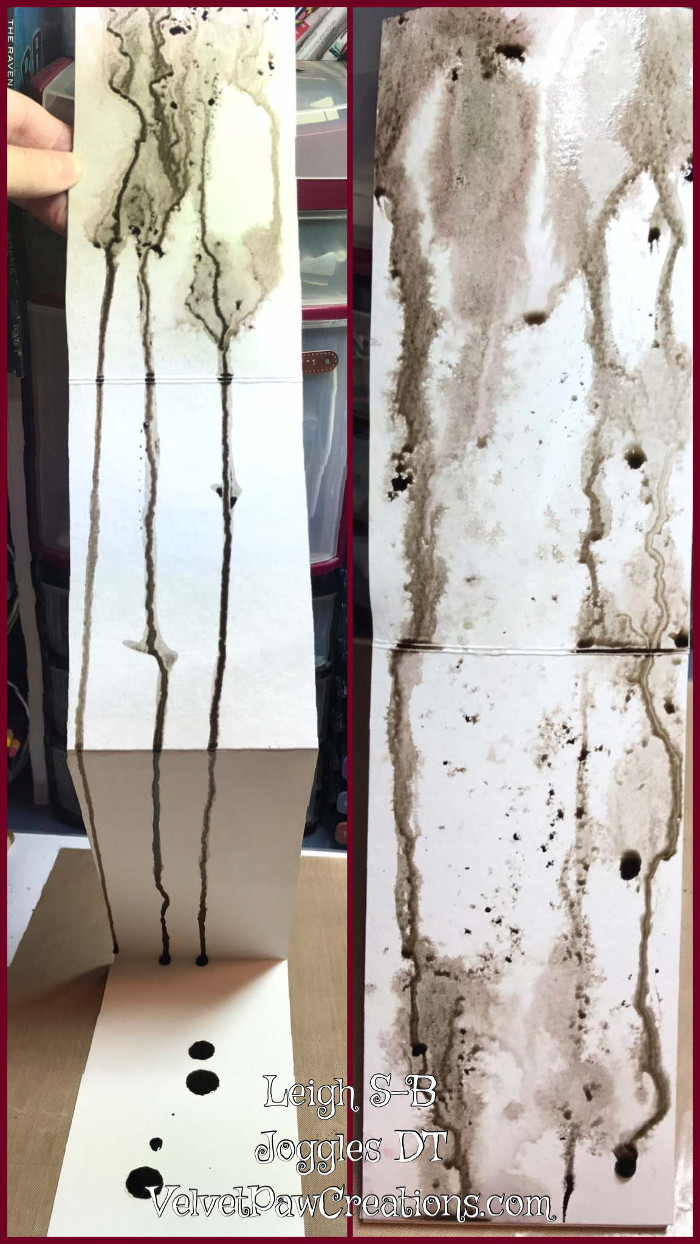
I then splattered and dripped pure and diluted Weathered Wood Reinker on all the pages in the same way. I decided to apply less of this colour and keep the Pumice Stone as my dominant colour. Drip and splat until you’re happy with how your pages look.
The pages are looking great so far!
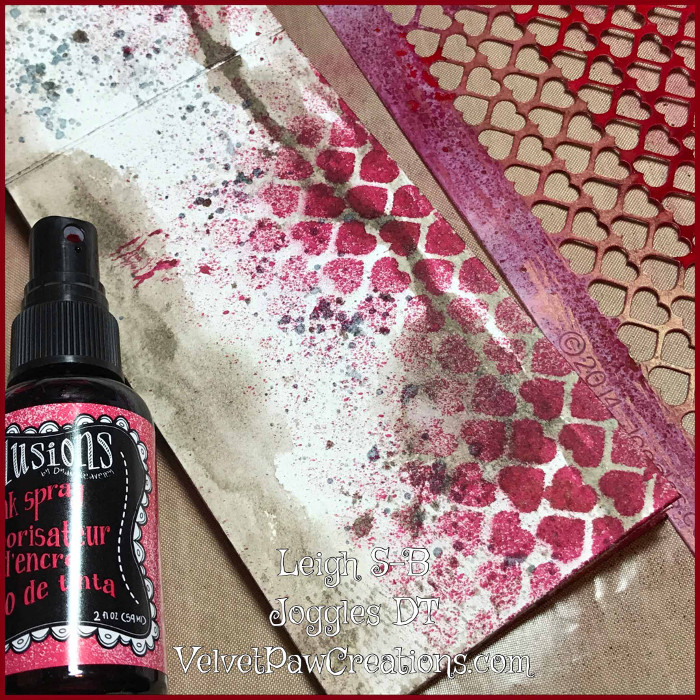
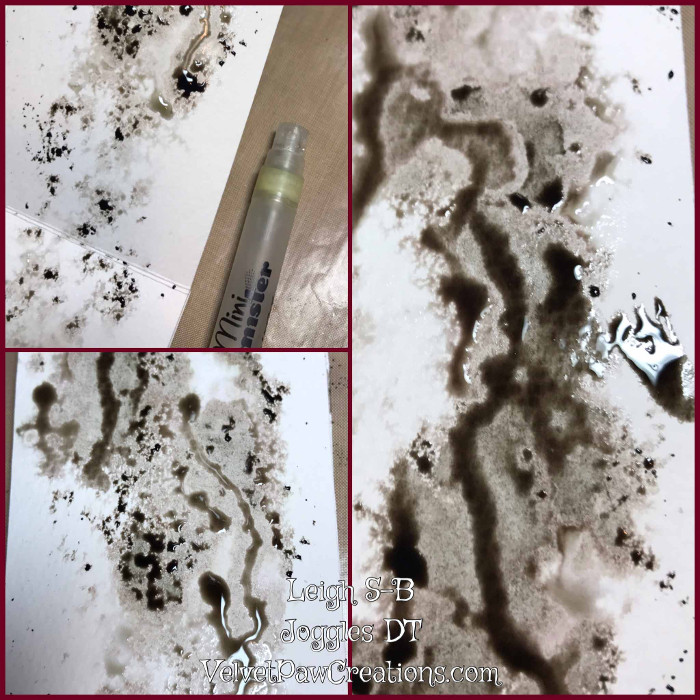
The next step is to randomly add the red hearts pattern from Joggles Punchinella Trio 1 stencil to each page by spritzing through the design with Cherry Pie Dylusions Spray Ink. You’re going to get your fingers really messy so you might want to re-think those gloves at this point. I had red fingers for 2 days…LOL!
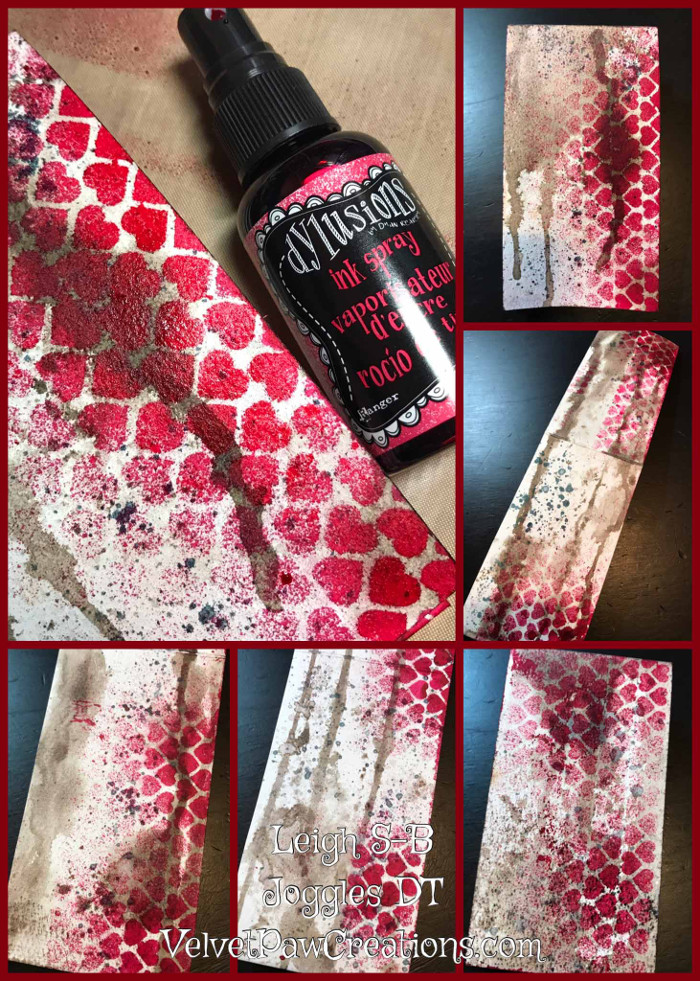
Here’s a look at the pages now decorated with hearts. I love the distressed and smeared look of the hearts. They tie in nicely with the heart-wrenching anguish I want my book to portray. Heartbreak is messy and my pages reflect that emotion nicely, I think.
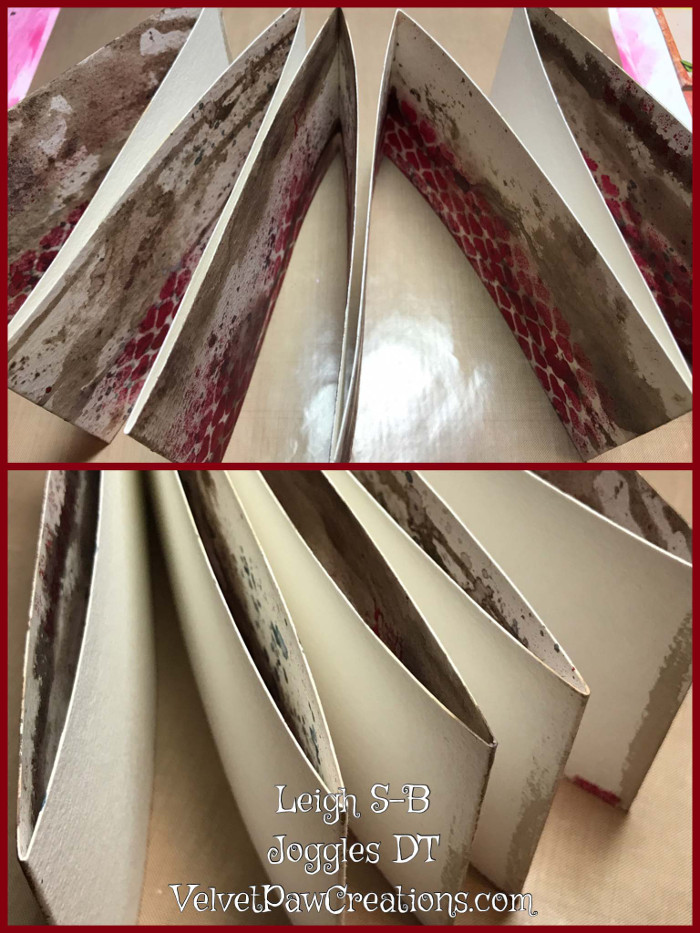
Before moving on to the next step, make sure all the pages are completely dry by zapping them with a heat tool. We now need to address all that bright off-white colour of the undecorated side as well as the page edges!
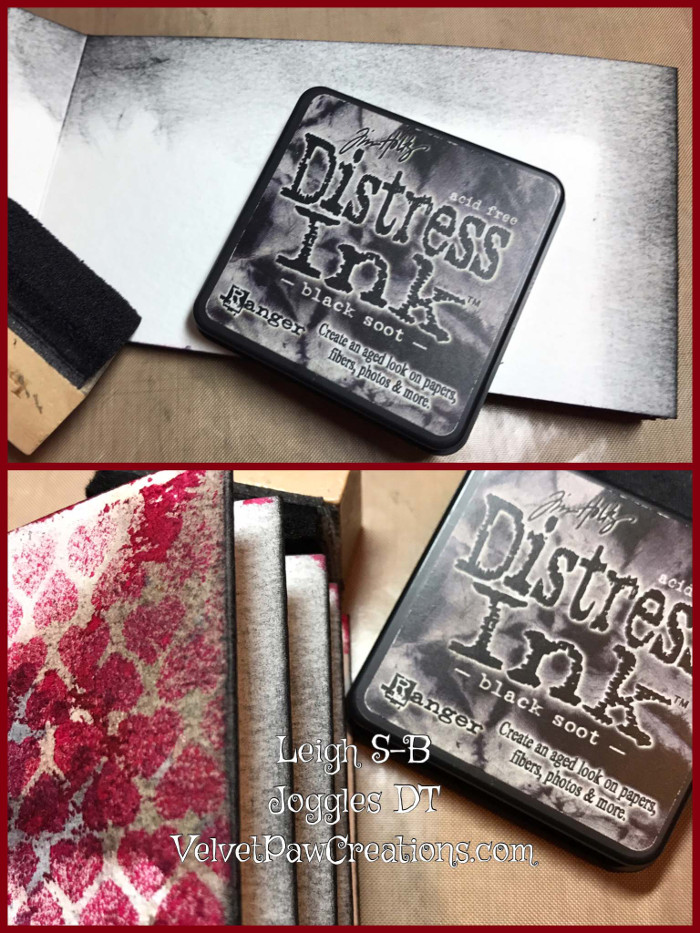
I’ve mentioned before that I like to use black ink to give my projects a “finished look” and black also adds a nice sense of edgy darkness. Apply Tim Holtz Black Soot Distress Ink to the undecorated side of the book with an ink blending tool. You only need to go in far enough to ensure that no off-white will show once the book is assembled.
Pinch the book pages together between your fingers to make sure you get all the edges, too. You don’t want any white peeking through and ruining the dark and gloomy feel of the book.
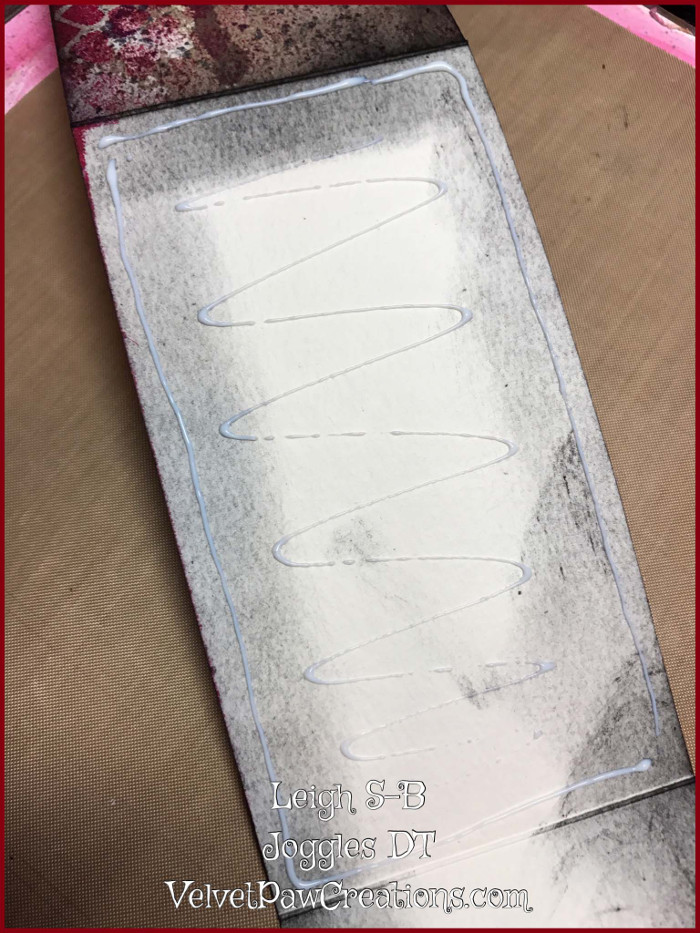
Adhere the undecorated sides of the pages together to create a traditional style book with a glued spine instead of leaving the book as an accordion that can be pulled out and flattened. You could leave it as an accordion if you wish and take your project further by decorating both sides.
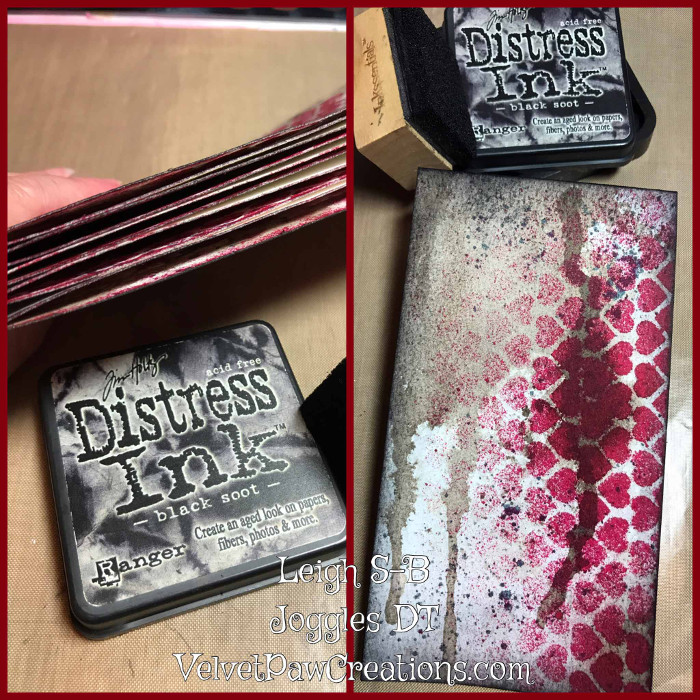
Use clothes pegs to clamp the pages together as you go just for a minute or two to ensure they stick together nicely. Then add more clamps for a few more minutes once the entire book has been glued.
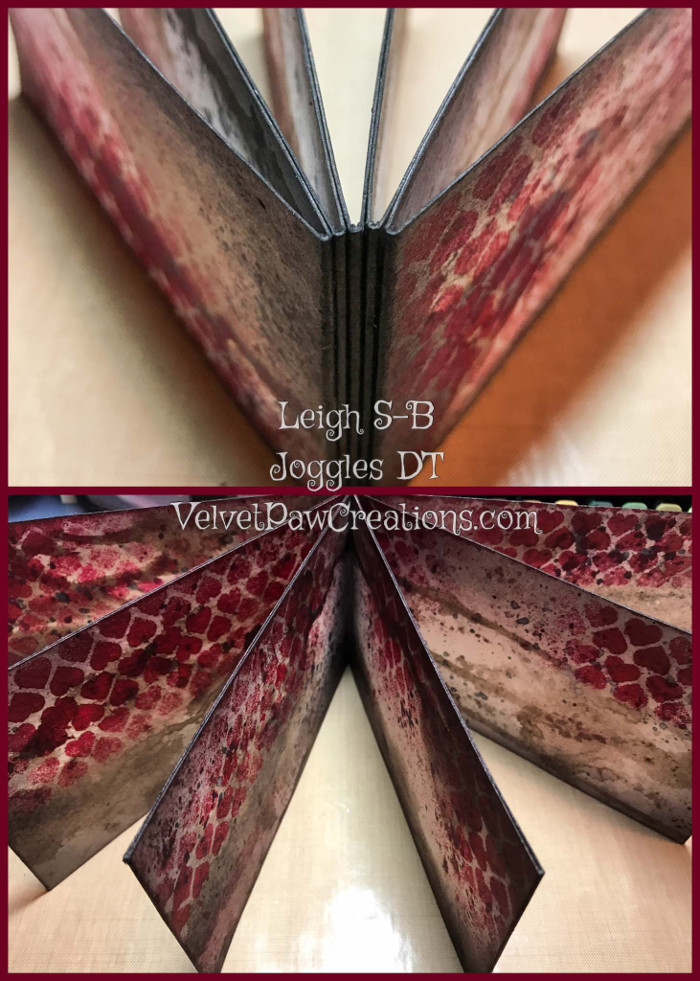
Look how yummy the book is looking now! Love it!
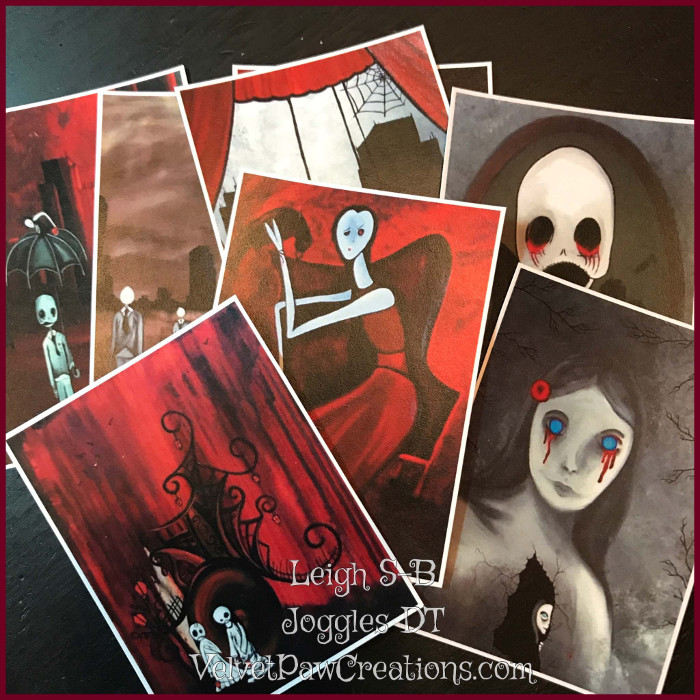
The next step is to cut out the collage images and leave a narrow white border around each, reminiscent of old photographs.

Further replicate the look of an old photo album by adding photo corners. I played around and applied metallic silver, blue, and red rub-on creme to the black corners and dry fit onto a “photo”. I also auditioned a metallic gold one to see which look I preferred. The plain black ones felt right for this project.
I also added photo corners to the front and back covers of the book by pulling apart the photo corners and adhering just the ‘fronts’ to the corners.
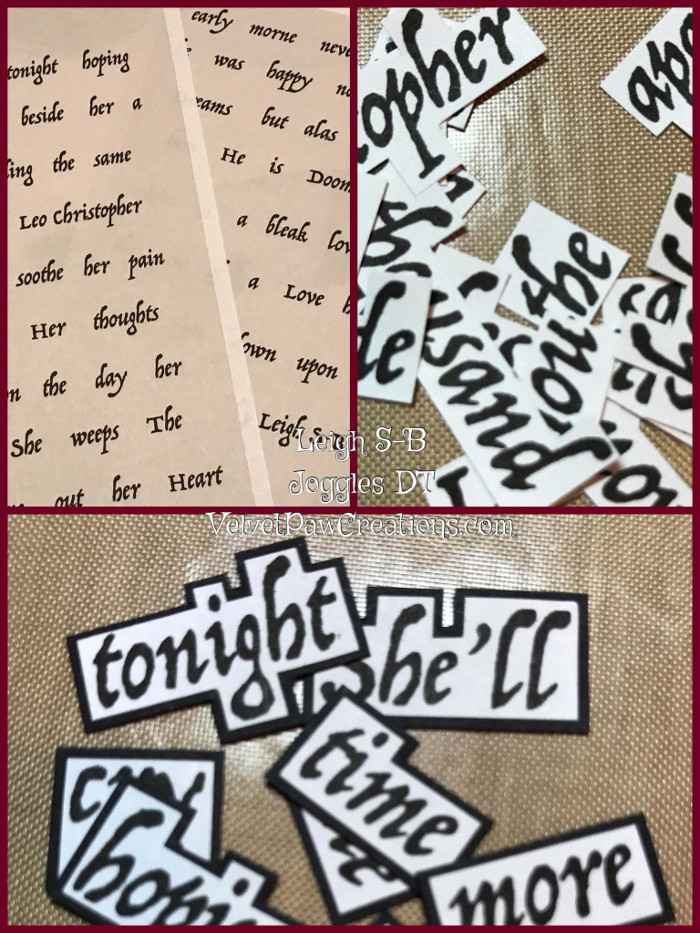
Now its time to type up the story. I typed the text in Photoshop CS6 and applied a more vintage white colour to the background because bright white paper would ruin the overall feel of the book. Cut out each word, mount them on black cardstock, and then cut out each word again leaving a narrow black border.
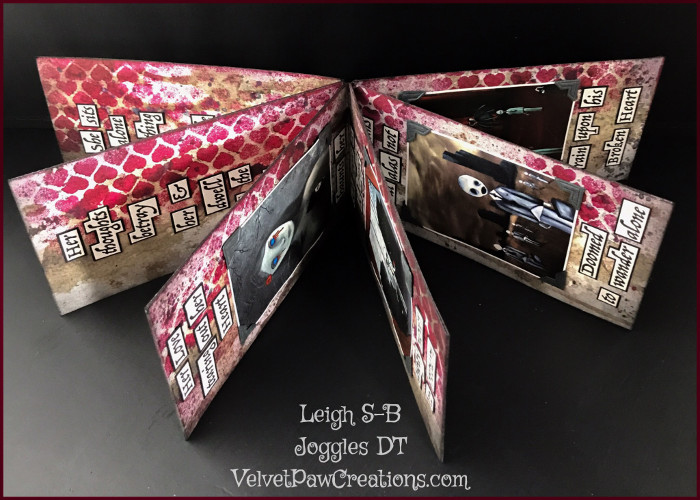
It’s now time to adhere the “photos” and the story to the book pages. You’ll notice that I put half of the Leo Christopher poem on the front cover, the part that tells the story from the woman’s point of view and ended it with “&” to indicate that there’s more to the story. Then you get immersed in the tale as you page through and end with the rest of the poem on the back that tells you more of the tale from the man’s point of view. Such a sad tale but I hope you enjoyed my book, nonetheless, and have been inspired to make your own from Joggles’ accordion book selection :0)
Happy Stamping and have a great weekend!
Leigh S-B
12 Comments
What a captivating piece!
Thank you Cheryl😊
Thank you so much Cheryl😊
This is awesome! Love this idea; thank you for sharing your talent with us.
Thank you Faye, I’m pleased you love it😊
I love this Leigh! As usual, the story is as captivating as the artwork.
Thank you so much Diana😊
Wonderful tutorial and your artwork is stunning as always…love the dark grunge look!
Thank you so much😊
Absolutely LOVE this!
Thank you so much DK
Amazing work! Fabulous story and design.