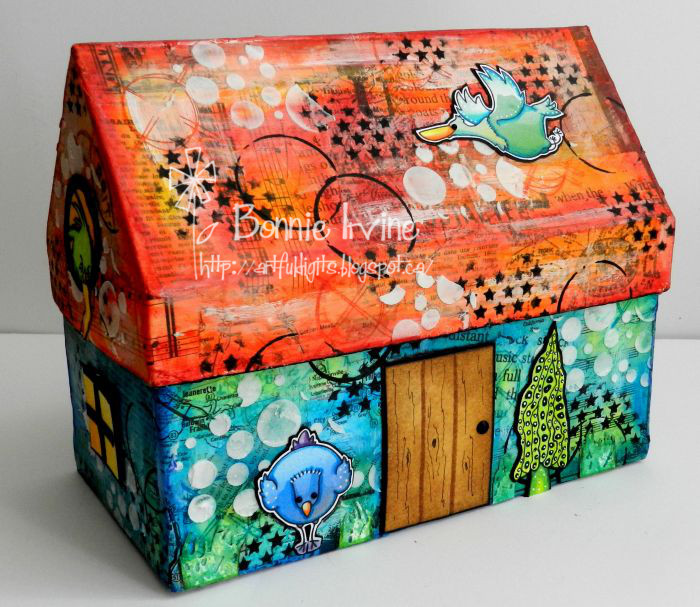
Hi everyone! It’s Bonnie here today with a mixed media whimsical storage box which just happens to be shaped like a house. I am a huge fan of houses and they often pop up in my art in some form or another. When I saw, this cute Paper Mache Gingerbread House Box in the Joggles shop, I thought it would make a fabulous treasure holder or gift box. I could see decorating one for Christmas and filling it with a bag of cookies or fudge.
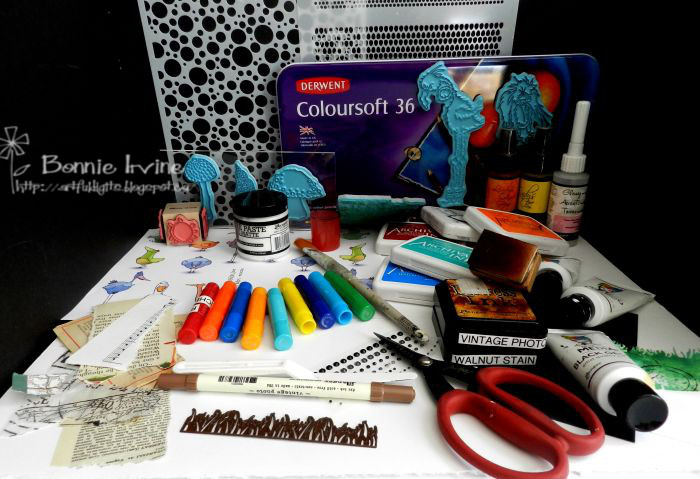
Supplies:
Paper Mache Gingerbread House Box
Joggles/Virginia England Cling Mounted Rubber Stamps: Magic Mushroom #2; Magic Mushroom #3; Rhonda; Ralph
Joggles/ Margaret Applin Designs Cling Mounted Rubber Stamp – Vintage Correspondence
Stampotique Originals – Kate’s Doodle Cube
Joggles Collage Sheets – Silly Birds 1
Joggles Clear Acrylic Stamp Mount – 4 inch x 8 inch
Joggles Stencils – Punchinella Quintet – Minis
Joggles Stencils – Bubble Blast
Archival Ink Pads: Garden Patina; Manganese Blue; Jet Black; Tiger Lily; Red Geranium
Faber Castell Gelatos: Cotton Candy; Boysenberry; Lime; Lemon; Cherry; Blueberry; Tangerine; Mango; Snow Cone
Tim Holtz Distress Ink Pads: Vintage Photo; Walnut Stain;
Ranger Inkssentials Ink Blending Tool
Tim Holtz Distress Marker – Vintage Photo
Lindy’s Stamp Gang – Two Toned Starburst Sprays: Marigold Yellow Orange; Yellow Rose of Texas
Dina Wakley Media: Palette Knife; Gel Medium; Black Gesso; White Gesso
Inkssentials Glossy Accents and Joggles Fineline Applicator 20/410 – 16 Gauge
Tim Holtz/Tonic Studios – NonStick Micro Serrated Scissors – 7 inch
Aleene’s Super Thick Tacky Glue – 4 ounce jar
Other: small black rhinestones; white card stock; black card stock; 1 inch paint brush; grass die; ephemera paper scraps (music, book text, map, tissue wrap); black pen; white pen.
Here is my process:
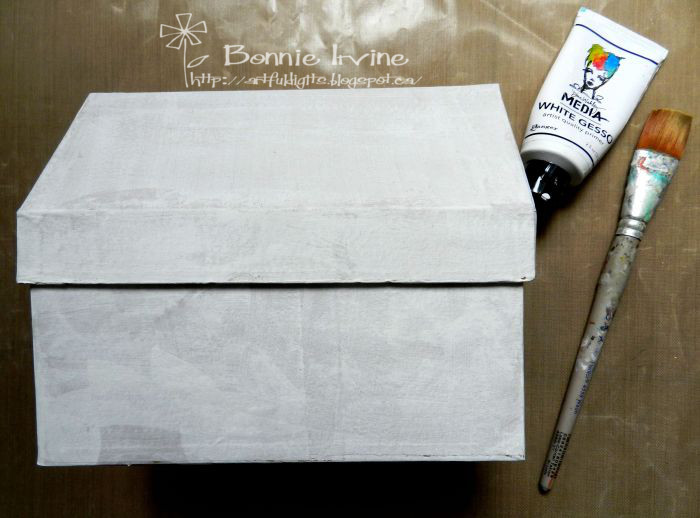
Begin by covering both the inside and the outside of the house base and lid with Dina Wakley Media White Gesso. Allow to dry.
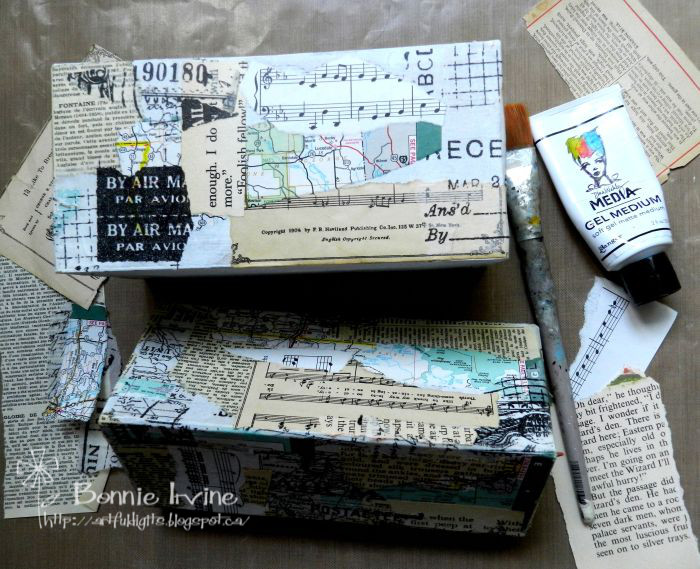
I always have scraps of paper ephemera in a small bin on my table to add into my mixed media projects…such things as old music paper, book text, maps,and scraps of Idea-ology Tissue Wrap. I overlapped these scraps in a random pattern, adhering them to all outside sections of the house base and roof using Dina Wakley Media Gel Medium. I wasn’t looking for solid coverage and I didn’t add them to the insides. The gel medium was used under and over the paper scraps to help with the next step.
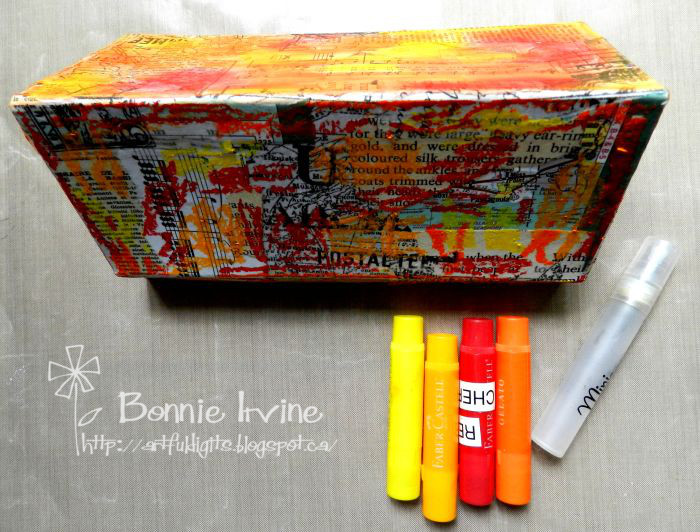
Randomly apply Lemon, Cherry, Tangerine, and Mango Faber Castell Gelatos to all sides of the roof/box lid using scribbly strokes. There is no need to cover all of the scraps as these spread easily. Using your finger, move and blend the colours until you have the coverage you want. If the gelatos are hard to move at any time, dip your finger in water and continue. A baby wipe would also work as long as it wasn’t too moist. In the photo above, the upper section is blended and the lower one is still in the scribble stage.
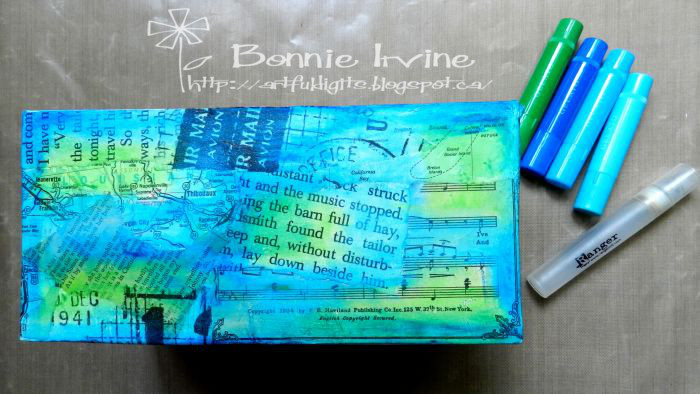
Repeat this process on the house base using Lime, Blueberry, Cotton Candy, and Snow Cone Faber Castell Gelatos. I used the Mini Mister to spritz water on my NonStick craft sheet to wet my finger when needed.
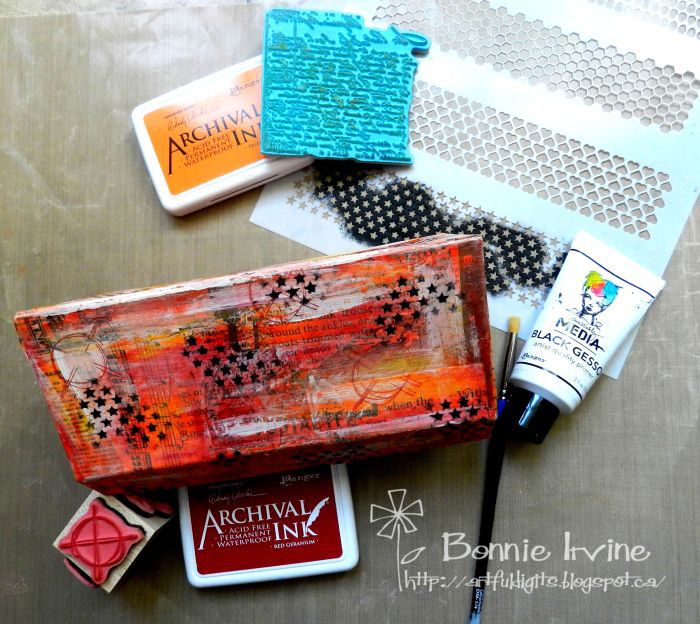
Returning to the roof section of the box, stamp texture onto the gelato background using Joggles/Margaret Applin Designs Vintage Correspondence Cling Mounted Rubber Stamp and Tiger Lily Archival Ink. Repeat the stamping using Red Geranium Archival Ink and a design from Stampotique Originals Kate’s Doodle Cube. Add more pattern and interest by stenciling the little stars from Joggles Punchinella Quintet- Minis stencil with Dina Wakley Media Black Gesso in several places on each of the 4 sides.
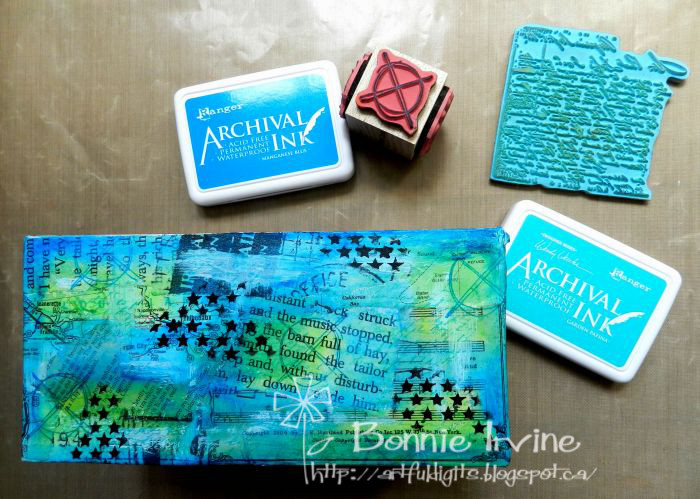
The same stencil and stamps were used on the house base but Manganese Blue Archival Ink was used with the doodle stamp and Garden Patina was used with the Vintage Correspondence one. White gesso was dry brushed across the top and bottom of the house base and roof on all sides to beak up the intense colour a bit.
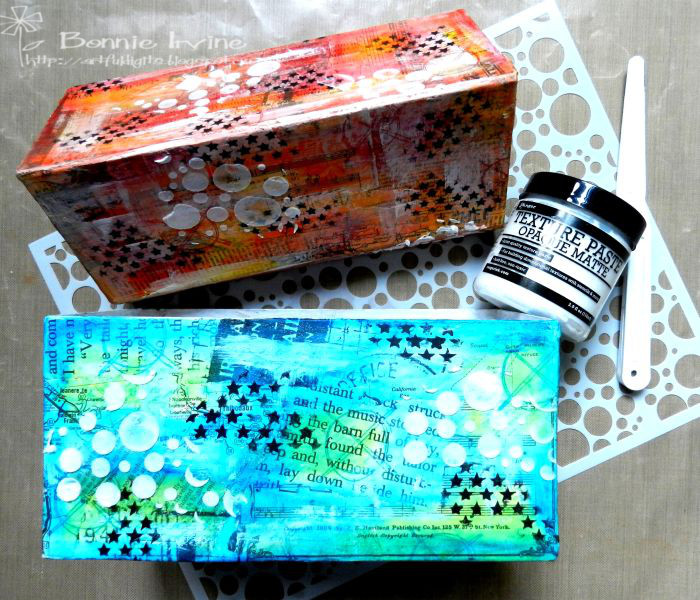
To further give the eye a break from the vibrant colours and to add dimensional texture, Ranger Texture Paste was scraped through Joggles Bubble Blast stencil on both the top and bottom sections of the house. This was allowed to dry thoroughly before moving on.
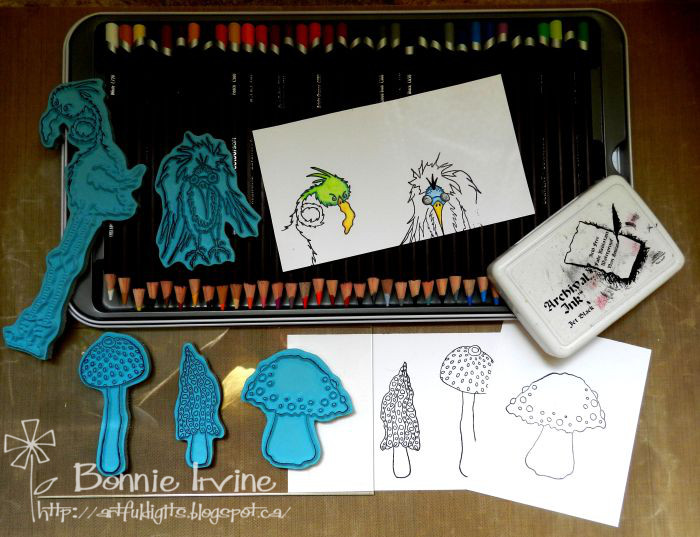
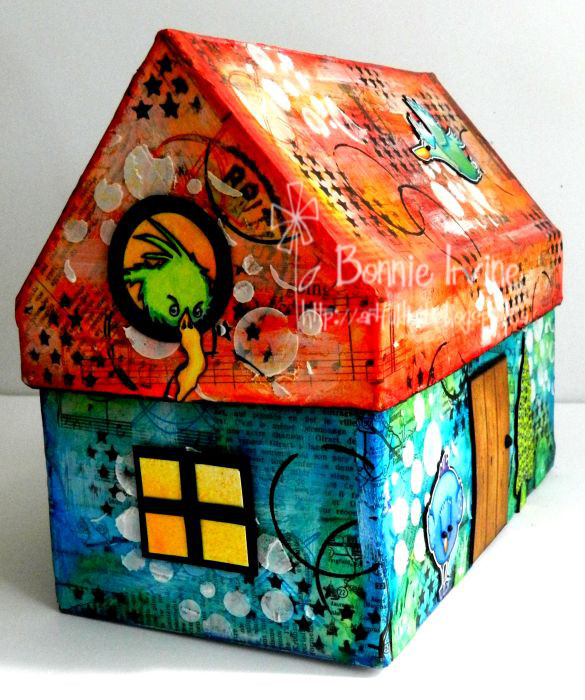
While the Texture Paste was drying, I worked on the doors, windows, and stamped images I would be adding to complete my house. Joggles/ Virginia England Magic Mushrooms 2 and 3, Rhonda’s head and Ralph’s head were stamped onto white cardstock using Jet Black Archival Ink. I stamped Magic Mushroom 4 but didn’t end up using it. The images were then coloured with Derwent Coloursoft pencils and fussy cut. The mushrooms were matted with black cardstock and trimmed out again. The black matting helps them stand out from the busy background.
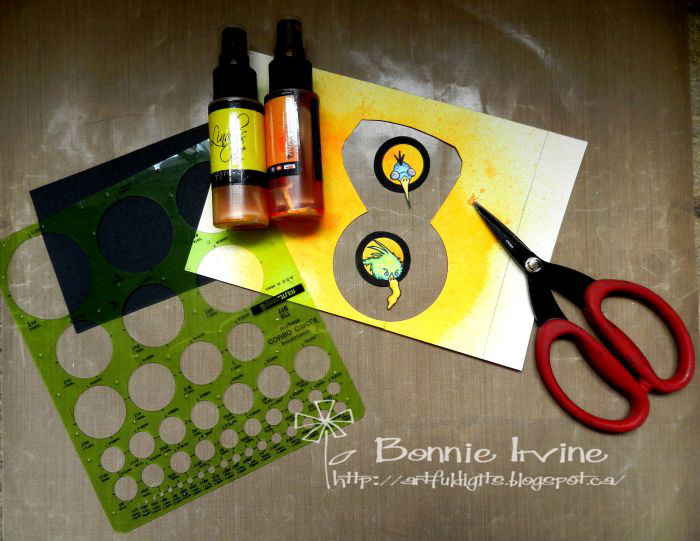
To cut the round windows on either end of the roof, white card stock was first sprayed with Marigold Yellow Orange and Yellow Rose of Texas Lindy’s Stamp Gang Two Toned Starburst Sprays and dried completely. A circle template was used to trace two 1 inch circles from the sprayed paper and again to cut two 1 3/8 inch black circles for the window frames. These were glued together and Rhonda and Ralph’s heads were adhered to them to give the impression that they were sticking their little bird heads out the windows.
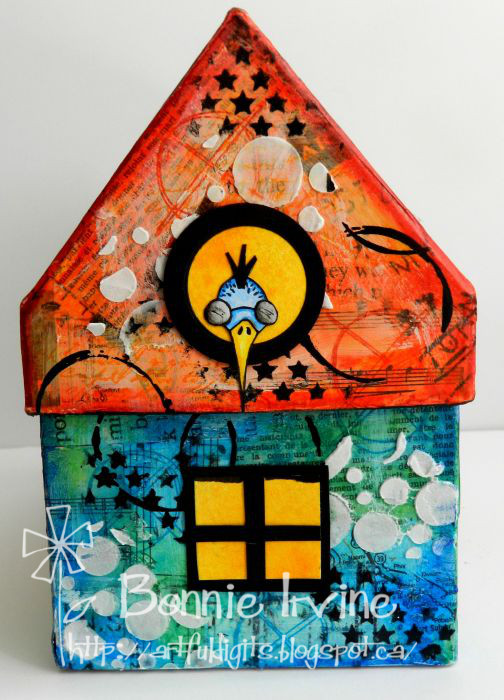
The bottom windows were one and 1/4 inch x one and 1/8 inch rectangles cut from the remaining yellow spritzed paper. These were adhered to slightly larger rectangles of black and tiny strips of black were added to separate the panes. These were then glued to the house using Scor Tape. ** It’s important to place the roof back onto the house before adhering the windows and critters so that you know where to place them so the roof doesn’t cover the tops.
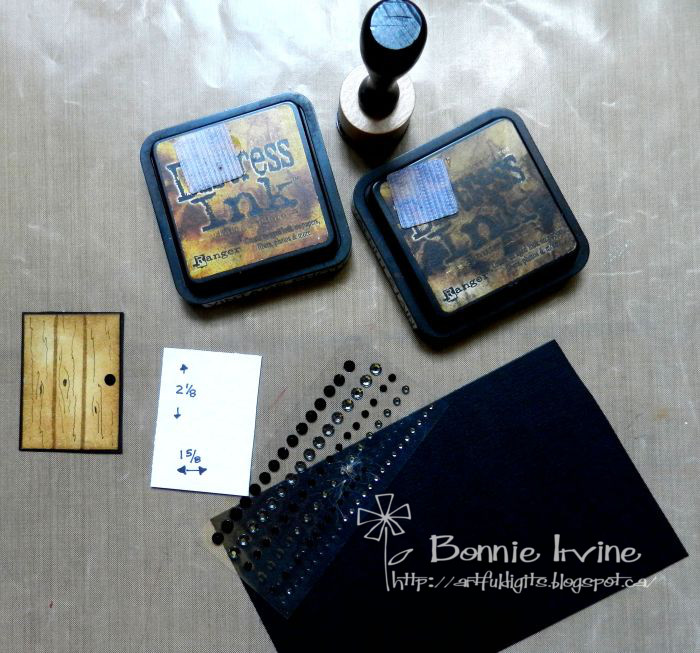
The front door started life as a white card stock rectangle cut to the measurements shown in the photo above. The door was then scored with two vertical lines .5 inches apart. Vintage Photo and Walnut Stain Distress Inks were applied to the door using an ink blending tool and the scored indentations were filled in with Vintage Photo Distress Marker. Black pen was used to create the wood grain lines. A black card stock rectangle slightly larger than the door was adhered to the back to look like the door frame and a black gem was added as the door knob. The door was attached to the house with .5 inch Scor Tape.

The little stamped heads and the mushrooms looked a little lonely so one of the blue birds, the green flying birds, and one of the orange ones were fussy cut from Joggles Silly Birds 1 Collage Sheet. I did add some white pen marks to the birds just to add my own touch 🙂 They were cut out with a narrow white border and matted with black before being adhered to the house with Aleene’s Super Thick Tacky Glue.
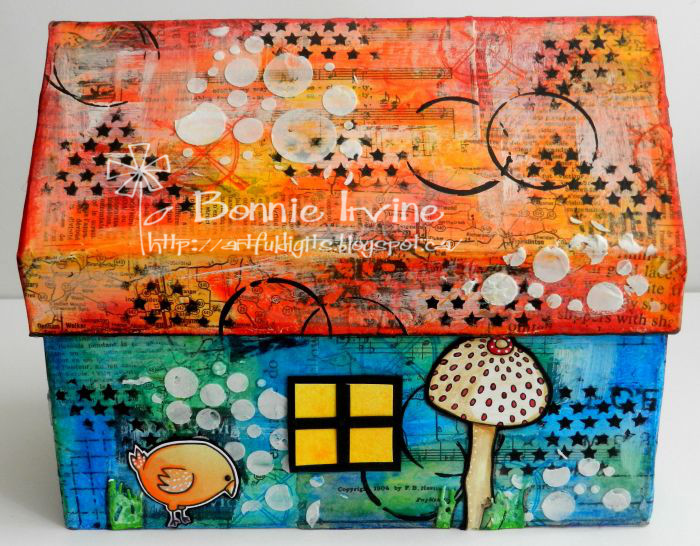
A die was used to cut a grass border from a piece of green mop up paper on my desk. The border was then cut into pieces and added around the mushrooms and birds. A little shading was done around the images using the darker of the gelatos and a wet brush. More of the darkest gelatos was added to the outside and bottom edges of both the top and bottom sections of the house. To finish off the box, the inside and the very bottom were painted with acrylic paint and the box was sprayed with matte acrylic sealer.
Thanks for stopping by today. We would love to hear and see your ideas for altering this fun house box. The possibilities are endless…oooh, imagine a Halloween house!
Comment
This is so cute! Love all the detail you added to the background and the house. Thank you for sharing another awesome project!