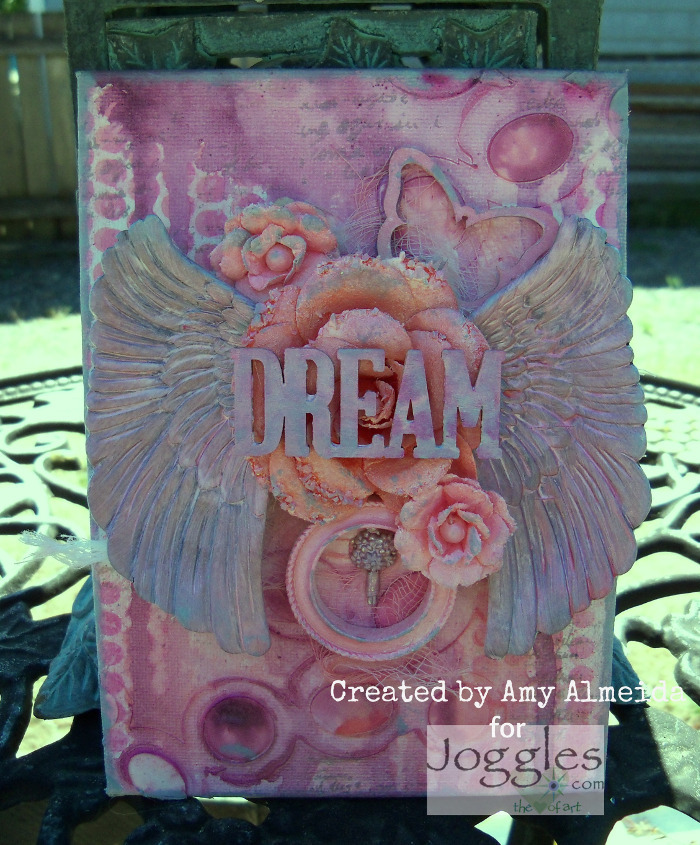
Good Morning, Amy here, and today I have a “dreamy” mixed media canvas board I made using Joggles stencils. Stencils are so versatile to add texture with pastes or dimension with different color mediums. I had a lot of fun creating this board and hope you enjoy it too. :o)
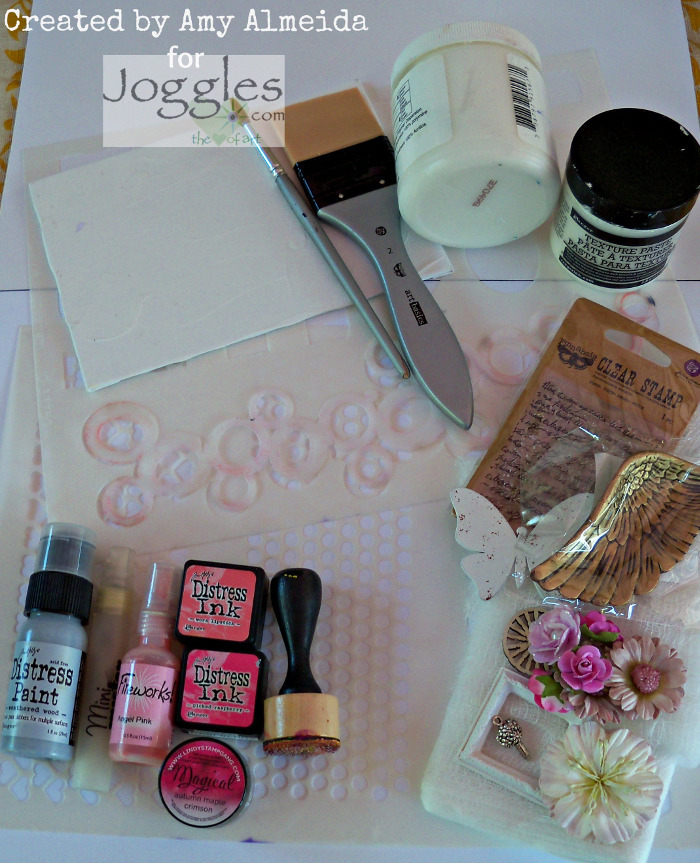
Supply List:
Joggles Stencils- Punchinella Trio 1
Joggles Skinny Minny Mask – Checkerboard & Rings
Prima Silicone Brush (or substitute with Dina Wakley Media Palette Knife or Fedrix #2 Palette Knife)
Tim Holtz Distress Mini Ink Pads – Worn Lipstick & Picked Raspberry
Tim Holtz Distress Paint – Weathered Wood
Lindy’s Stamp Gang Magicals Pigment Powders – Autumn Leaves – Autumn Maple Crimson
Ranger Inkssentials Mini Ink Blending Tool
5×7 inch Canvas Panel (Fredrix Canvas Panel (5″ x 7″)
Liquitex White Gesso (or substitute Dina Wakley Media White Gesso)
Golden HEAVY Gel Medium (or substitute Glue Gun)
Water Mister (Inkssentials Mini Mister)
Other Supplies: cheese cloth; wood veneer, metal and clay embellishments; flowers; Fireworks Spray- Angel Pink; Prima Clear Stamps “Messy”; brush.
Here is my process:
The Canvas Panel I used was already primed but if your panel is not, start with giving it a light coat of gesso and then let it dry completely before moving onto the next step.
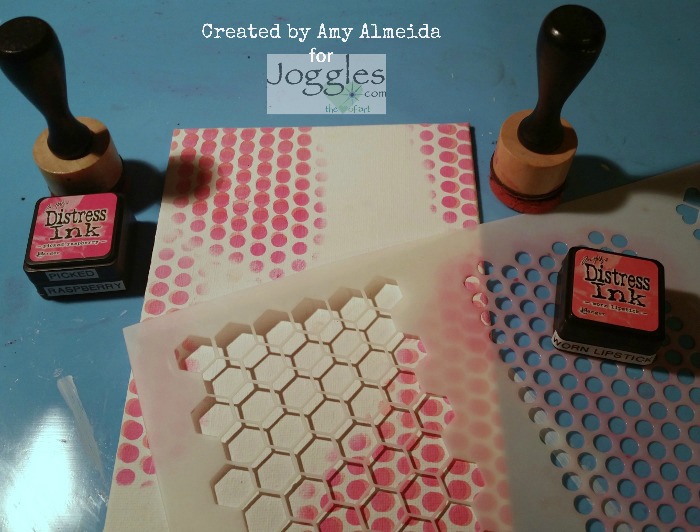
Start by applying Tim Holtz Worn Lipstick Distress Ink thru the Joggles Punchinella Trio 1 Stencil around the edges of the canvas with the Ranger Inkssentials Mini Ink Blending Tool. Then shift the stencil over slightly and repeat with the darker color. Picked Raspberry Distress Ink was used here. QUICK TIP: I find it works best by starting with your lightest color and going over that with the darkest color to avoid color contamination on the blending tool but have fun trying different color combinations. :o)
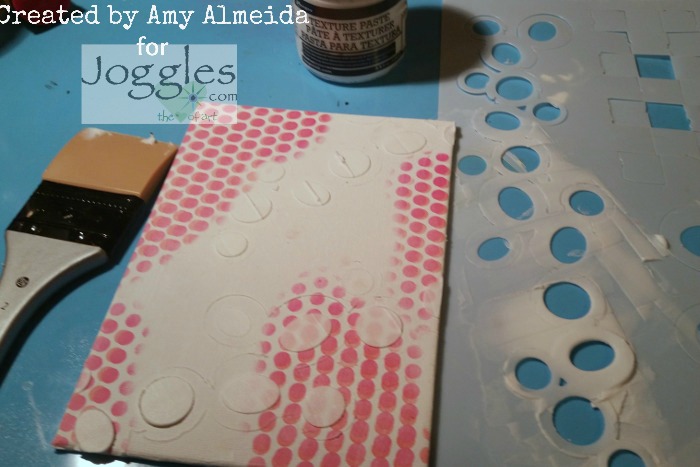
Now it is time for some texture. Place the Joggles Skinny Minny Mask – Checkerboard and Rings onto your canvas where you want your rings to be. I placed mine sideways along the top and bottom, and left the middle free for my embellishments that are coming up in the steps ahead. Using the Prima Silicone Brush or palette knife, swipe some Ranger Texture Paste through the Skinny Minny Mask – Checkerboard and Rings. Pick the mask up straight so as not to ruin your design by smearing the wet paste. Place it down in another spot and swipe some more Texture Paste through the mask. Let dry completely or use a heating tool to speed up drying time.
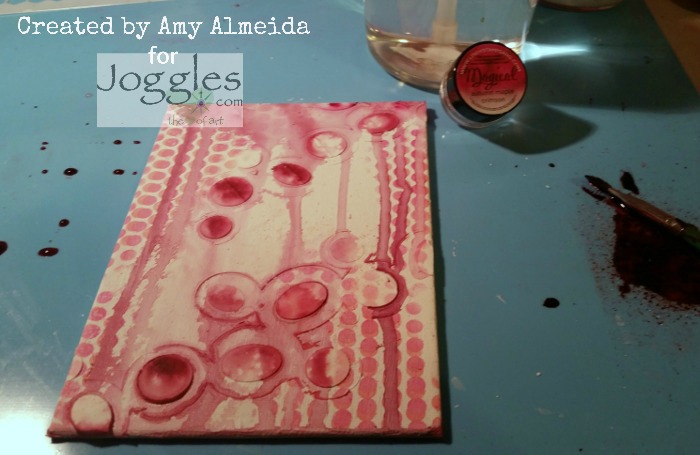
Scoop a little of the Lindy’s Stamp Gang Autumn Maple Crimson Magicals Pigment Powder onto your craft mat and spritz with water using your Mini Mister. Stir it with your brush until fully mixed. Hold your canvas upright and spread the Magicals across the top, letting it run down your canvas. Add extra color to your raised stenciled patterns to define the texture. Continue to add more color until you’re happy with the color and design and then let dry completely. QUICK TIP: If you find your color too dark, just spray some water with your Mini Mister to dilute the color tone.
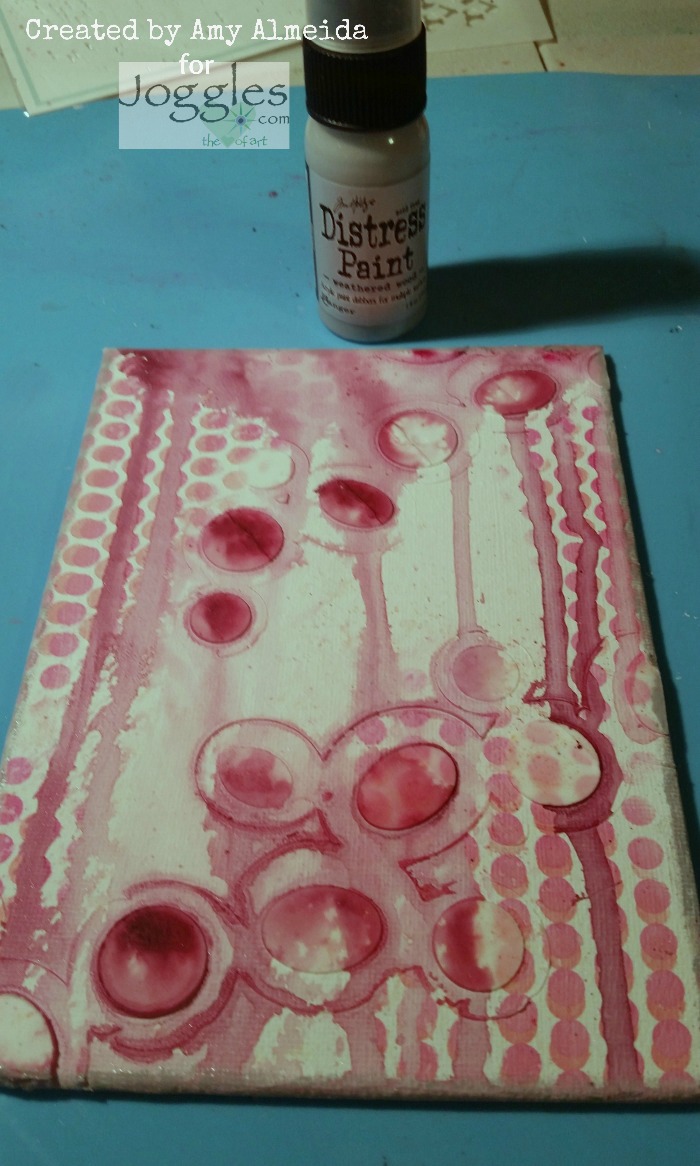
Add colour around the edges of your canvas with Tim Holtz Weathered Wood Distress Paint. I love pink and grey together so that’s why I went with this color combination but you can use any Distress Paint to ink around your edges and help define your project.

Using any text script stamp (Prima “Messy” Clear Stamp used here) with the Cool Graphite Ranger Dye Ink and stamp onto your canvas randomly. This just adds some soft texture to your background.
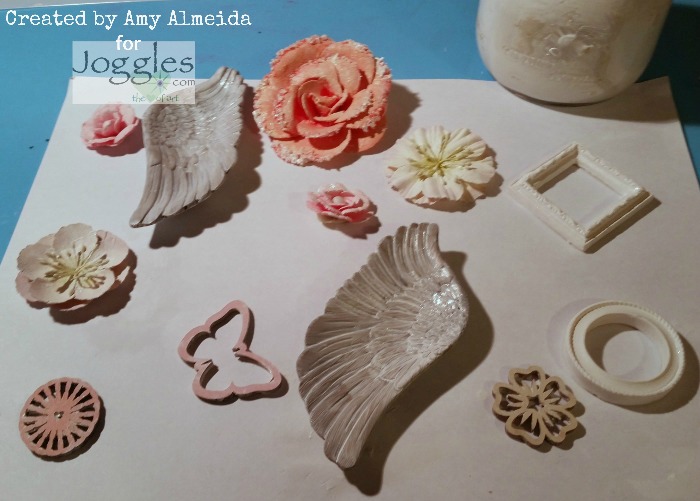
Set your canvas aside and give all of your embellishments a good coat of White Gesso. I used flowers, clay angel wings, wood veneer and resin embellishments from my stash. Let these dry completely.
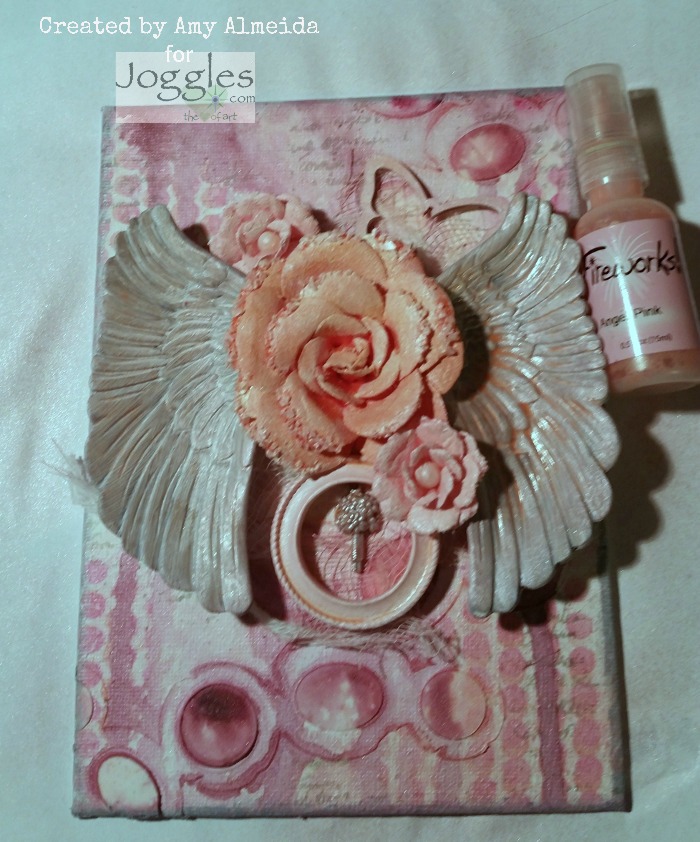
Now for the fun part! Glue your cheesecloth and embellishments to your canvas with the Heavy Gel Medium or glue gun. QUICK TIP: I start in the middle with my biggest embellishments and work out, building up from there. Once dry, spray with dye sprays, glitter mists or spray of your choice (Fireworks “Angel Pink” was used here as I love the shimmer and soft color it adds to the project).
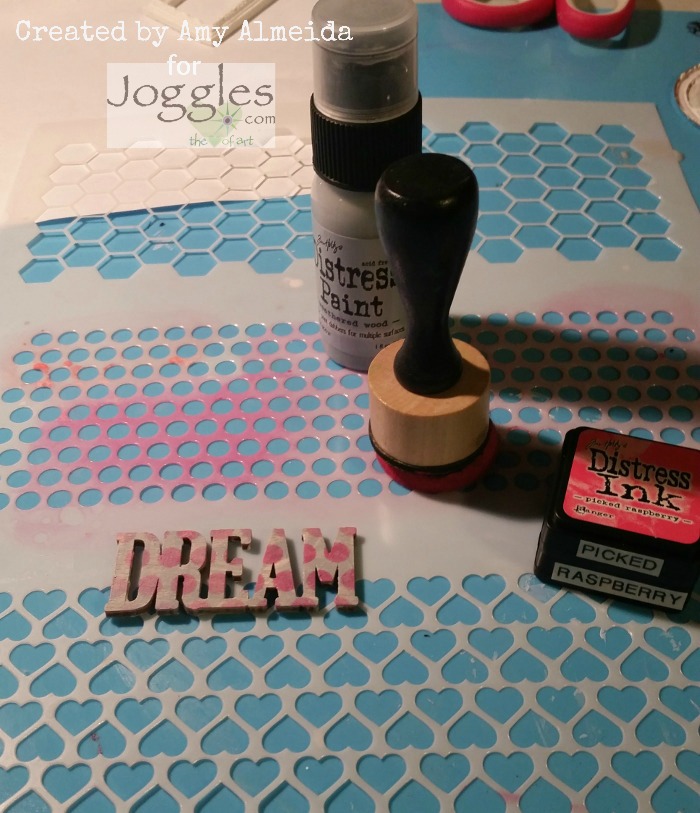
Now take your “Dream” wood veneer or chipboard piece and colour it with the Weathered Wood Distress Paint. Once dry, place the Joggles Punchinella Trio 1 Stencil on top of the word embellishment and apply colour through the openings with the Picked Raspberry Distress Ink and Mini Ink Blending tool. And Voila! You have a pretty embellishment that ties in with the rest of your project. QUICK TIP: Using stencils and different mediums is a fun way to change your plain embellishments into ones that fits your project needs.
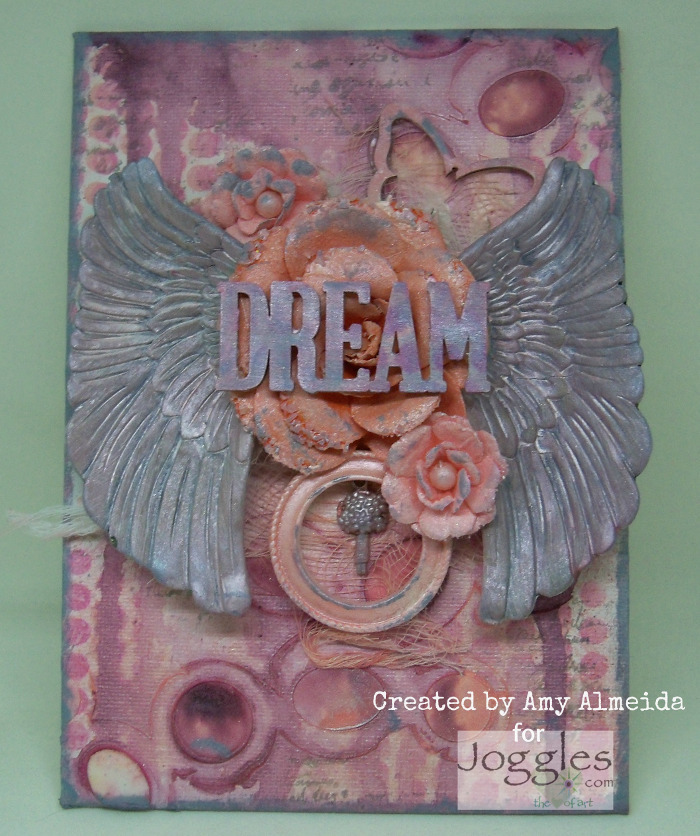
Glue the “Dream” word onto your canvas in the center of your embellishments using Heavy Gel Medium or glue gun.
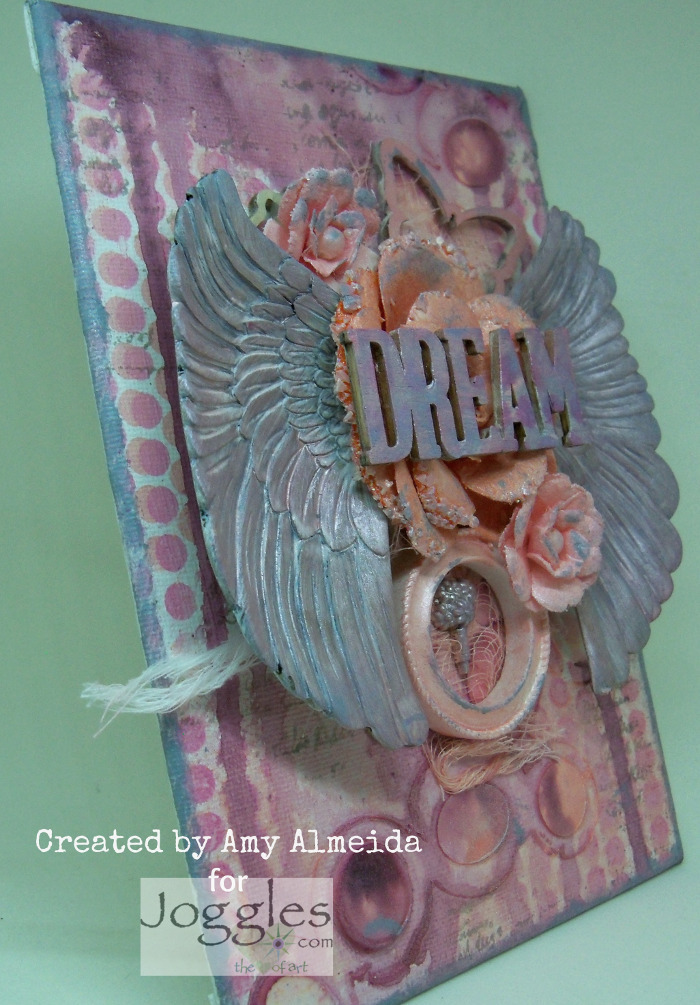
Using the Weathered Wood Distress Paint, go over the edges of some of your embellishments to highlight and define. And we are now done. :o)
I sure hope I’ve inspired you with some fun and different ways to use Joggles Stencils! Be sure to show us your mixed media makes over at the Joggles Art Adventure FB Group. We’d love to see what you create! Thank you for joining me today, and happy craftin’!
Comment
Oh Wow that’s really pretty Amy.