Welcome to the second week of our Art Journal Adventure!
The theme this week is working in a grid. “Grid” can be interpreted in a lot of different ways and what you see in my page spread is only one option. What you create may look nothing like mine and if it happens that way, it’s all good. The idea is that you create grids as you see them in your mind’s eye. If you don’t have a mental image, then use what I did as a jumping off point.
I chose to use large grids, but if you think about it, a calendar could be a gridded art journal page. So the elements in your grid can be small, if you choose. My grids are not all the same size, nor is the entire page given over to grids. I decided to leave white space in the background, giving this page spread a reasonably open feeling. You could do just the opposite and fill every last bit of the pages with grids or color the background so there is no white space left.
I started by imagining how the grids would look and then lightly sketching them in with a pencil. For this step, I like to use a pencil with a hard lead as it creates a fine, light line that is easy to erase. I’m using the Dylusions Square Kraft Journal that has the lovely manila colored Ranger Mixed Media Paper as the pages.
Yup, you can barely see the lines in this photo and as I said, that’s deliberate. Much easier to erase!
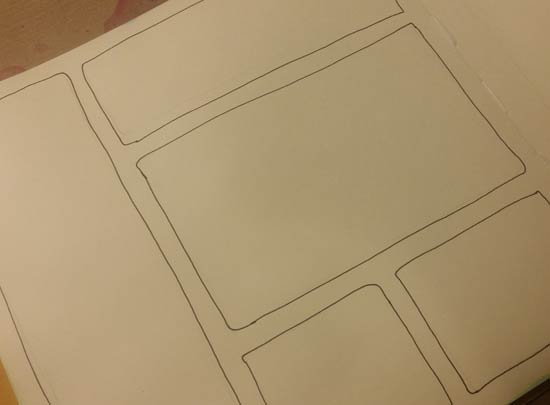
I used a black PITT Pen, the “S” Superfine point to draw in the actual grid lines. See how the lines are wobbly, with imperfect corners and joins that don’t meet? That’s fabulous! (let go of the need for perfection. please. you’ll be so much happier with your work)

I did the same thing on the right page in the spread but felt like the grids needed a little more, so I added hash lines on one side of each of the rectangles.
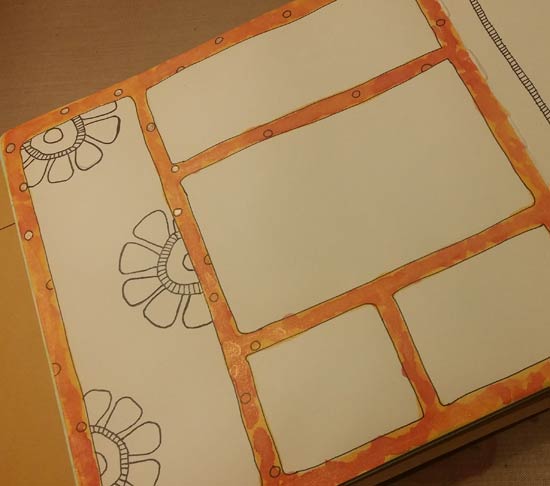
For the left side of the spread I wanted there to be color outside of the boxes, leaving the inside the color of the Mixed Media Paper. I used a combination of colors (Dylusions Ink Sprays & Distress Spray Stains) in Tim’s Detail Water Brush, just lightly brushing color into the areas between the grids until I was satisfied with the colors. If you look in the upper left of the page you’ll see small circles that are filled in with a Metallic Gelly Roll Pen. Just draw the circle with the PITT pen, then fill it with a color of the Gelly Roll that works with the background.
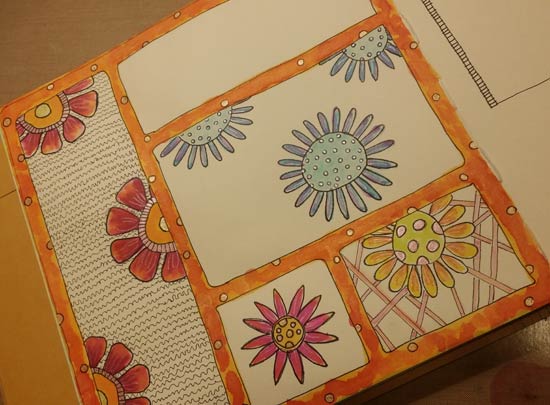
I decided the left side of the spread was going to be all Doodle Flowers randomly stamped into each of the boxes. Use a piece of paper when you’re stamping close to the edge like this to mask the area outside of the box, so you confine the stamped image the inside of it. Just lay a scrap piece of paper to cover the area you don’t want the image to print on, then stamp right over it. The paper will protect the colored area outside of the box while the image stamps inside and looks like it’s cut off by the edge of the grid. I ended up using all three of our Doodle Flower stamps, plus the Scribble Flower styles. See all of our stamps here.
I also decided to fill in the background of some of the grids, just to liven them up a bit. Scribbles and doodles in some, but not all, of them. May as well change things up a bit to keep things from looking samey-samey.
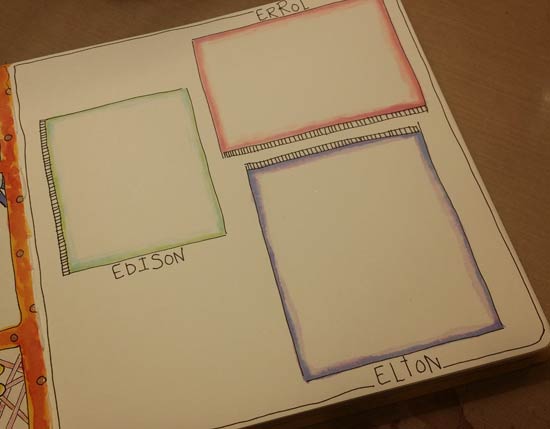
On the right side of the spread I decided to add a thin border of color to the inside of each of the boxes, leaving the background plain. I used my trusty PITT pen and drew a really simple border around the page, leaving room for the name of the birds where they intersected it.
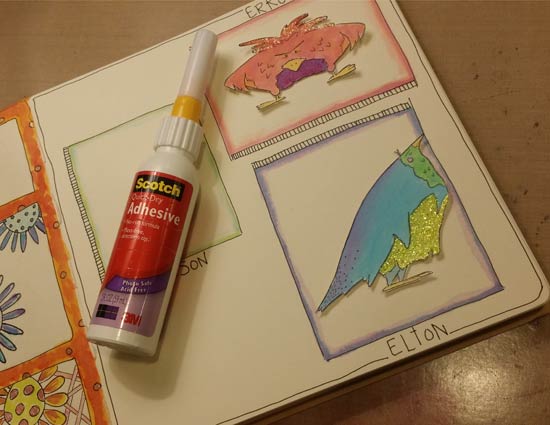
Then it was time to decide what to place in the boxes… I went with The Bird Edison, The Bird Elton, and The Bird Erroll. Any of them would work of course, or you can choose to put other figures or objects into them. Stamp them using Black StazOn Ink on 90# Watercolor paper. I colored each of the birds using the same sprays that are in the Detail Water Brushes, lightly stroking on the color. You can layer the colors one on top of the other for a more blended, multicolored look. Finish the birds by adding Stickles somewhere; on the breast, head or wing, to give the boys a little sparkle.
I glued them using Scotch Quick Dry Adhesive. Notice that I have one of our Fineline Applicator Tips on the bottle. It allows me to squeeze just the right amount of glue into tiny little areas. The tip I recommend for Quick Dry Adhesive is the 20/410 – 18 gauge. That fits the neck of the bottle and the tip size will allow the glue to flow through, creating a tiny bead if you need one that small. Apply more pressure for a larger bead of glue. With the three birds in place, and with the final grid on the left side of the spread filled with another Scribble Flower…

The spread was finished. There’s the 2016 AJA, week 2, finished. Grids explored and conquered!
I very much want to see what you do, so send photos please!
Barb
22 Comments
Such a fun spread. Love the grid, I think they are fun to work in. Haven’t thought of giving the ‘grid section’ it’s own design. Great idea.
A nice, quick way to create a journal page or spread!
I know that I am going to love doing this !
This is how my day will go —-Coffee , along with Barbara Blog ! Great way to start the day !
Thanks .
Mary
Love your style and inspiration. How do we send photos?
FAB grid pages, Barb! LOVED seeing the first page evolve through the pics. Great design and coloring. What can I saw about the birds? They are awesome! 🙂
My goal is to do these each week with you until I learn and get comfortable with tge different techniques. I love your styles and you explain so well! Thanks
Awesome pages – I am playing catch-up and hopefully by Wednesday – I will be current!! Love those birds!
What a great Art Journal page! I will definitely make a page like that with my favorite stamps ☺
I’ve been a fan of yours since you opened Joggles. I was making cloth dolls at the time and you were my main source of supplies. You’ve inspired me to join you on your art journal adventure. I really enjoy how you get so much visual appeal without using a ton of supplies. I have a Dylusions journal that’s been sitting around for a while just waiting for the right use. Now I have a great use for it.
Loving it! Can’t wait to try it!
Great to have a theme and ‘grid’ will be fun and liked that you said it didn’t have to be perfect ~ Have done 2 pages in my artist journal ~ so would like send pics ~ where I send them ??? ~ Seems I always asking you questions but am new to this event ~ thanks,
Carol ~
Love the art journal idea. This is the first time I’ve tried to follow along with a project and I’m already learning a lot. But … my page with DY Ink Spray in a water brush really looks sloppy. I obviously don’t have the technique under my belt. Tips, please, on both using the water brush and whether to put down some water first. I tried both ways and neither was very attractive. I’m not sure whether to go ahead and do some doodling on the purple to see is that helps, or just gesso the whole thing and start over. . Thanks, Ann
I am doing single page entries as my journal only has 48 pages! Here are my “Fabulous” guys! Trying to incorporate my zentangle practice too!
Love your zentangle borders!!!
It is fun to try to use just what you have instead if you don’t have the supplies used in the blog post. So here is my interpretation. So much fun.
This is beautiful! Love the birds.
I just used what I had, too! And here is what I ended up with!
Really cool! Love all the arrows and the sea creatures are so cute!
Thanks!
Was so much fun to do! Thanks Barb ☺
oh no! i missed the chance to upload my grid challenge project.
Hi Agnes,
You can still upload any photo you wish. It’s not too late!
Barb