When I sent samples of the new Bloobel Designs stamps to Virginia, I expected something pretty fantastic and was not disappointed. The level of detail and interesting ideas in her art is amazing and I’m very grateful for all of her hard work.
She has a knack for color and layout, and I’m always interested to see how she transforms products into pieces of art. Today’s card is no exception – I love the way she used the figures to create this fun birthday surprise card.
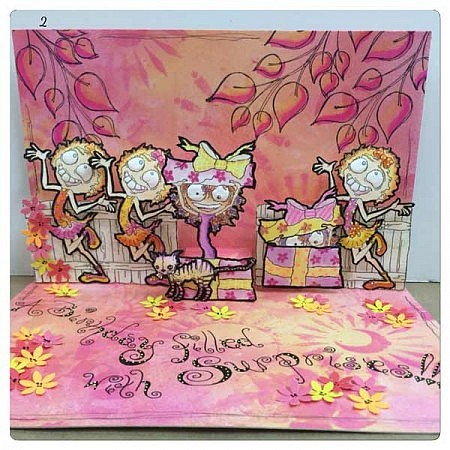
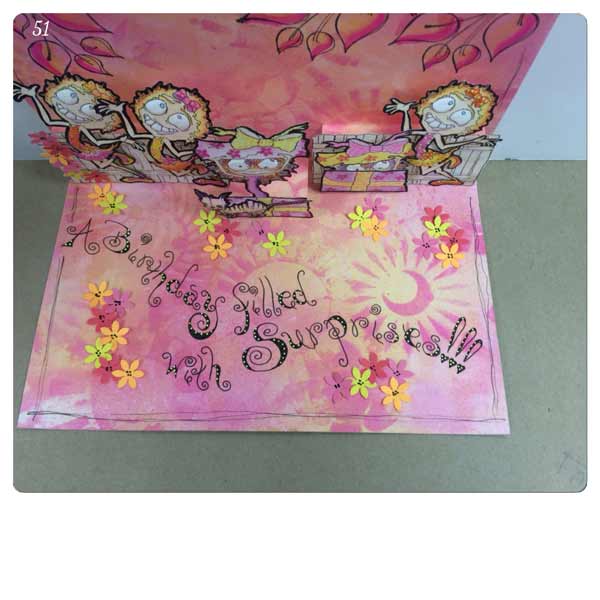
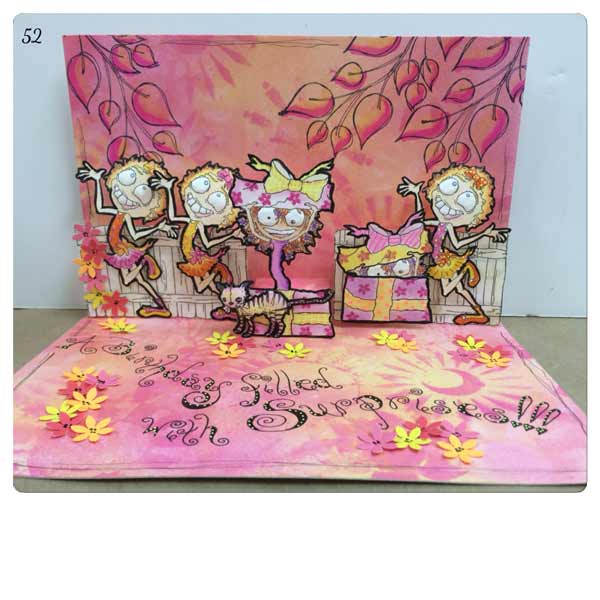
Sally’s Surprise Pop-Up Card

Supplies
1 Sheet 11×14 Mixed Media Paper (or something smaller – just make sure you have enough for an 8 1/2 x 11 and a 8 1/4 x 5 1/4)
2 Sheets of 8 1/2 x 11 White Card Stock
Scraps of Card Stock – Bright Yellow, Bright Pink, Orange and Coral
Dylusions Ink Sprays – Bubblegum Pink, Tangerine Dream and Lemon Zest
Joggles Stencil – Here Comes The Sun (10-33783)
Joggles/Bloobel Stamps – Sally Surprise, The Egg Juggler and The Egg Painter
Stampotique Originals Stamps – Kitty and Puss Puss
Dylusions Stamp – Leaf Branch from the “Further Around the Edge” Set
Fence Stamp
Tiny Flower Stamp
Small Flower Punch
StazOn Ink Pad – Black
ScorTape or Double Sided Transfer Tape
Foam Tape
Glue
Pitt Pens – #1 and #05
Gelly Roll Pens – Pink, Yellow and Orange
Colored Pencils – I used Pinks, Yellows, Oranges and Purples
Low Odor Mineral Spirits
Blending Stubby
Tim Holtz Distress Ink Pads – Old Paper, Picked Raspberry
Foam Craft Sheet
Stylus – Small and Medium
Paper Trimmer or X-acto Knife and a Ruler
ScorPal or Bone Folder and Ruler
NOTE: This card will not fold flat as assembled here. If you want or need it to fold flat do not add dimension to the images or use foam tape to attach the images. It will look fine using flat images and flat tape. I’m just a nut case about adding dimension and depth to my cards.
Start out with Inking up the 11×14 Mixed Media Paper using the Dylusions Ink Sprays – Bubblegum Pink, Tangerine Dream and Lemon Zest.
NOTE: The pictures provided here are not the actual sheet I used for this project…nor are the colors I used or the Stencil I used. Sorry I picked this sheet I had created months ago so I had no pictures of it…But the pictures I’ve provided give you the general idea of how the process is done.

Using Dylusions Ink Sprays – Bubblegum Pink, Tangerine Dream and Lemon Zest and water in a spray bottle
Randomly spray Water on the Mixed Media Paper, not a ton, just enough to wet the paper a bit. Next Randomly spray Ink over the water. When you have enough color to your liking you can spray more water on top of it or if it’s pretty saturated skip the extra water.
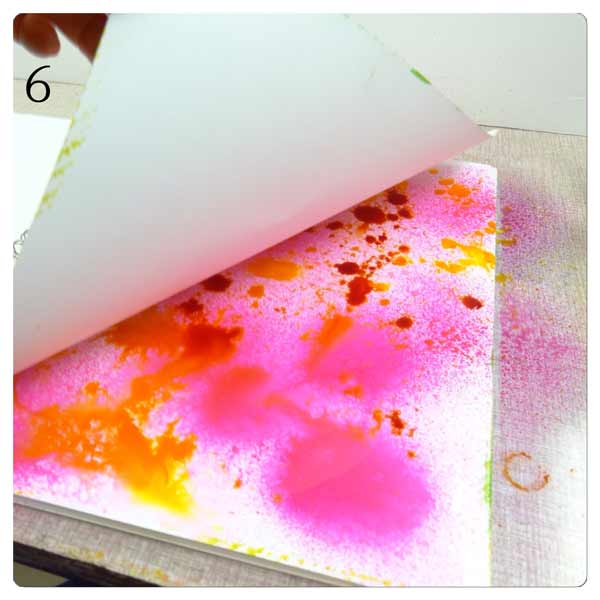
Now take another sheet of Mixed Media Paper and place it on top of your inked sheet.

Run your hand over the top of both sheets or roll a roll of paper towels over it to blend the colors.


Lift back the top sheet. Mop up any excess ink with paper towels. You will have 2 inked up sheets – One to use for this project and one for another project.
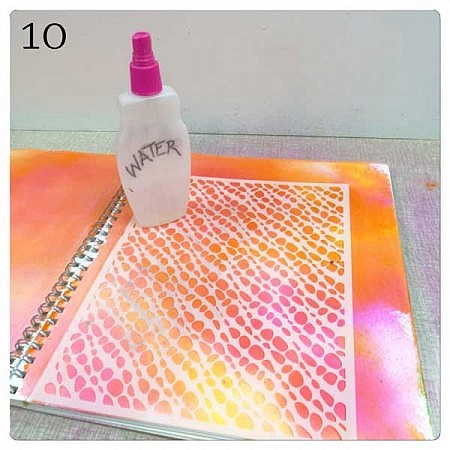
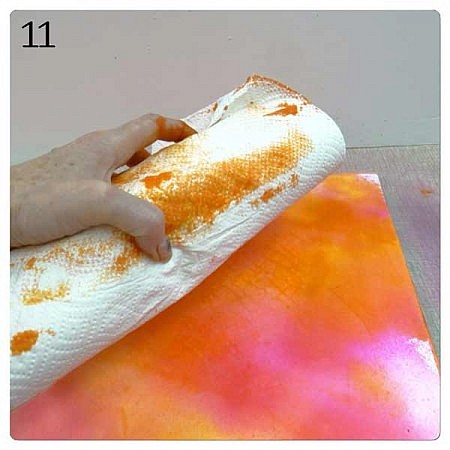

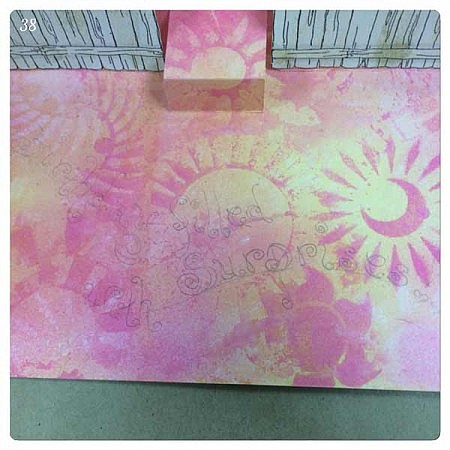
Next lay Joggles Stencil – Here Comes the Sun (shown is Joggles Wander Stencil) on your inked up sheet. Lightly spray over it with Pink Bubblegum Ink. Remove Stencil. Mop up excess Ink.
NOTE: The pictures shows “ghosting” which is the result of water being sprayed over the Stencil instead of Ink. The process is the same just with different results, as the water “lifts” color from the inked paper and the ink just adds more color. Set this sheet aside to dry thoroughly.

Stamp out the following using StazOn Black Ink Pad:
3 images of Joggles Sally Surprise – you will use one whole image, one bottom and top with part of the head attached and one you will use only the gift sections.
3 images of Joggles The Egg Juggler
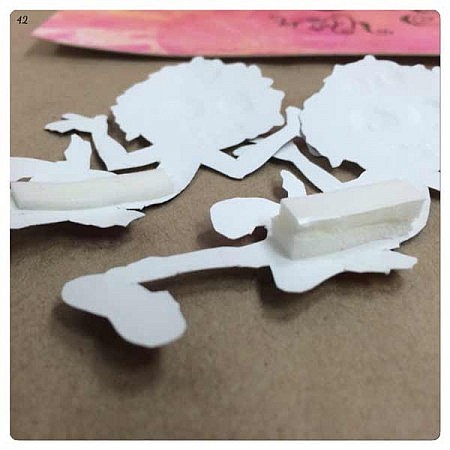
1 image of Joggles The Egg Painter – when you cut this image out, cut away the egg in his hand
1 image of Stampotique Originals Kitty
1 image of Stampotique Originals Puss Puss
2 images of a Fence
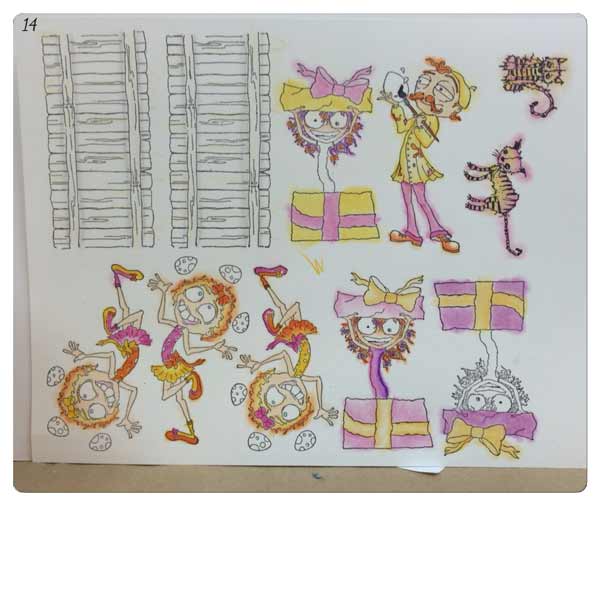
Color Images – you can see my technique for coloring with colored pencils by clicking here. Scan down to picture 13, that’s where the process begins.
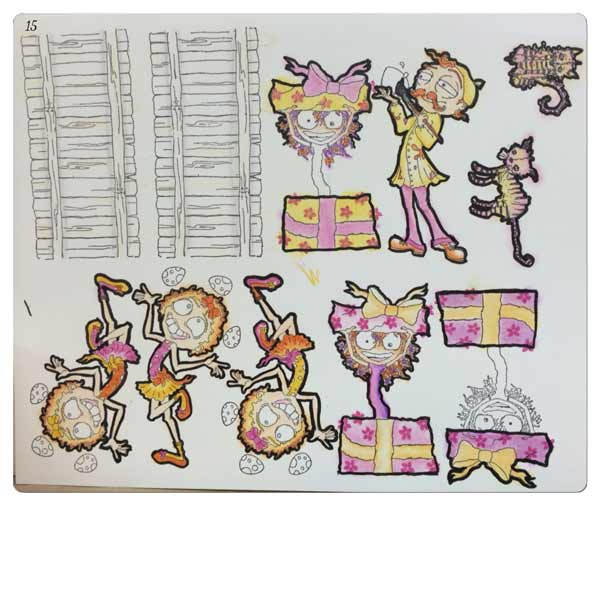
I decided to outline the images with a Black #1 Pitt Pen since I used colors on the images that were close to my background colors. I wanted the images to “pop” not blend into the background. NOTE: I did not outline the Fence Images but I used just a small amount of gray pencil then decided they needed more of something so I used Tim Holtz Distress Ink “Old Paper” and just applied some with my finger.
Before cutting out the images I used Gelli Roll Pens (Pink, Orange and Yellow) to add some details/texture to the Ribbons, Bows, Sashes, etc. I also used a Tiny Flower Stamp to add a pattern to the Gift Boxes. And I drew a small gift box to place in The Egg Painters hand to replace the egg you will cut away.
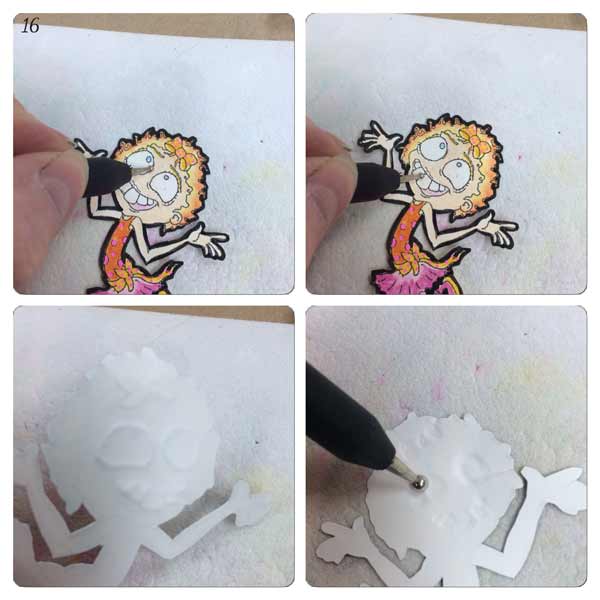
Once you have the images cut out, it’s time to add some dimension to them.
You will use the Foam Craft Sheet and the Stylus for this.
For the Sally Surprise and The Egg Juggler images I only added dimension to the eyes and mouth areas.
Using the small Stylus and the image face up on the Craft Foam “draw” around the eyes and teeth. Flip the images over, using the medium Stylus with medium pressure make circular motions in the eye area. Use the small Stylus for the Teeth areas.
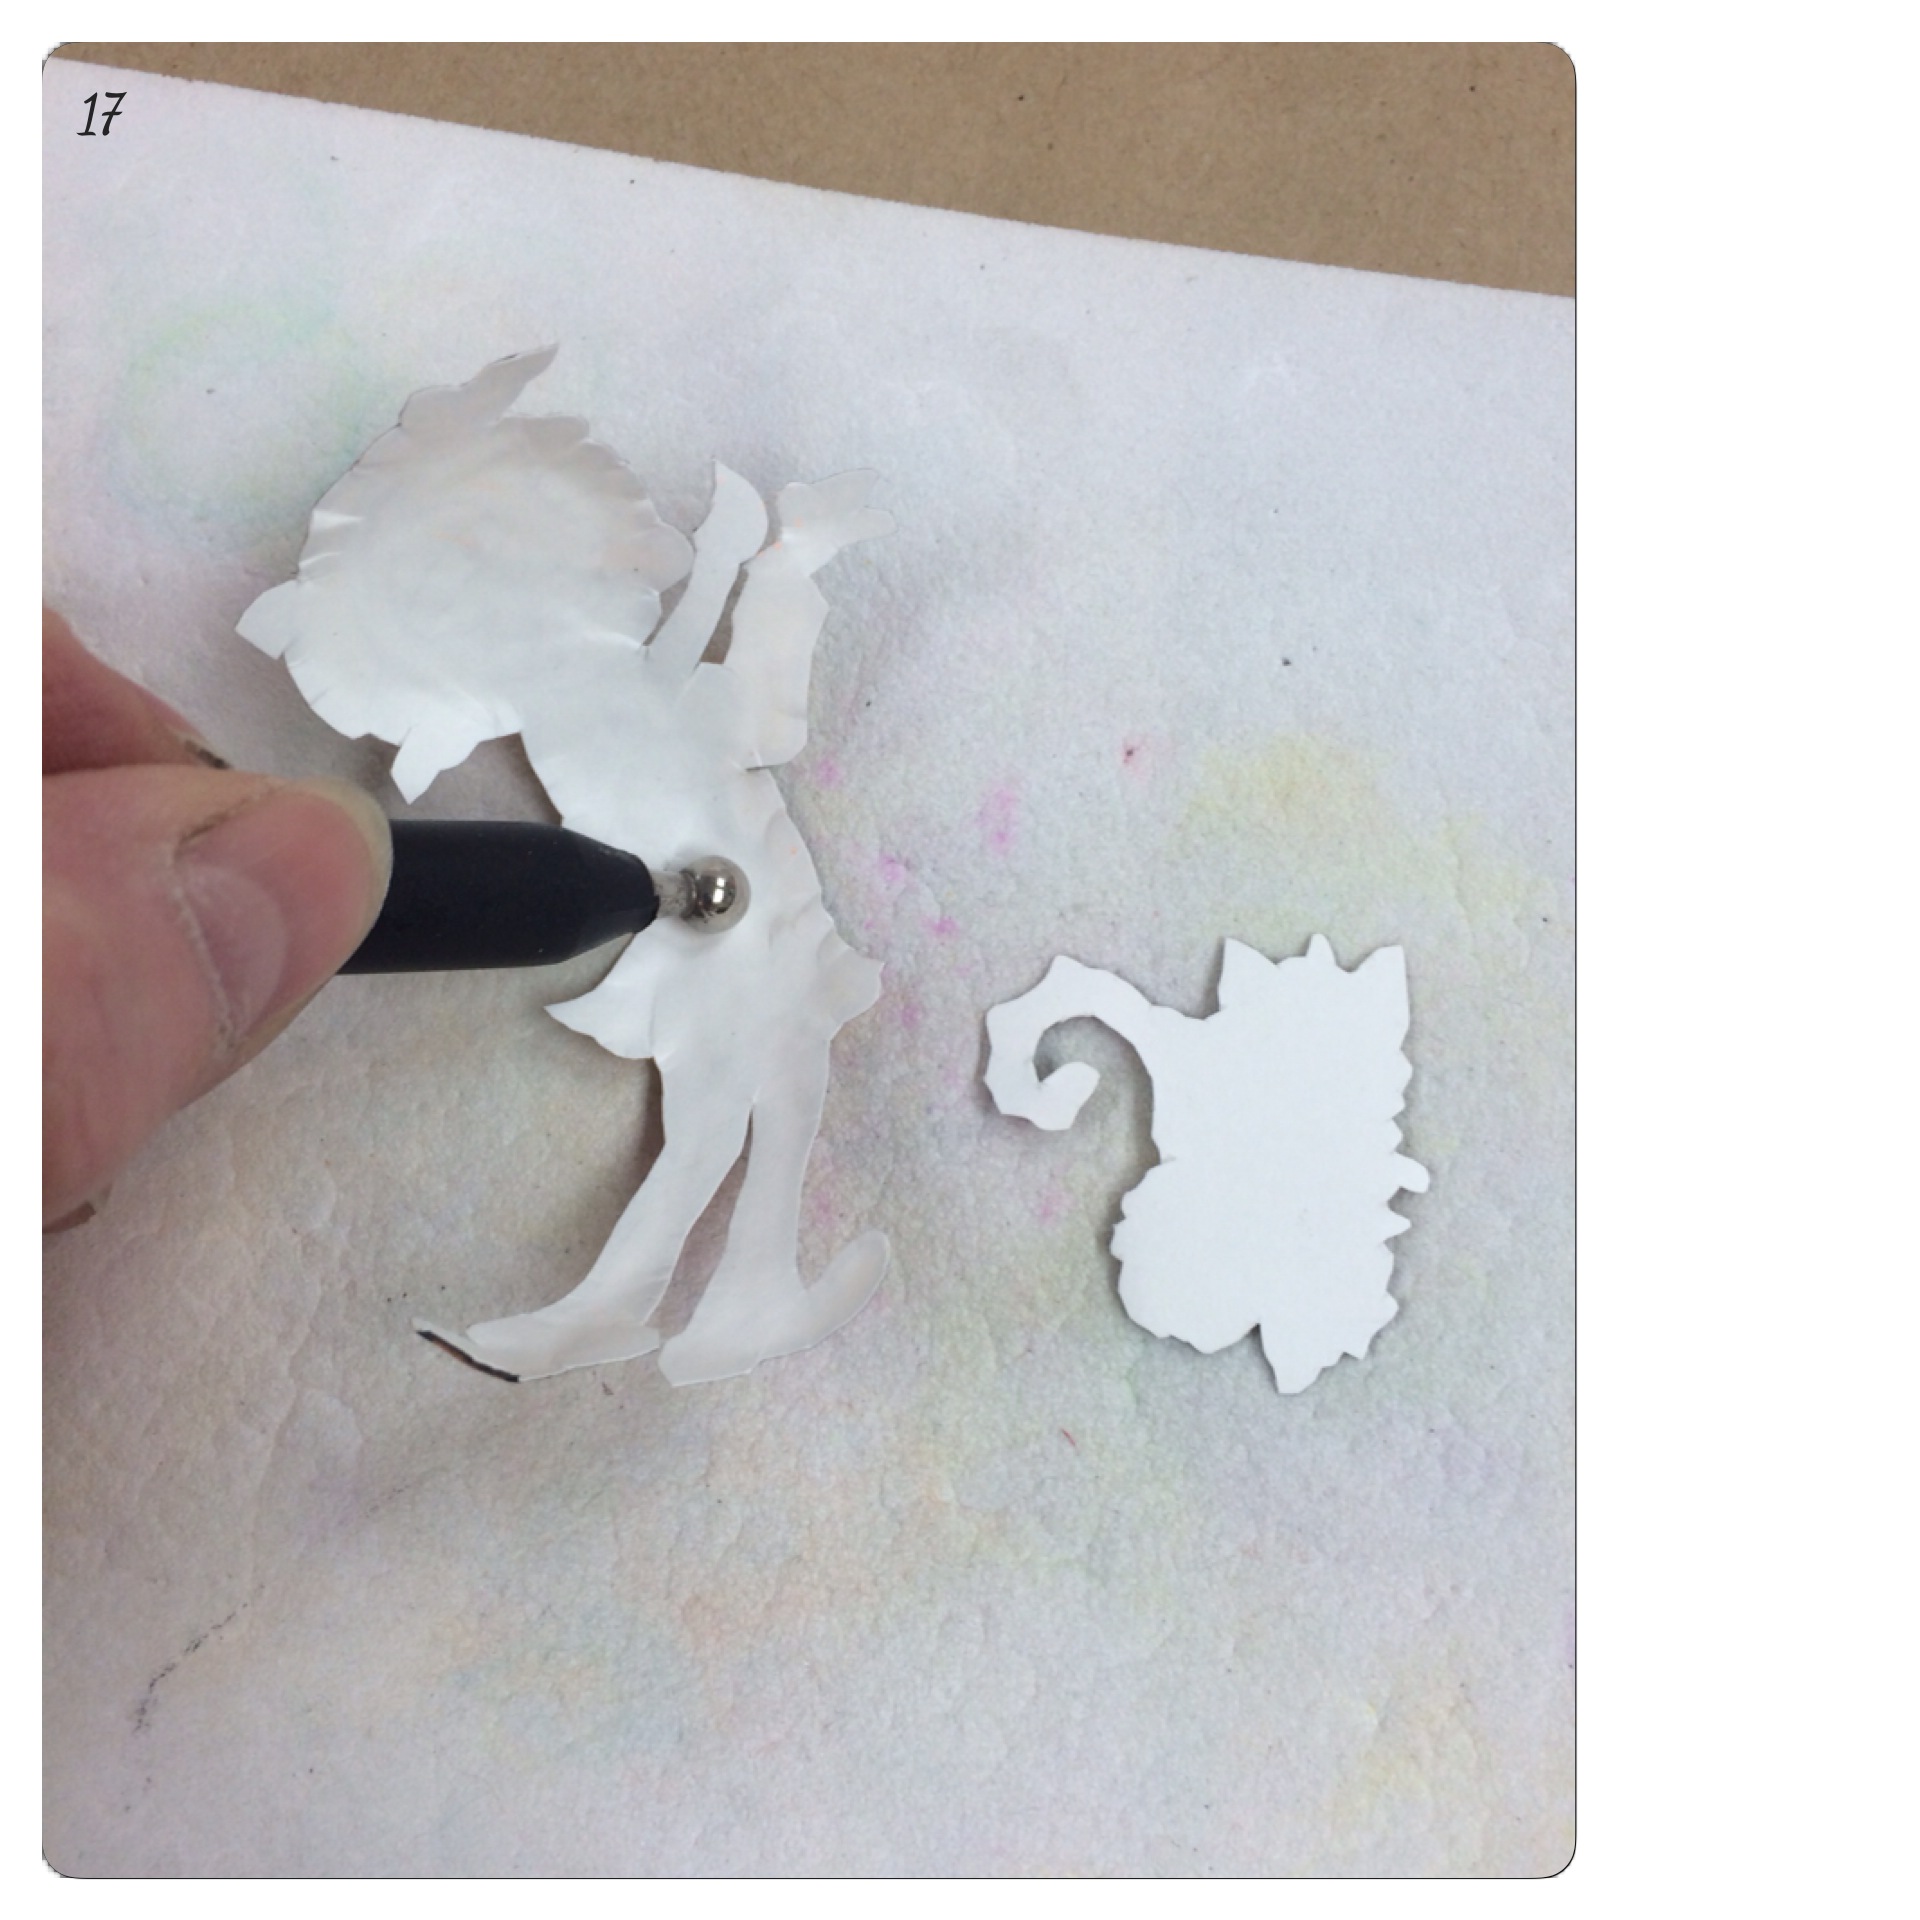
For the images The Egg Painter, Kitty and Puss Puss you can just apply pressure on the backs of the images using the medium Stylus and circular motions.
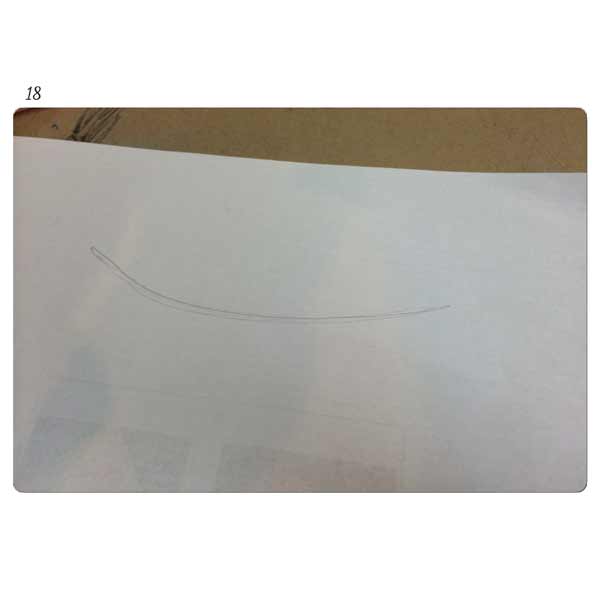
Ok let’s make the Banner. I don’t have a Banner Stamp and although I could have made one from an SVG file, I decided to just draw one out. This is how I did it:
I sketched a curved line.
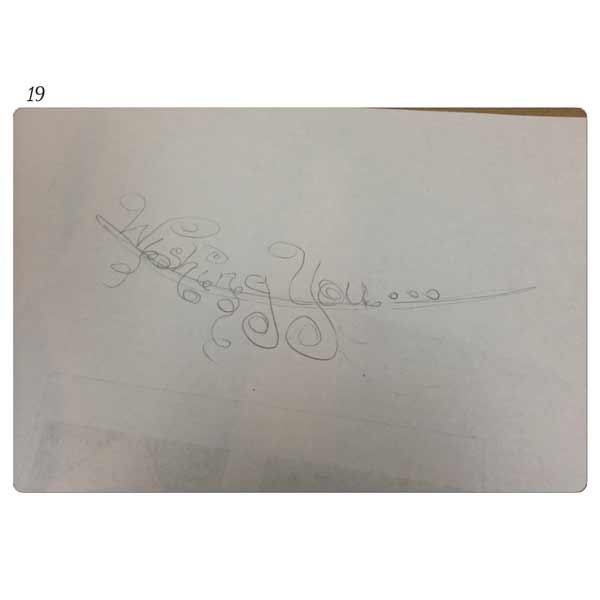
I sketched out the text.
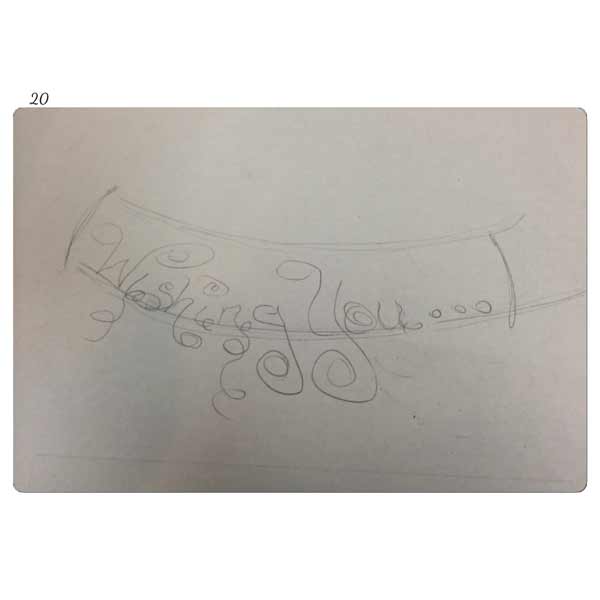
I added the top and sides to the Banner.
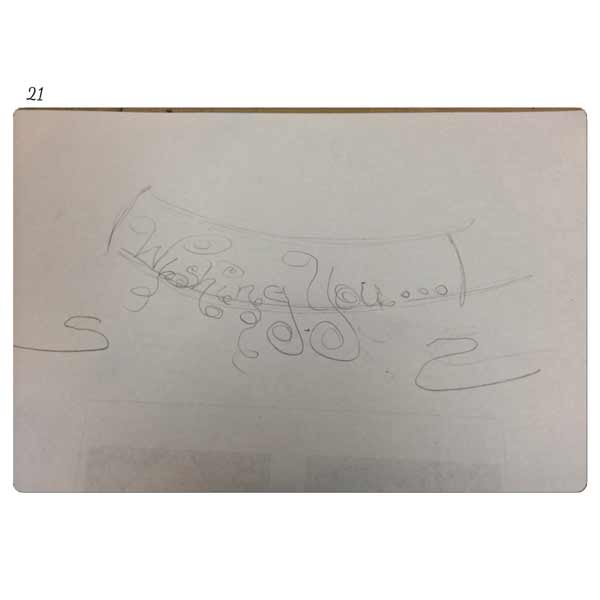
To make the draping, about 2 1/2 or 3 inches down from the ends of the Banner I drew an “S” shape on the left side and a backwards “S” shape on the right side.
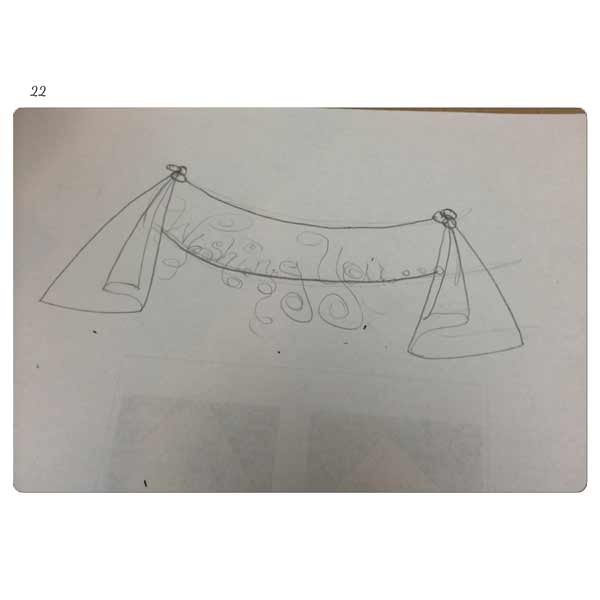
To finish off the draping I drew lines from the top corners of the Banner to the ends and curves of the “S” shapes and added a group of 3 circles at the tops of each drape.
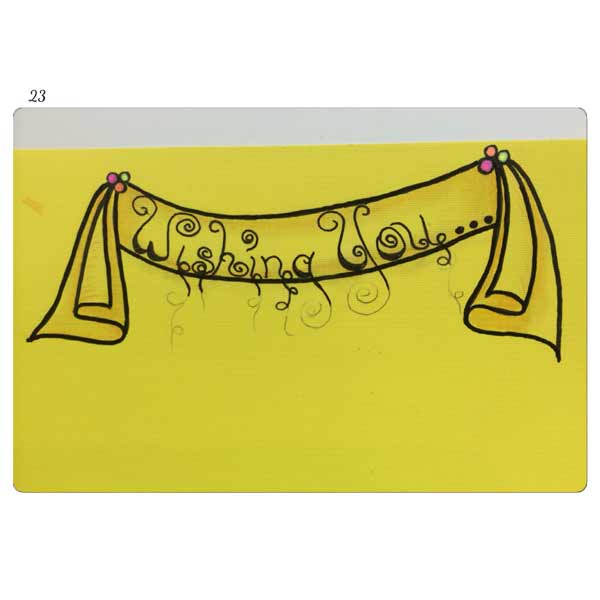
Once your sketch is finished you can clean it up with sharper lines. Once I had the Banner the way I wanted it I traced it to a piece of Bright Yellow Card Stock. Then added a bit of shading. Colored in the circles with a Black Pitt Pen, then used the Gelli Roll Pens to add color.
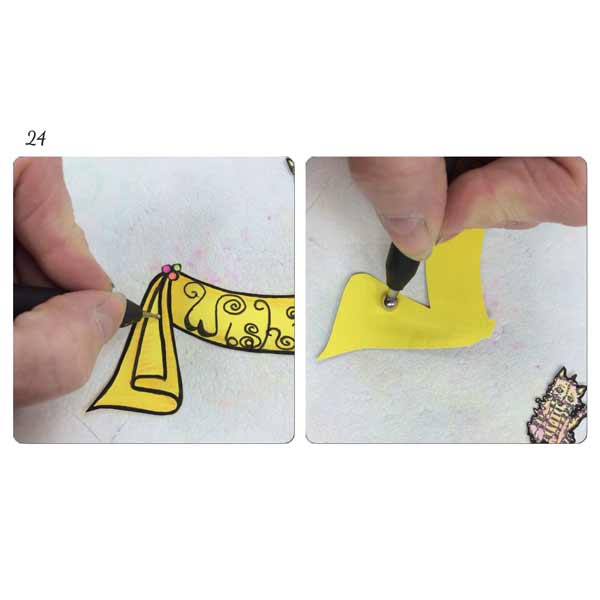
Cut out the Banner and add some dimension. Notice that when I cut out the Banner I chopped off the bottoms of the letters and confetti. Not to worry, I will be adding that back once I’ve attached it to the front of the card.
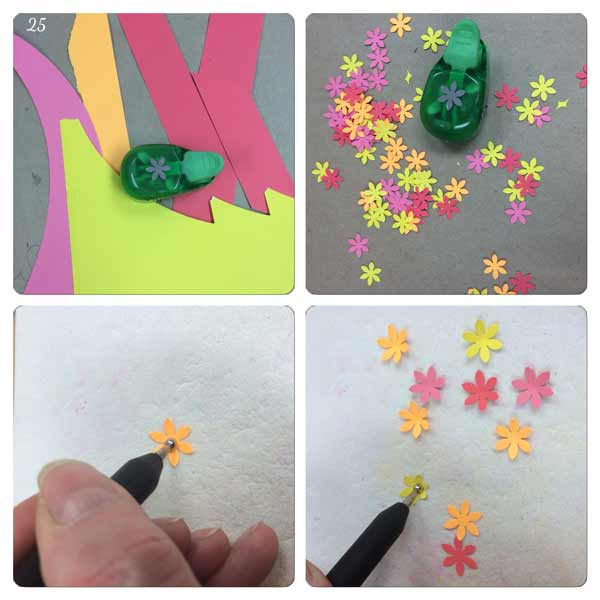
Using scraps of Card Stock in Bright Yellow, Bright Pink, Orange and Coral punch out several Small Flowers. Add dimension by placing the flowers on the Craft Foam and applying pressure to the center of the flower using a small Stylus.
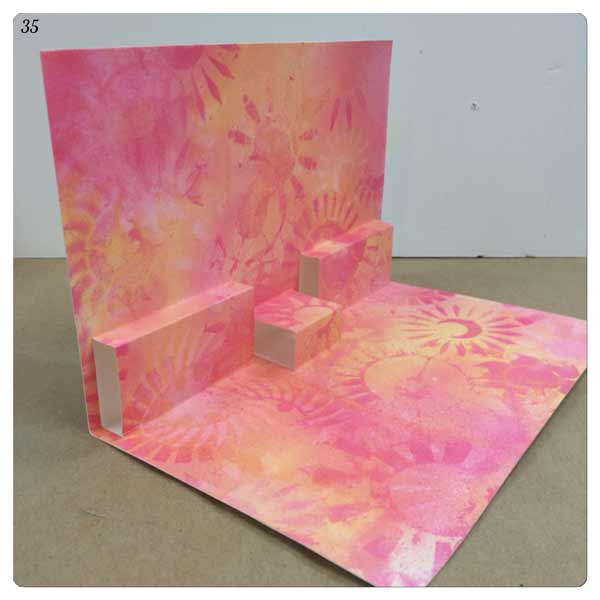
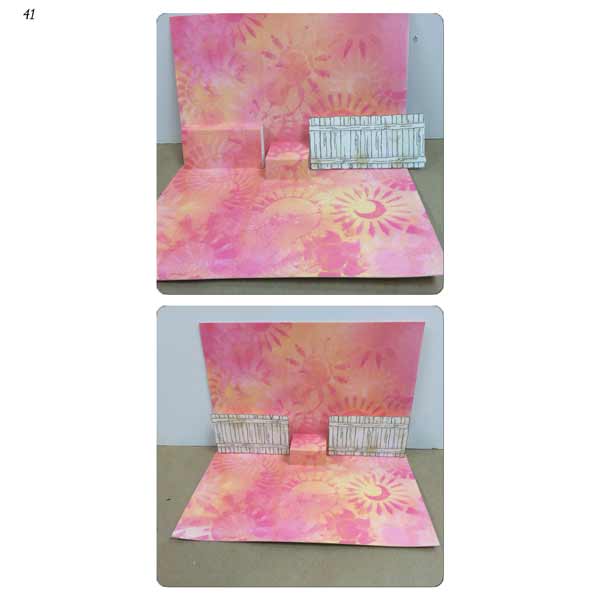
Ok at this point your inked up Mixed Media Paper should be dry.
Cut it into 2 pieces. One at 8 1/2 x 11 and one at 5 1/4 x 8 1/4
The 8 1/2 x 11 piece will be the inside of the card. Now let’s cut and score that piece.
NOTE: I will be showing the cutting and folding on a plain white piece of card stock, not the Inked Mixed Media Paper. I think it’s easier to see in the pictures.
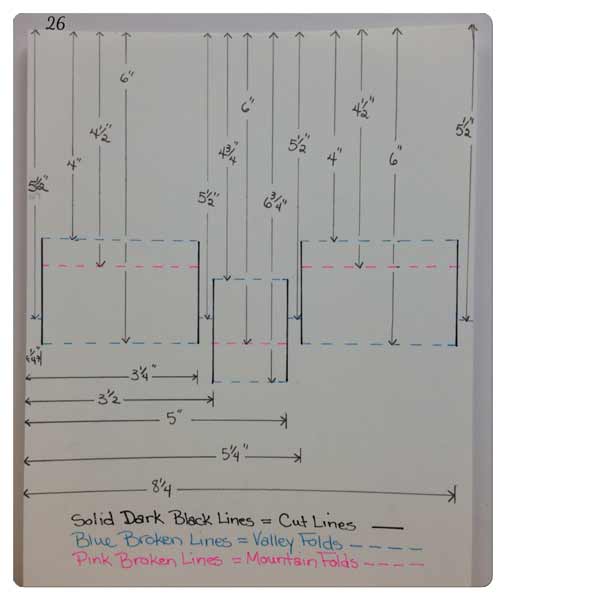
Ok this picture shows all the cut and fold lines and all the dimensions. I know it’s looks confusing. I just wanted you to have all this info for visual effect. I will explain exactly how to cut and fold it in text form below this picture.

Place Inked Mixed Media Paper (IMMP) in Paper Trimmer placing the long edge @ 8 1/4” (top of Card is at the 0” mark so make sure you position the paper correctly)
Position blade at 4”, make a 2” cut. From 4” to 6”.
Move long edge of the IMMP to 5 1/4”.
Again make a 2” cut from the 4” mark to the 6” mark. [This completes the cuts for the right hand stage]
Move long edge of the IMMP to 5”
Position blade at 4 3/4” make a 2” cut. From 4 3/4” to 6 3/4”
Move long edge of the IMMP to 3 1/2”
Again make a 2” cut between marks 4 3/4” to 6 3/4”. [This completes the cuts for the center stage]
Move the long edge of the IMMP to 3 1/4”
Make a 2” cut between the 4” and 6” marks
Move the long edge of the IMMP to 1/4”
Again make a 2” cut between the 4” and 6” marks [This completes the cuts for the left hand stage]
Time to make the score lines.
NOTE: Dimensions are from the Top of the Sheet
Score between the cut lines for the right and left stages at 4”, 4 1/2” and 6”
Score between the cut lines for the center stage at 4 3/4”, 6” and 6 3/4”
Score at each side and between each stage at 5 1/2”….this is the center of the card
Now let’s fold this card into shape. I find it easiest to insert a finger or two behind each stage to make the folds.
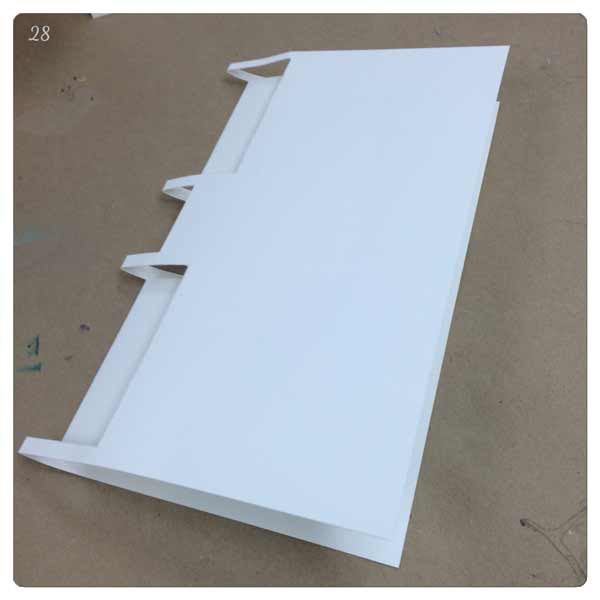
Valley fold at the top and bottom of each stage and at the 5 1/2” marks between the stages and the outer edges.
Mountain fold the score lines that are within the stages.
Close the card and smooth out the fold lines.

Opened it should look like this [remember I’m showing it with plain white card stock…not the IMMP]
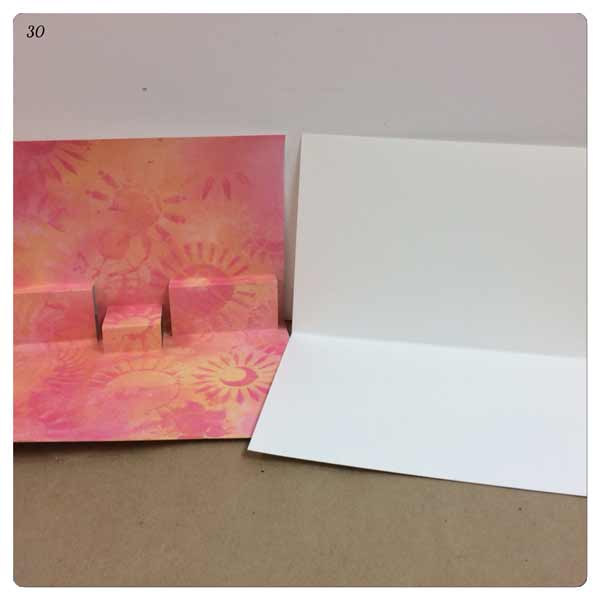
Time to assemble.
Take an 8 1/2 x 11 piece of White Card Stock and score and fold it in the middle to make an 8 1/2 x 5 1/2 card. You now have the outer portion and the inside staged portion of the card.


Flip the Staged section over. Working on one half ONLY, do not attempt to attach the entire two pieces together lying flat. Attach ScorTape or Double Sided Transfer Tape around the outer edges and at the edge of the stages. Also for added security add a strip or two in the middle section. DO NOT put any kind of adhesive on the stage areas. I used glue for the narrow sections on the sides and between the stages. Now carefully line up the two pieces. Don’t worry if it’s not perfect, I have yet to make a pop-up card that I didn’t have to trim once I got the two pieces together.
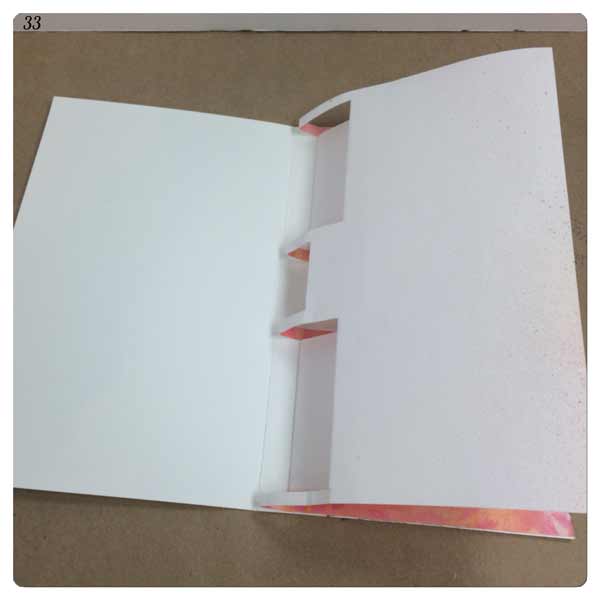
Now fold the inner staged section closed. Apply ScorTape or Double Sided Transfer Tape as you did for the first half.

Fold the outer section over the inner section making certain that you adhere the pieces from the folded edge out, with no “bubbles” between the two sections.
Check for uneven edges and trim if necessary. This is what it should look like.
At this point I’m going to instruct you to do things a tad bit different than they are shown in the pictures. You know it’s all about that hindsight being 20/20 thing…I am probably the most hap-hazard crafter around. I generally only have a vague idea of what I want to create…and as things progress even my vague ideas seem to be nowhere in sight!!!
So here goes, time for the fun part. Time to adhere all those fun images you made….But wait I’m getting ahead of myself…again….Just like when I’m crafting….there is still some doodling and stamping to do on the card before we add the Images….this is where I’m going to instruct you to do things the easy way…instead of MY way.
Take the 8 1/4 x 5 1/4 piece of IMMP and using the #05 Pitt Pen draw 3 or 4 semi straight lines around the outer edge. Or draw any kind of border you’d like.
At this point I assembled the entire front BEFORE I attached it to the front of the card…D’oh…don’t do that. Attach this piece before you start adding stuff to it. It’s really much easier that way.
Now let’s add a few things to the inside of the card before I get off track again.
Using the StazOn Black Ink Pad and the Dylusions Leaf Branch from the “Further Around the Edge” Set, stamp some leaves at the top of the inside of the card. [Ignore the images in the photo…they’re not really there…case in point of how I do things azz backwards]

Using Dylusions Ink Sprays in a Water Brush – Bubblegum Pink and Lemon Zest add some color to the leaves. No need to be precise.
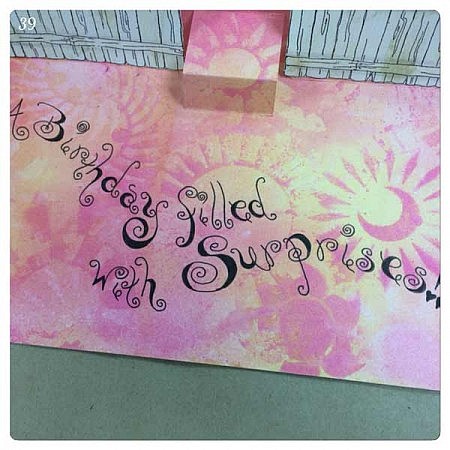
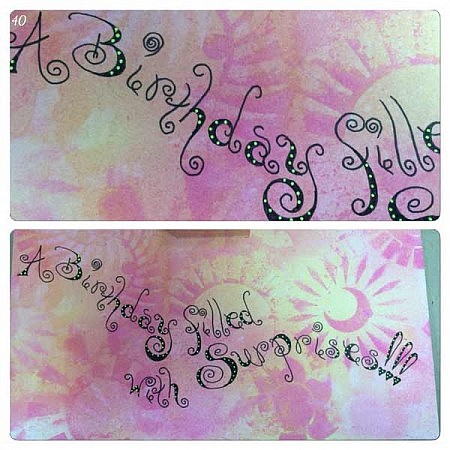
On the bottom half of the card sketch a line or two for your Text. Sketch the Text then go over it with the #05 Pitt Pen. I added some Dots using a Yellow Gelli Roll Pen.
Using the #05 Pitt Pen draw the same Border around the inside of the card as you did for the outside.
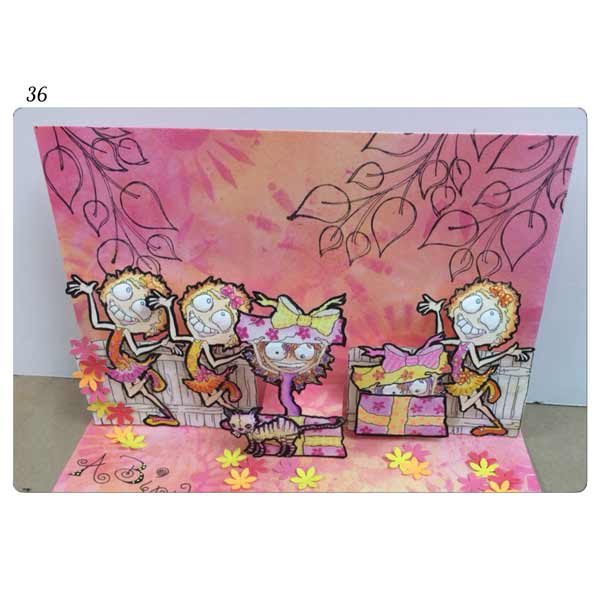
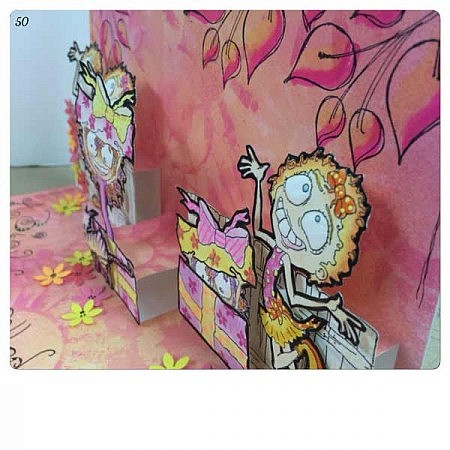
My Fence images were too large for the stages I wanted to attach them to, so I trimmed them down to fit. Attach the Fence images to the front of the right and left stages using ScorTape or Double Sided Transfer Tape.
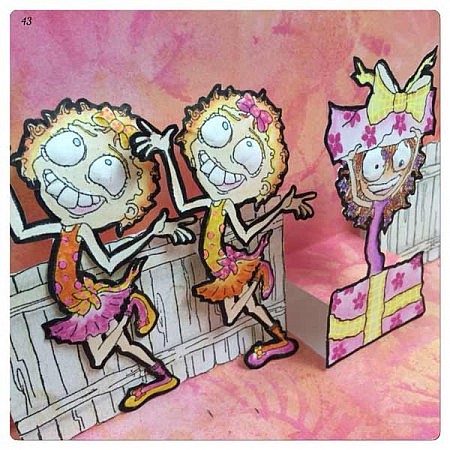
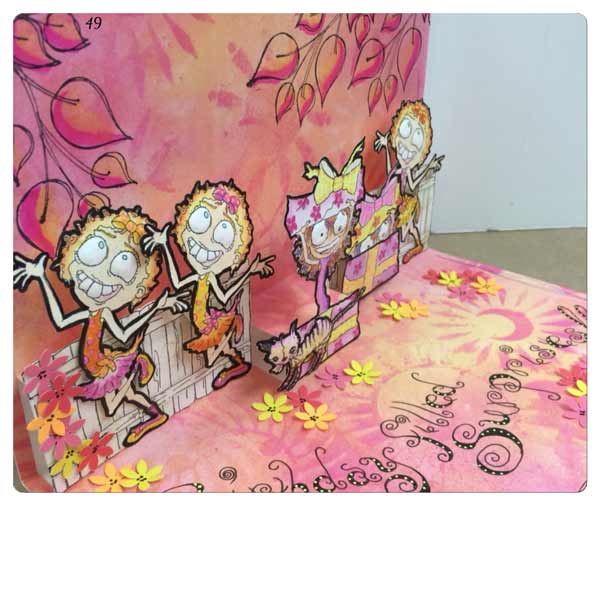
Attach one layer of Foam Tape to the back of 1 of The Egg Juggler images and 2 layers of Foam Tape to another Egg Juggler. Apply a dab of glue to the foot on the floor. Attach these two images to the Fence section on the left. Apply ScorTape or Double Sided Transfer Tape to the bottom section of Sally Surprise and attach her to the middle stage.
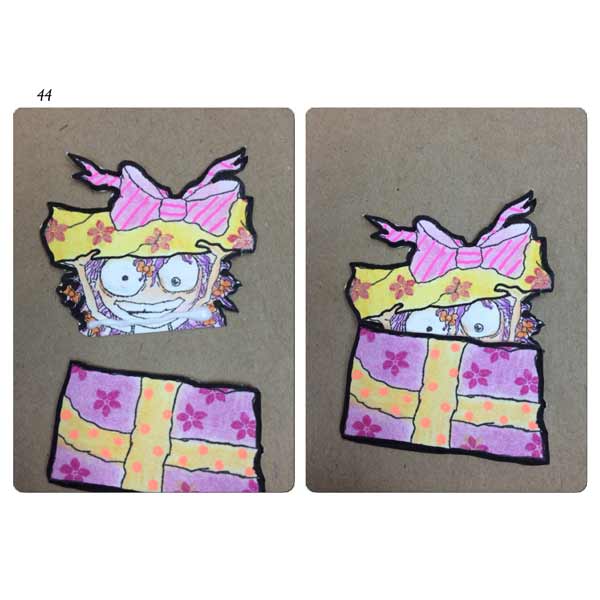
Assemble the Sally Surprise peeking out of the Gift Box. Apply a bead of glue to the bottom of the head section, position bottom of the gift box over her face so just her eyes are showing, press pieces together. Attach a double layer of foam tape to the back of this piece.
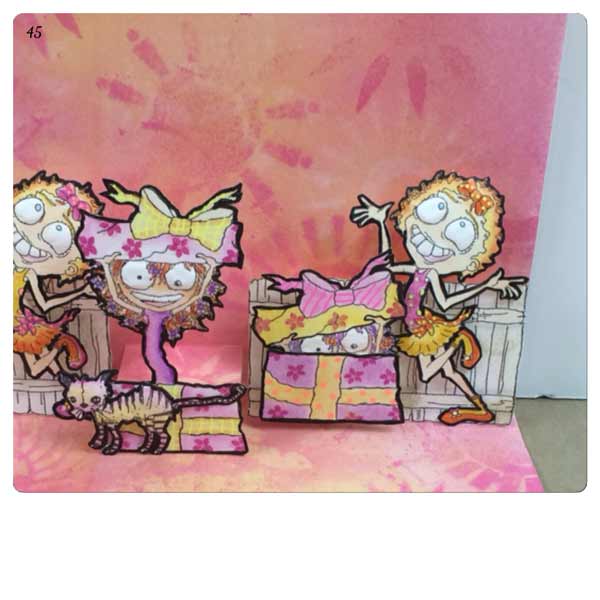
Attach a piece of Foam Tape to the back of the remaining Egg Juggler image and a dab of glue to the foot as you did with the others. Attach Foam Tape to the Stampotique Originals Kitty image. Attach The Egg Juggler to the right side of the right hand Fence section. Add the Sally Surprise Peeking image to the left of that Fence section NOTE: Because this image has a double layer of foam tape you will need to lift it just slightly so it’s not resting on the card floor or the card will not close properly. Attach Kitty to the front of the full image of Sally Surprise.
Ok we’re not totally finished with the inside of the card yet, but at this point we’re going to move to the front of the card.
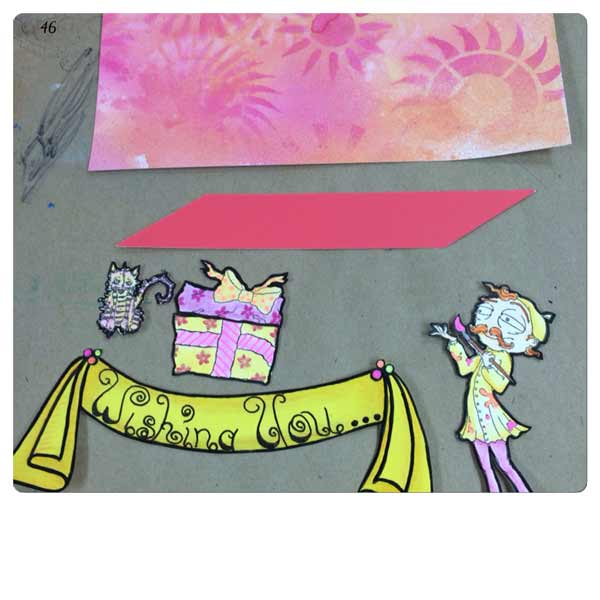
These are the pieces I used for the Card front.
You will need to cut from a Coral color piece of scrap Card Stock a piece that is approximately 7” x 1”. Cut angles at the ends. Draw some sketchy lines around the edges of this piece.
Oh there is also the tiny gift box that I drew to place in The Egg Painters hand. But it’s not in this picture because it had not been drawn at the time this picture was taken.
I attached the following images flat to the surface using ScorTape or Double Sided Transfer Tape: Banner, Rug, Gift Box
The following images were attached using Foam Tape: The Egg Painter (I also applied glue to his feet so he wouldn’t look to be “floating”), the Tiny Gift Box and Puss Puss
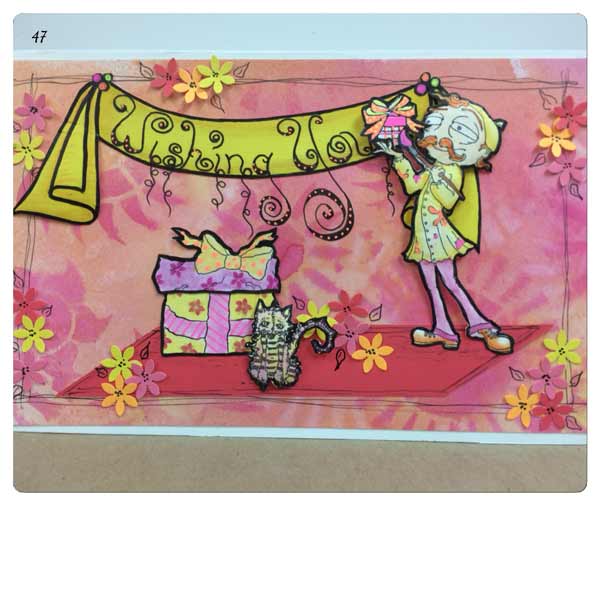
The Flowers were attached using white glue and I used the #05 Pitt Pen to add dots to the centers of them.
I used the #05 Pitt Pen to draw out the bottoms of the Banner Text and the squiggles. I also drew some Leaves around the flowers.
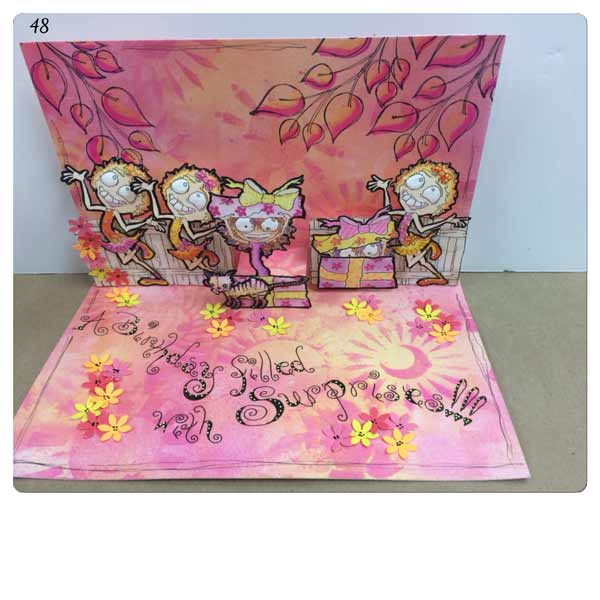
Now that the front is completed you can return to the inside and attach the flowers. Draw a few leaves around them and you’re done!!!!
6 Comments
So amazing! Love your style.
Wonderful card! The colors are so vibrant and your use of the stamps is genius. Thank you for all the fabulous ideas!
WOW The card is a present in itself!
Fabulous Tutorial, great card!
Outstanding, Virginia! I love how you have featured these fabulous stamps. Gorgeous card and what a wonderful tutorial!
AMAZING, fun-filled card! Love the coloring, stamping, bkgrd and every little detail. Like the way you altered the characters, too. A present in itself! 🙂