Good morning! I’m Teresa and welcome to my first post as part of the amazing Joggles DT. I am so excited to be here with you, sharing my ideas and techniques, and hopefully inspiring you to try them for yourself.
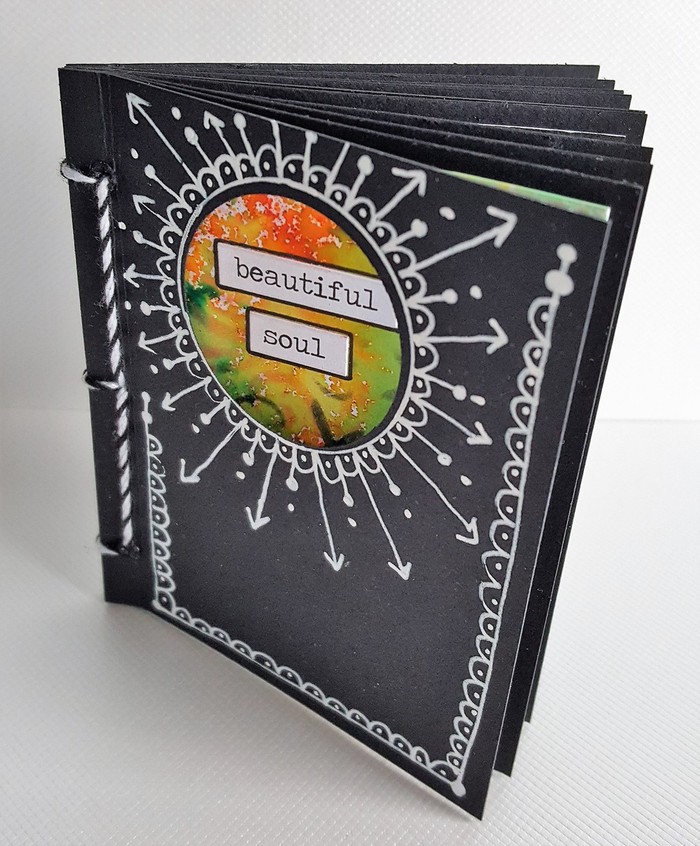
When I was asked to create a project with the Joggles Itty Bitty ATC Stencils, I was thrilled! I love ATCs and this range of stencils is sized perfectly for adding visual interest and texture to ATCs. However, I didn’t just want to create a couple of ATCs for this tutorial, so I have gone one step further and created a mini book of inspiration that is small enough to tuck into a pocket or handbag and carry around with you. Just perfect for when you need a little extra bit of positive energy.
Supplies:
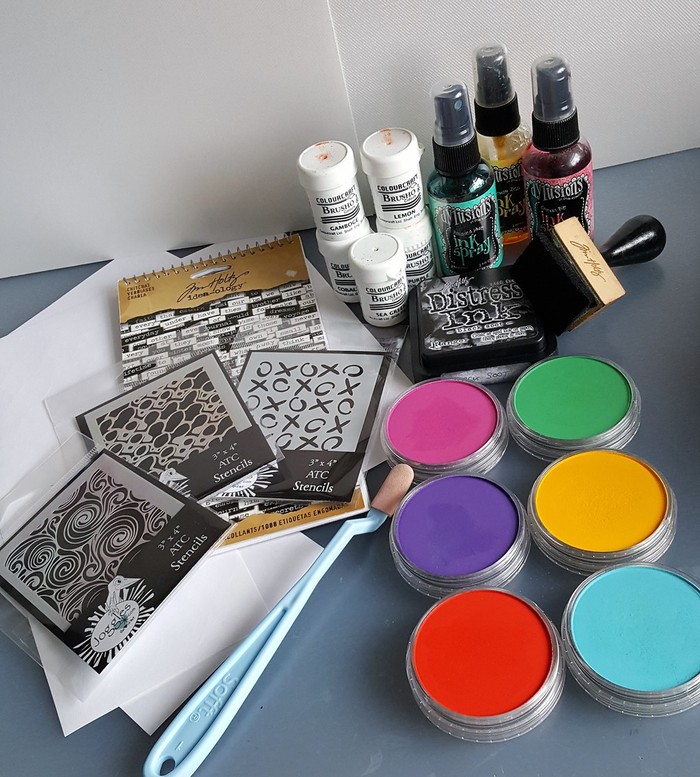
Joggles Itty Bitty ATC Stencils: Mini Cyclone, Mod Squad, XO
Colourcraft Brusho Crystal Colours: Purple, Cobalt Blue, Gamboge, Lemon, Sea Green
PanPastel: Permanent Green, Turquoise, Violet, Magenta, Diarylide Yellow, Permanent Red
Sofft Tools [65001] Knife and Covers, No.1 Round 1/5
Tim Holtz Distress Inkpad – Black Soot
Ranger Inkssentials Ink Blending Tool
Dylusions Ink Spray by Dyan Reaveley: Cherry Pie, Lemon Zest, Polished Jade
Joggles Sticky Snippets: Hearts, Small Starburst
Idea-ology by Tim Holtz Chit Chat Stickers
Uniball Signo Broad White Gel Pen (or use Gelly Roll Pen – White – Medium Point)
Unipin 0.8 Black Fineliner Pen (or use 0.8 Micron Pigma – Black)
Uni Supermarker (or use Pigma Graphic Pen – 2mm Black)
White A4 Cardstock
Black Cardstock
Collall All Purpose Glue (or use Aleene’s Original Tacky Glue)
Pokey Tool – (or use Tim Holtz/Tonic Studios – Retractable Craft Pick
Baker’s Twine (5 yards) – Black
Little B Circle Die (or use Marvy Uchida Clever Lever Extra Jumbo Craft Punch 1.5 inch Circle)
Here’s my process:

I began by taking an A4 sheet of white card and adding colour with Colourcraft Brusho Crystal Colours, spritzing with some water to help the colours burst and blend. The colours I used here are Purple, Cobalt Blue, Gamboge, Lemon and Sea Green. I have pierced tiny holes in the caps of my Brusho pots so that I can sprinkle small amounts of the colour crystals onto my page – I find this much easier than dipping into the posts with a brush or small spatula. Using Brushos is not an exact science, but I love the unexpected nature of the product…it’s always a surprise what patterns and colour blends you get! Once I was happy with the effect, I used my heat tool to help dry the card, blotting any heavily wet areas with paper towel to avoid pooling and muddying of the colours.
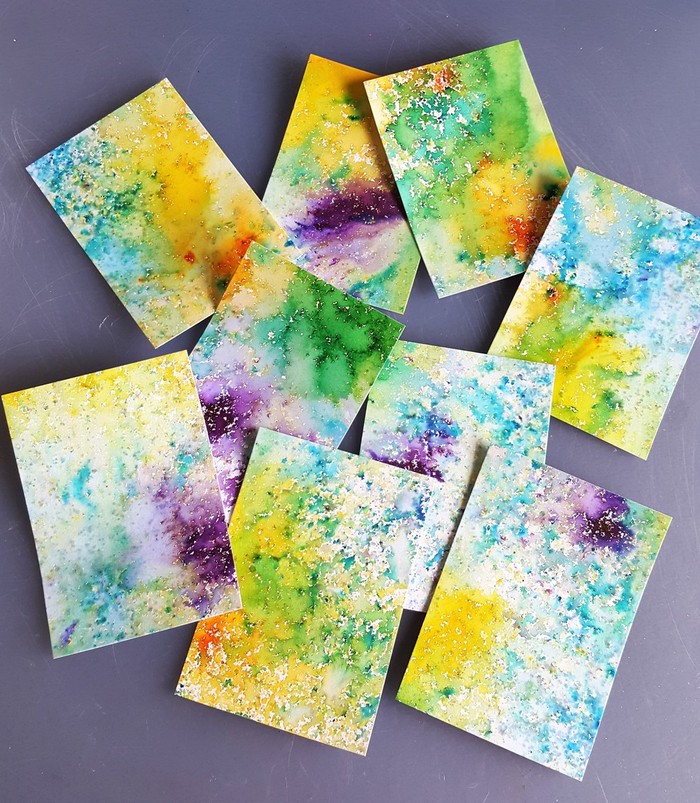
Once dry, I cut my card into 9 ATCs (2.5 x 3.5 inches) and made a decision on which Joggles Itty Bitty ATC Stencils I wanted to use for my next background layer.
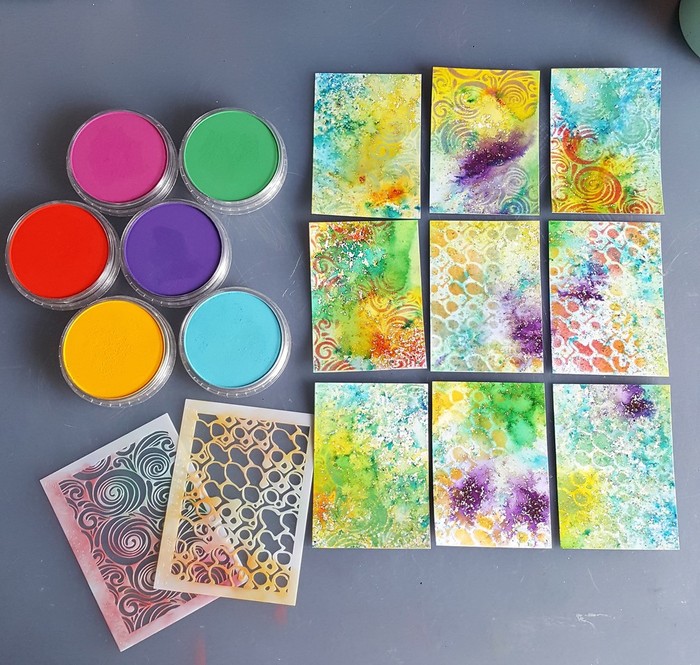
As these stencils are so beautifully intricate, I decided to use PanPastels through them, applying the colour with a Sofft Tool. PanPastels are highly pigmented so they are perfect for using with stencils. The vibrant colours I used here are Permanent Green, Turquoise, Violet, Magenta, Diarylide Yellow, and Permanent Red. I applied the Pan Pastels randomly. The Sofft Tool allowed me to blend the colours so there were no harsh edges. For this stage of the process, I used Mini Cyclone and Mod Squad Joggles Itty Bitty ATC Stencils. The two designs complement each other quite well and are both ideal for a background layer rather than a focal point.
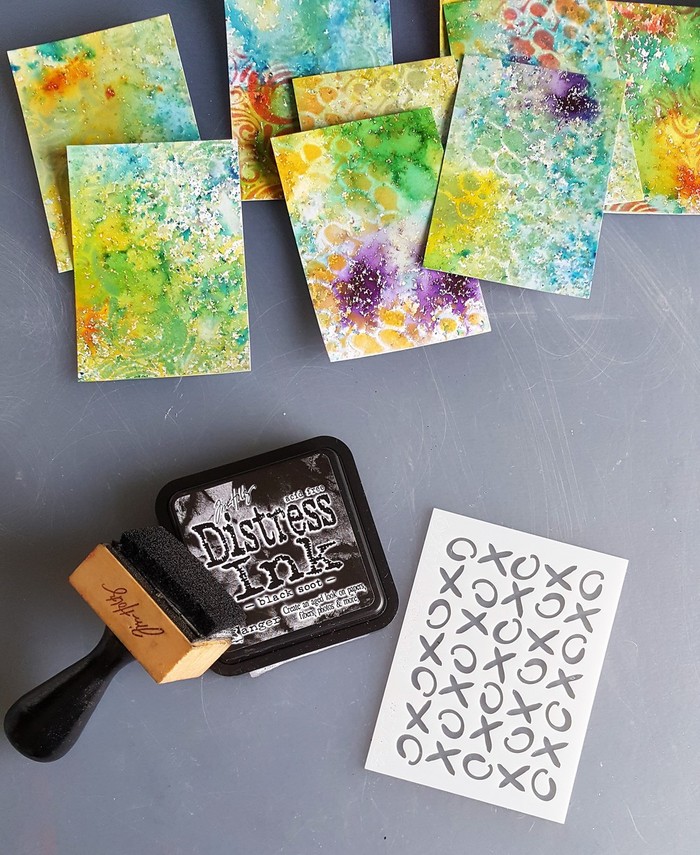
I wanted another layer of stencilling, something that would be more in the foreground of my design. I chose the XO Joggles Itty Bitty ATC Stencil and applied Black Soot Distress Ink with a Ranger Inkssentials Ink Blending Tool through it.
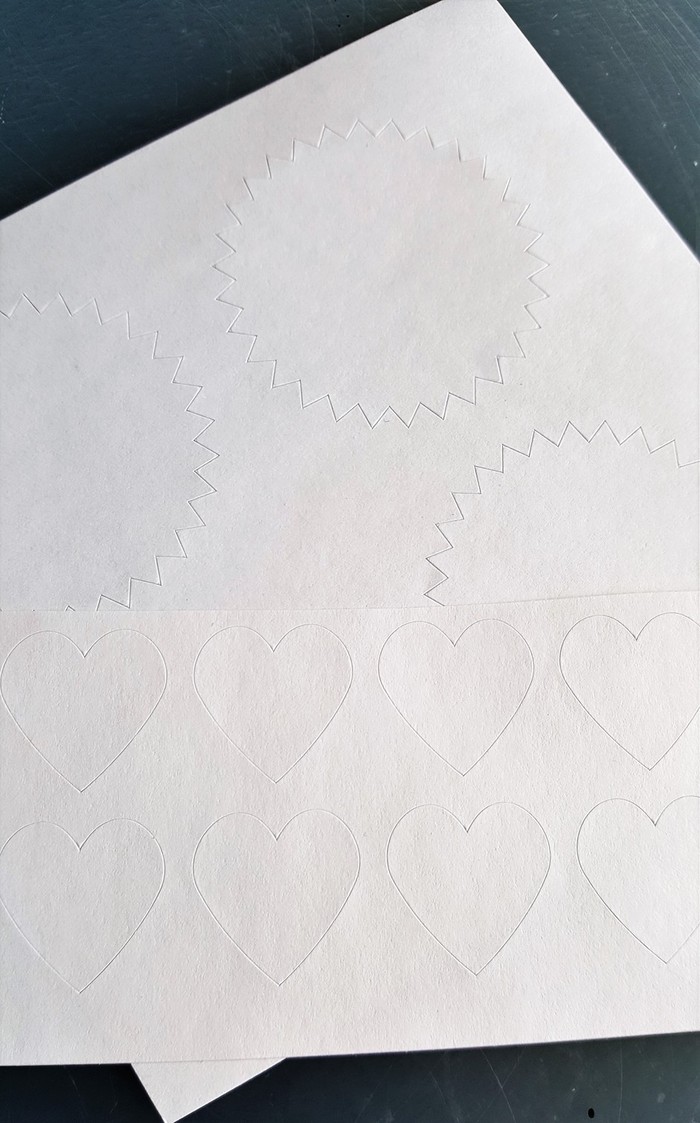
As part of my DT package, I received some Joggles Sticky Snippets. I was curious to try these out so chose the Hearts and Small Starburst designs and cut some from the sheet.
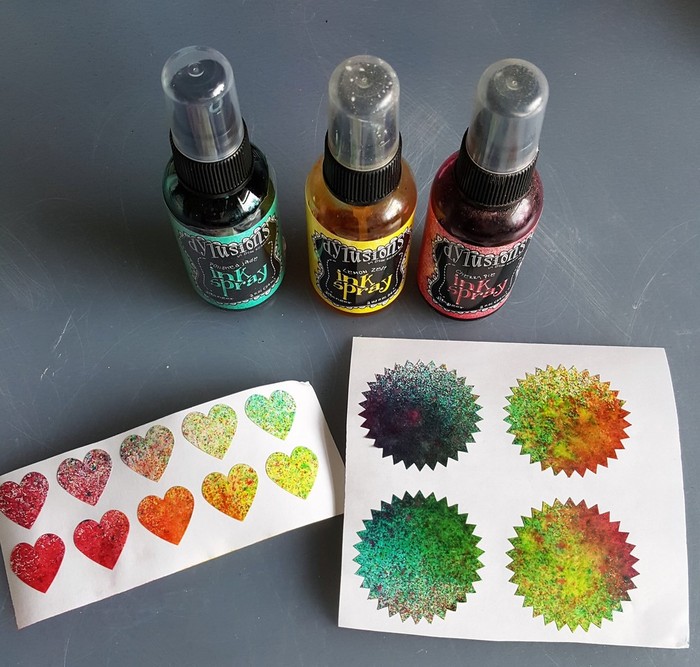
I decided to colour them with Dylusions Ink Sprays in Cherry Pie, Lemon Zest, and Polished Jade, just spritzing randomly. They take the colour really well, and I allowed them to dry before removing from the backing sheet.
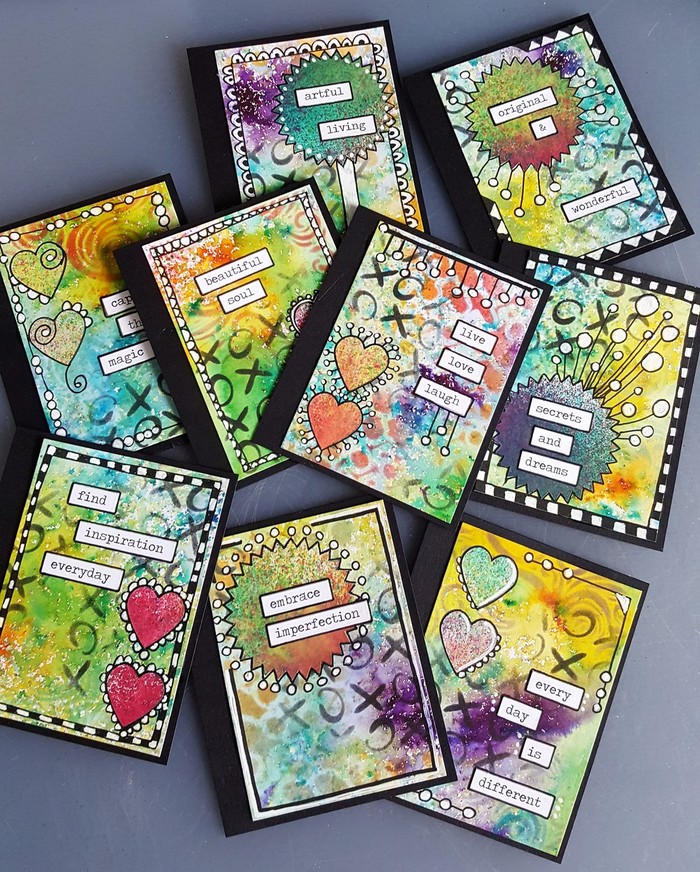
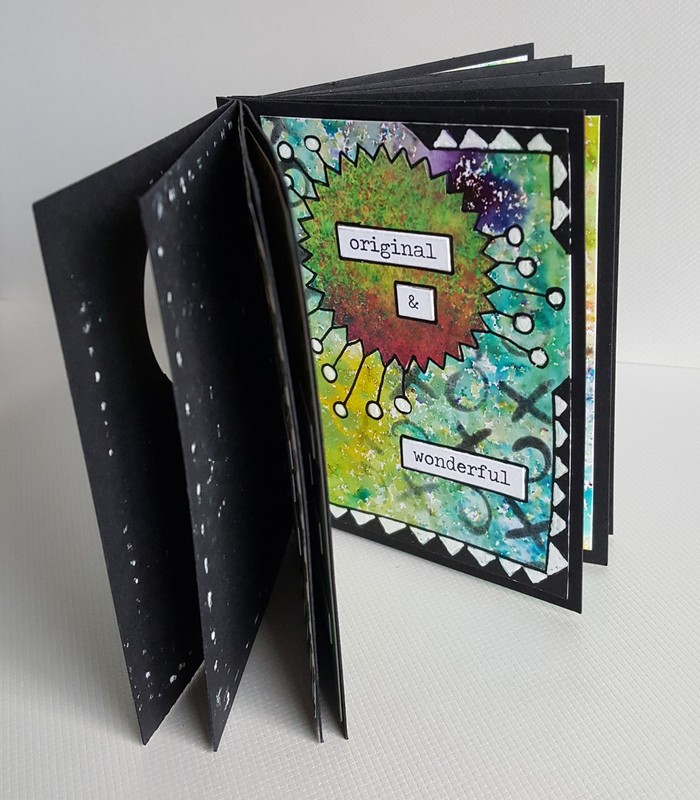
Now it was time to ‘assemble’ my pages. I used the coloured Sticky Snippets and added extra details using a white gel pen and black fineliner. I doodled around the Sticky Snippets and added some whimsical borders. My inspirational words come from the Idea-ology by Tim Holtz Chit Chat Stickers. Each ATC was matted onto a piece of black card 3 x 3.75 inches, aligned to the right, ready for binding.
I cut an extra piece of black card to create the cover to my book and die cut a circular aperture with a Little B die. The placement of this allowed the words on the first page to show through. I added some decorative detail with my white gel pen.
Using a pokey tool, I pierced three holes in each page to allow me to bind with some baker’s twine. This was just threaded through using a large needle, then tied off inside the back cover to hide the knot.
Thanks for stopping by the blog today – I hope you enjoyed my first project here. Please feel free to leave a comment below – I would love to hear your feedback!
44 Comments
Very nice, I might give this a go. Thanks
Thankyou Jo. I am glad I inspired you. It’s a fun project that can easily be adapted x
Nice graphic design and colors! Makes me want to try those ATC minis.
Thanks Christine. The mini stencils are brilliant, easy to use, easy to store and they won’t break the bank either!
I love this Teresa. The way that color pops on the black is awesome and the doodling adds such a nice hand element.
Thank you Diana. I find doodling very therapeutic and a good way to add personality to a project x
Wonderful, colorful little book! What an awesome idea. Thank you for sharing your creativity with us!
Thanks Faye – I’m glad you enjoyed my project!
Absolutely ADORABLE. An inspiration! I love books and I want some of those mini stencils. Next paycheck…….
Thanks for sharing your talent. Candy
Thank you Candy – you won’t be disappointed (the hardest part will be choosing which designs to buy!!)
Luscious colors, Teresa! Great use of the Sticky Snippets as focual points and a terrific inspiration book!
Thanks Donna – I am so impressed with the Sticky Snippets, they are such a simple idea, but so versatile!!
Fun project! LOVE the ATC size stencils!
Thanks Michele – they are a must have item. Such a great size to work with xx
Hello… I LOVE how the sticky snippets turned out especially the one in the lower left corner…the round one.
Good job!!
Thanks Dolores – I am glad you liked my project today. The Sticky Snippets were such fun to use along with the stencils xx
I absolutely love what you created. This is so inspirational and I plan to make one for a church member that would love something like this with inspirational and scriptures inside!!! Thank you for sharing your wonderful talent. Hugs and blessings
Thankyou CaroleAnn – so kind of you!! I am sure your friend will appreciate the gift, and I am thrilled to have inspired you to go and create something similar xx
This looks so amazing! Really will give this a try. Haven’t used brushes so will need to buy some. Any excuse!!!
Thank you Liz!! Brushos are a lot of fun and there are many different ways of using them so you won’t be disappointed!! Happy to have inspired you x
WOW! That is a gorgeous creative endeavor! And I love the idea of creating a little book to inspire ourselves as we’re out in the world. 🙂
Thanks Sara!! I am so glad you enjoyed looking at my project today. Miniature books make lovely keepsakes or gifts for family and friends xx
I just finished a small accordion book and loved the size. Now I need to make this. I am thinking way ahead. I have an arty sister who loves everything Christmas. Guess what her gift will be this year.
Thank you Bette Jo – this format would make a fantastic Christmas gift idea, your sister will love it xx
Love your ATC book and the bright colors on black. Looking forward to seeing more of your creations.
Thank you Patricia – plenty more bright colours coming up in my next tutorial. So glad you enjoyed this one xx
I agree with everyone else! Wonderful – size, pops of color against the black, white doodles, style, other elements…. I want to try all of the products!
Thank you so much Julia – I am so glad that you enjoyed my walkthrough! Have fun working your way through the product list!!
I’m a faithful follower of all things Joggles. I’ve gone ATC crazy lately. Loved your use of colors and multiple supplies in this project … great inspiration to create a mini-book. Thought I’d use some of my “stash” of ATCs, but decided l’d have more fun designing co-ordinating ones especially for it. Thanks for sharing! Keep up the great work! Have a wonderful weekend!
P.S. I already had on hand all the products you used, big Joggles fan that I am. Am posting my first ATC attempts as my book’s not quite finished yet. 🙂 Am looking forward to sharing this project when my 2 granddaughters come to visit this summer.
Wow Jan – these are wonderful. Thanks so much for your comments, and for sharing your art with me. I am sure your book will be a wonderful treasure once complete xx
Lovely, thank you!
Thanks Uli – glad you enjoyed looking!
Wonderful mini ATCs book Teresa!
Thanks so much Leigh!!
ThIs is a truly gorgeous project. My muse has been on break for forever and had just about given up that I would ever be my artistic self again but this project made me feel an interest I haven’t felt in a long time. I love ATC’s and these are lovely and the book is perfect for displaying them. Thank you so much for the inspiration.
Thank you Carol – your comments warm my heart. I am thrilled to have inspired you and hope that your muse has returned to stay xx
i adore your project. I am making many books of late and love love love your steps! You seem to be a combination of Barb and Bonnie.
I can’t wait to see more.
Have you done any liquid pours.? That is my next direction and just ordered a few paint tubes from Joggles in anticipation.
Thank you Jane! I am happy to be a combination of Barb and Bonnie, two wonderfully creative souls!! I haven’t tried liquid pours yet although I find them intriguing….it’s on my ‘to do’ list (along with many other things!!) I hope that you enjoy the projects that I have lined up for the next couple of months as much as you enjoyed this one xxx
Hi, this is a great project. I’ve never used PanPastels. Once you used them with the stencils did you need to do anything else to keep them from smudging or interacting with the next layers?
Hi Terry – Sorry for the late reply (I’ve been holidaying!) As with all pastels you can get some smudging or tranfer, but these seem to have greater staying power than others (possibly due to the very fine smooth texture). I didn’t see the need for fixative in this project, but you could use a light aerosol fixitive if you prefer.
Thank you Teresa! I really enjoyed making this little book for my granddaughter!!!
Barbara – this is amazing and I feel honoured to have insired you to create tihs. It looks fabulous and I am sure that it will be treasured for a long time xx
This is the best thing I’ve ever found on Pinterest! I honestly feel that way. Thank you so much for sharing your talent, knowledge, and this project in detail.
Lovely little book, thank you for sharing