• Blog Home
  • Joggles Store
  • Categories
    • 5 Minutes Of Fun
    • Barb’s Random Art Stuff
    • Design Team
    • Guest Posts
    • MidWeek Muse Video Tutorials
    • Promotions & Giveaways
    • Store Happenings
    • Uncategorized
      • Blog Home
      • Joggles Store
      • Categories
        • 5 Minutes Of Fun
        • Barb’s Random Art Stuff
        • Design Team
        • Guest Posts
        • MidWeek Muse Video Tutorials
        • Promotions & Giveaways
        • Store Happenings
        • Uncategorized
      DT Post – Karen Sessions’ Black Bubbles Inspire Layout and Card
      November 18, 2016

      17-karen-sessions-nov18-foam-stamps-bubble-layout

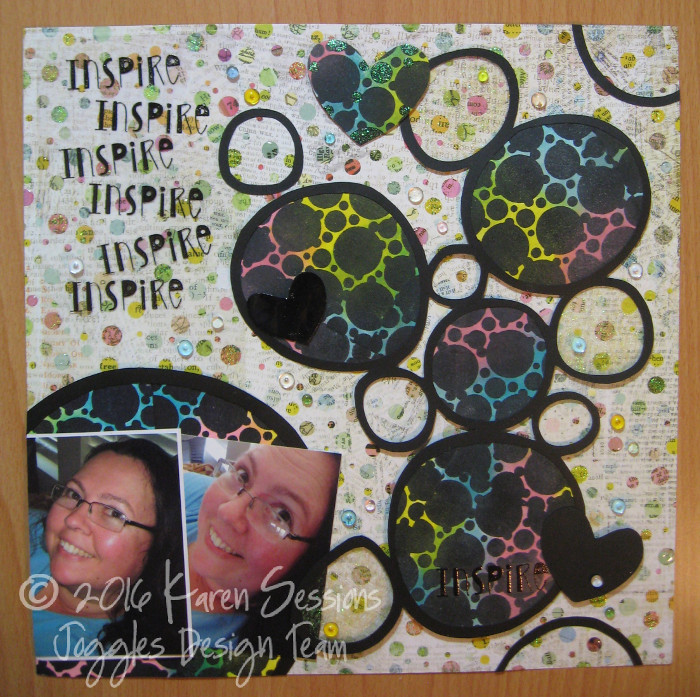
      Hi everyone! It’s Karen here today to share my fun layout featuring Joggles Bubbles Foam Stamp. I created a stamped background and used the stamp to make embellishments for my scrapbook layout.

      Let me show you how I did it and share what I learned along the way.
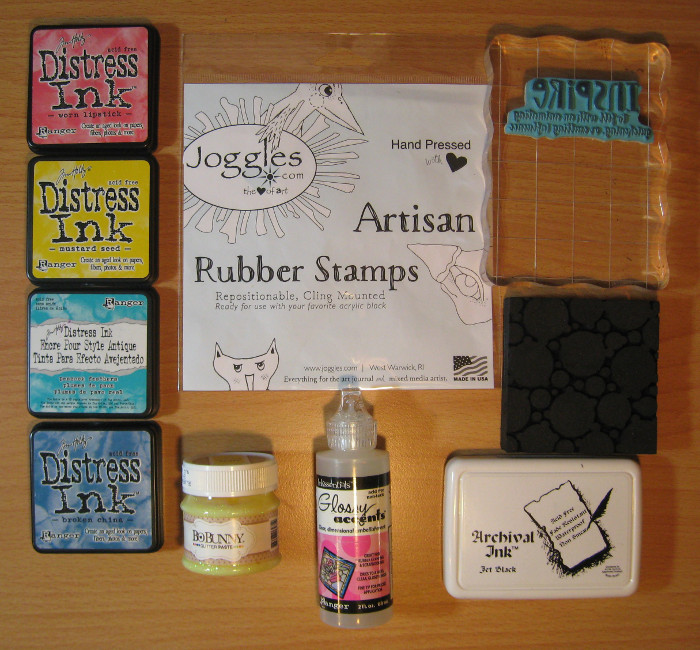
      25-karen-sessions-nov18-foam-stamps-bubble-layout

      Supply List:
      Joggles Foam Stamp – Bubbles (57013)
      Bo Bunny Double Dot Glitter Paste – Lemonade
      Tim Holtz Distress Ink Pads – Worn Lipstick / Mustard Seed / Peacock Feathers / Broken China
      Joggles Cling Mounted Rubber Stamp – Definition – Inspire [33642]
      Ranger Archival Ink Pad – Jet Black
      Versamark Watermark Clear Ink Pad
      Ranger Heat It Craft Tool
      Inkssentials Glossy Accents Dimensional Clear Glaze
      Ranger Inkssentials Ink Blending Tool
      Inkssentials NonStick Craft Sheet

      Other Supplies: white & black cardstock, paint brush, White Seafoam Embossing Powder (Stampendous), transparency, Midnight Bronze Obsidian Embossing Powder (Lindy’s Stamp Gang), Out of Print Cardstock 3324 (Basic Grey), Dew Drop Bubble Jewels (The Robin’s Nest), dimensional foam tape or squares

      Here is my process:

      01-karen-sessions-nov18-foam-stamps-bubble-layout

      Protect your work surface with a Non-Stick Craft Sheet. Ink Joggles Bubbles Foam Stamp with Jet Black Archival ink and stamp the image repeatedly to completely cover the white card stock.

      03-karen-sessions-nov18-foam-stamps-bubble-layout

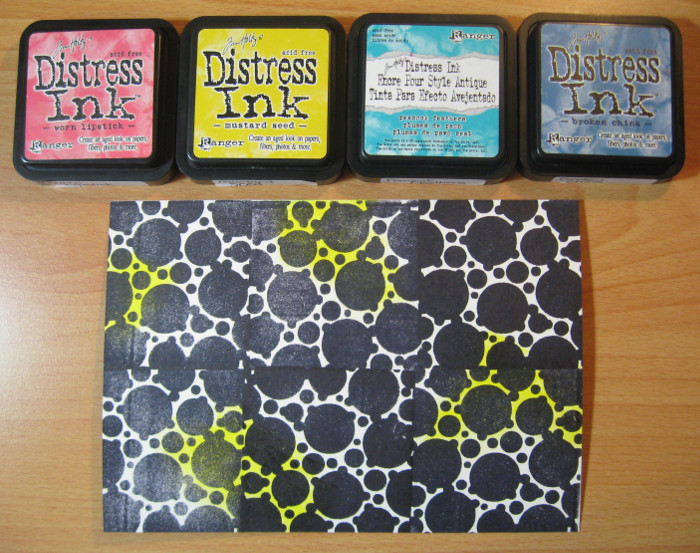
      Next, apply Tim Holtz Distress Inks over the bubble impressions using a sponge ink applicator. Blend the inks in irregular shapes allowing for some colors to overlap.

      06-karen-sessions-nov18-foam-stamps-bubble-layout

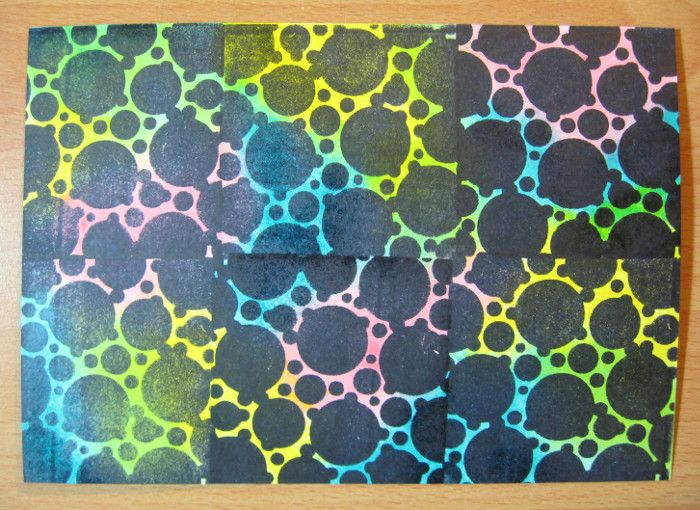
      Three areas of each color create a pleasing balance. The colours used were: (Worn Lipstick / Mustard Seed / Peacock Feathers / Broken China)

      08-karen-sessions-nov18-foam-stamps-bubble-layout

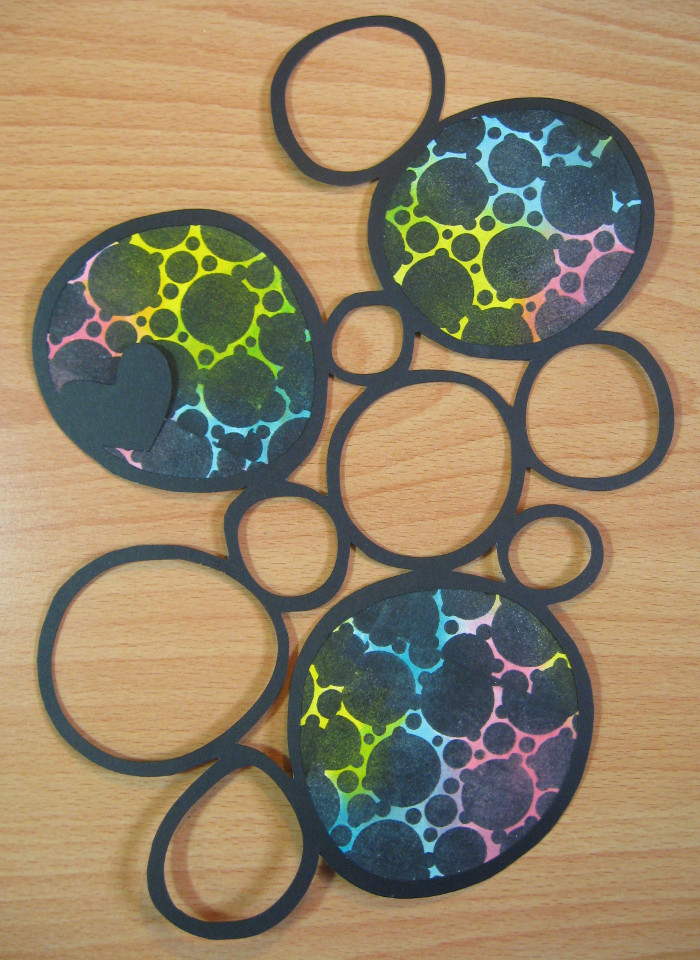
      Draw and cut out a large bubble design from black cardstock. The bubbles look better if they are not perfectly shaped but do make sure they touch so they remain connected once cut out. Vary the size of the bubbles as well. Use the stamped bubble background and mount it behind three of the larger bubble apertures. Trim away any excess overhanging paper.

      09-karen-sessions-nov18-foam-stamps-bubble-layout

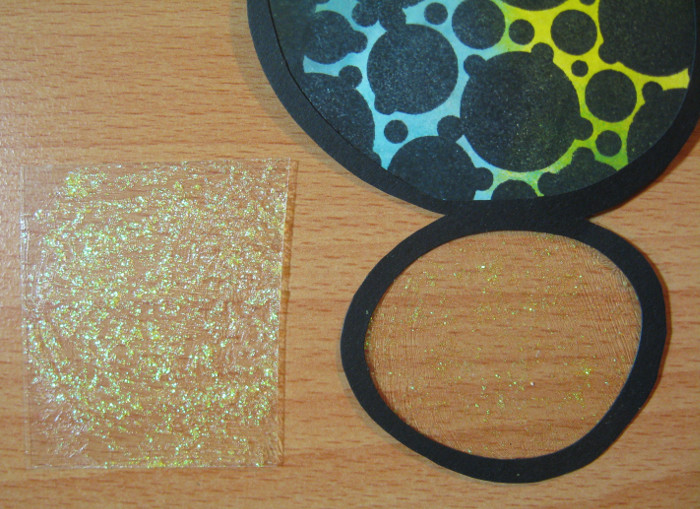
      Apply a thin layer of Bo Bunny Lemonade Double Dot Glitter Paste onto a piece of transparency with a paint brush. When thoroughly dry, mount sections of it behind three of the smaller bubble apertures. Trim away any excess transparency.

      14b-karen-sessions-nov18-foam-stamps-bubble-layout

      Cut a small heart from black card stock and apply a generous coating of Glossy Accents. Set aside to dry.

      11-karen-sessions-nov18-foam-stamps-bubble-layout

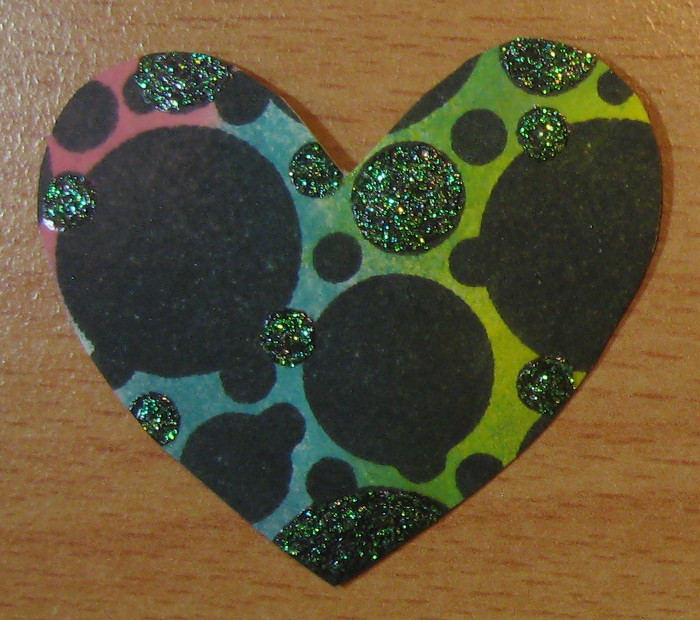
      Cut a heart from the stamped bubble background and apply Lemonade Glitter Paste randomly onto some of the small black bubbles.

      13-karen-sessions-nov18-foam-stamps-bubble-layout

      Adhere the large bubble embellishment down the right side of the 12×12″ pattern paper chosen as the base of the layout.

      14-karen-sessions-nov18-foam-stamps-bubble-layout

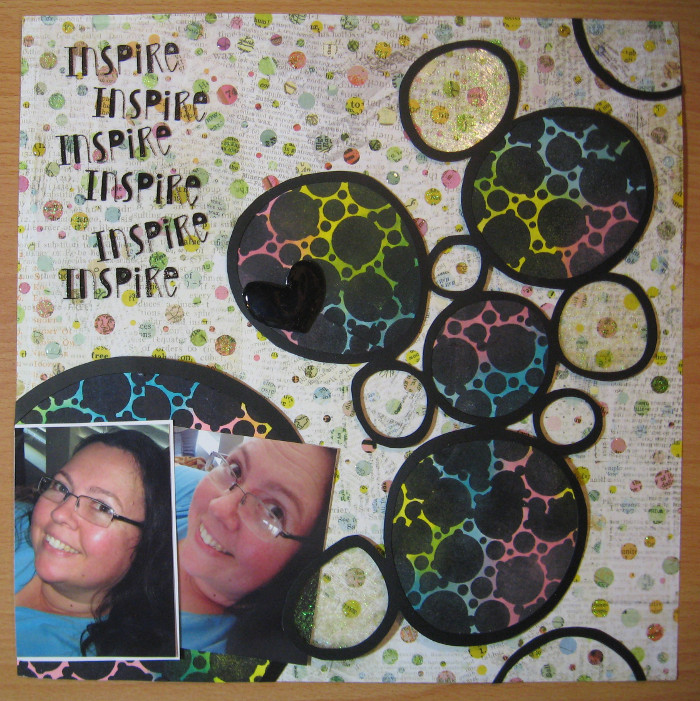
      Next, stamp Joggles Inspire Cling Stamp onto transparency with Versamark Ink to form an irregular column of the word “Inspire.” Heat emboss with black embossing powder and attach to the upper left corner of the layout. Then, add a photo cluster to the lower left corner.

      Tip: Attaching the transparency neatly can be a bit tricky so you need to do some pre-planning and cut the piece of transparency larger than you anticipate needing. To disguise the spot where adhesive is applied, place a corner of the transparency under another embellishment so that it can be adhered without any glue showing through.

      15-karen-sessions-nov18-foam-stamps-bubble-layout

      With dimensional foam tape, add the finishing touches and adhere the paper hearts and additional bubbles which were cut to look like they were going off the edges of the page. Next, apply glitter glue and Glossy Accents randomly on the background design for extra shine and shimmer.

      16-karen-sessions-nov18-foam-stamps-bubble-layout

      Finally, embellish the layout with a scattering of transparent bubble jewels.

      22-karen-sessions-nov18-foam-stamps-bubble-layout

      While I was experimenting with the bubbles foam stamp, I created a second background paper using the same design & ink supplies. This time I heat embossed the bubbles with white embossing powder. (Below left)

      23-karen-sessions-nov18-foam-stamps-bubble-layout

      Tip: After applying the distress inks, wipe over the embossed areas with a tissue to absorb any small beads of ink that are clinging to the non-absorbent plastic. Using the same four Distress Inks for the background colors but varying the color of the main image produced equally beautiful results. Notice the dramatic effects you can get by just changing from black to white embossing.

      24-karen-sessions-nov18-foam-stamps-bubble-layout

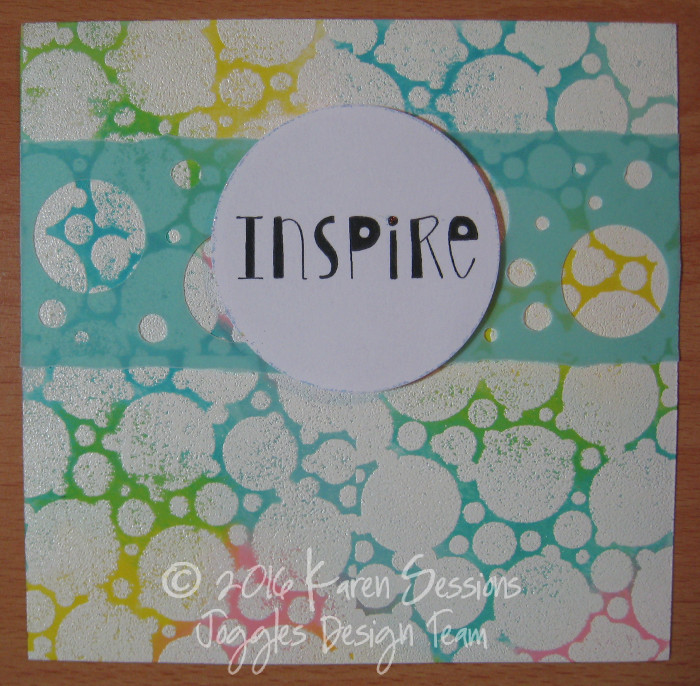
      Above,  I used the white bubble background for a simple card.

      Because foam stamps are so versatile and easy to hold & clean, it was very convenient and fun to use this Joggles Bubbles Foam Stamp and, of course, it made wonderful crisp impressions. By trying a variety of color combinations, you can really make your supplies stretch farther. I hope you have enjoyed my tutorial creating different looks with Joggles Bubbles Foam Stamp and will give foam stamping a try soon.

      Thanks & Happy Crafting.


      Card MakingDistress InksFoam Stampsscrapbook layout
      Share

      Design Team

      Bonnie Irvine

      You might also like

      New Art By Marlene Foam Stamps Are Now Available At Joggles!
      August 20, 2025
      Elizabeth’s For The Birds Collection Foam Stamps Card Making & More!
      August 8, 2025
      Elizabeth’s Klimt Inspired Scribbles & Doodles Foam Stamps Launch Today!
      May 23, 2025

      Leave A Reply


      Leave a Reply Cancel reply

      Your email address will not be published. Required fields are marked *

      • Follow Us

        FacebooktwitterpinterestyoutubeinstagramFacebooktwitterpinterestyoutubeinstagram
      • Share This Page

        FacebooktwitterredditpinterestlinkedintumblrmailFacebooktwitterredditpinterestlinkedintumblrmail
      • Recent Posts

        • Let’s Play & Create With LDRS Card Kits! October 5, 2025
        • Metal, Gold, and Klimt: Elizabeth’s Foam Stamps & Metal Leaf! October 3, 2025
        • Celebrate Creativity: It’s National Arts & Humanities Month! October 1, 2025
        • Bold Lines & Timeless Style: New FMD Stencils & Masks Launch Today! September 26, 2025
        • New Clear Stamps Designed By Elizabeth St Hilaire For Mixed Media Creating! September 24, 2025
      • Search The Joggles Blog

      • Subscribe To The Joggles Blog!

        Enter your email address to receive a notification when there’s a new blog post.

      • Categories

        • 5 Minutes Of Fun
        • Barb's Random Art Stuff
        • Design Team
        • Guest Posts
        • MidWeek Muse Video Tutorials
        • Promotions, Sales & Giveaways
        • Store Happenings
        • Uncategorized
      • Tags

        Accordion Books Alcohol Inks Art by Marlene Art Journaling ATCs Bloobel Stamps Book Making Card Making Cat Kerr Collage Sheets Cosmic Shimmer Deli Paper Dina Wakley Distress Inks Distress Oxide Inks Doodles & Tangles Dylusions Elizabeth St. Hilaire Finnabair Art Alchemy paint Foam Stamps Freebies Gelatos Gel Press Plates Gel Printing Glittery Stuff Holiday Inks & Sprays Itty Bitty ATC Stencils Joggles Products Marabu Margaret Applin Mixed Media Paint Product Spotlight Ranger Rice Paper Rubber Stamping Scrapbook Papers Stampotique Originals Stencils Sticky Snippets™ Tim Holtz Tunnel Books Video Tutorial Virginia England
      • Archives

        • October 2025
        • September 2025
        • August 2025
        • July 2025
        • June 2025
        • May 2025
        • April 2025
        • March 2025
        • February 2025
        • January 2025
        • December 2024
        • November 2024
        • October 2024
        • September 2024
        • August 2024
        • July 2024
        • June 2024
        • May 2024
        • April 2024
        • March 2024
        • February 2024
        • January 2024
        • December 2023
        • November 2023
        • October 2023
        • September 2023
        • August 2023
        • July 2023
        • June 2023
        • May 2023
        • April 2023
        • March 2023
        • February 2023
        • January 2023
        • December 2022
        • November 2022
        • October 2022
        • September 2022
        • August 2022
        • July 2022
        • June 2022
        • May 2022
        • April 2022
        • March 2022
        • February 2022
        • January 2022
        • December 2021
        • November 2021
        • October 2021
        • September 2021
        • August 2021
        • July 2021
        • June 2021
        • May 2021
        • April 2021
        • March 2021
        • February 2021
        • January 2021
        • December 2020
        • November 2020
        • October 2020
        • September 2020
        • August 2020
        • July 2020
        • June 2020
        • May 2020
        • April 2020
        • March 2020
        • February 2020
        • January 2020
        • December 2019
        • November 2019
        • October 2019
        • September 2019
        • August 2019
        • July 2019
        • June 2019
        • May 2019
        • April 2019
        • March 2019
        • February 2019
        • January 2019
        • December 2018
        • November 2018
        • October 2018
        • September 2018
        • August 2018
        • July 2018
        • June 2018
        • May 2018
        • April 2018
        • March 2018
        • February 2018
        • January 2018
        • December 2017
        • November 2017
        • October 2017
        • September 2017
        • August 2017
        • July 2017
        • June 2017
        • May 2017
        • April 2017
        • March 2017
        • February 2017
        • January 2017
        • December 2016
        • November 2016
        • October 2016
        • September 2016
        • August 2016
        • July 2016
        • June 2016
        • May 2016
        • April 2016
        • March 2016
        • February 2016
        • January 2016
        • December 2015
        • November 2015
        • October 2015
        • September 2015
        • August 2015
        • July 2015
        • June 2015
        • May 2015
        • April 2015
        • March 2015
        • February 2015
        • January 2015
        • December 2014
        • November 2014
        • October 2014
        • September 2014
        • August 2014
        • July 2014
        • June 2014
        • May 2014
        • April 2014
        • March 2014
        • February 2014
        • January 2014
        • December 2013
        • November 2013
        • October 2013
        • September 2013
        • August 2013
        • July 2013
        • June 2013
        • May 2013
        • April 2013
        • March 2013
        • February 2013
        • January 2013
        • December 2012
        • November 2012
        • October 2012
        • September 2012
        • August 2012


          © Copyright Joggles.com, Inc.