
Hi everyone. It’s Bonnie here today with some very cheeky fairies starring on layered tags. They may look angelic but they have attitude 🙂 I have added some fairy wings fussy cut from a Joggles Collage Sheet to a few of Tim Holtz’s Paper Dolls and featured them on layered up manila tags.
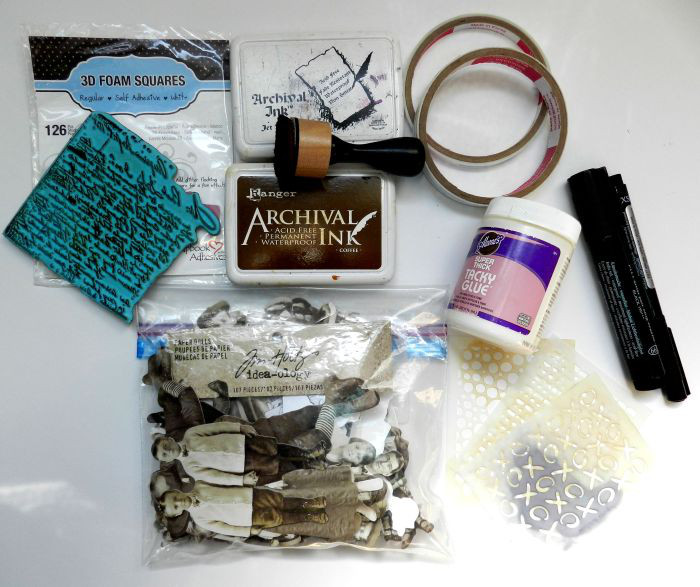
Supplies:
Joggles Itty Bitty ATC Stencils: XO; Dot Dash; Random Dots;
Joggles/Margaret Applin Designs Cling Mounted Rubber Stamp – Vintage Correspondence
Joggles Collage Sheets – Flying Things
Idea-ology by Tim Holtz – Paper Dolls
Archival Ink Pads: Coffee; Jet Black;
Ranger Inkssentials Mini Ink Blending Tool
Faber Castell Pitt Big Brush Pen – Black
Faber Castell Pitt Artist Pen – Super Fine Tip – Black
Aleene’s Super Thick Tacky Glue – 4 oz. jar
Scrapbook Adhesives 3D Self-Adhesive Foam Squares .5 x .5 inches
Other: #8 manila tags; .5 and .25 hole punches; black, white, and kraft card stock; lace; vintage ephemera – music, book, map paper; Star punch; heart die; vintage buttons; cheesecloth; sewing machine; Idea-ology rub-ons; small merchandise tag; punched butterfly; corrugated card stock; sari silk ribbon;black and white checked paper scrap;
Here is my process…hope you packed a lunch:
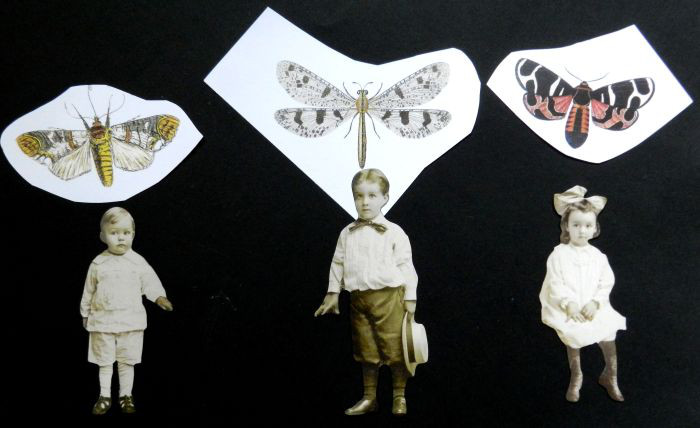
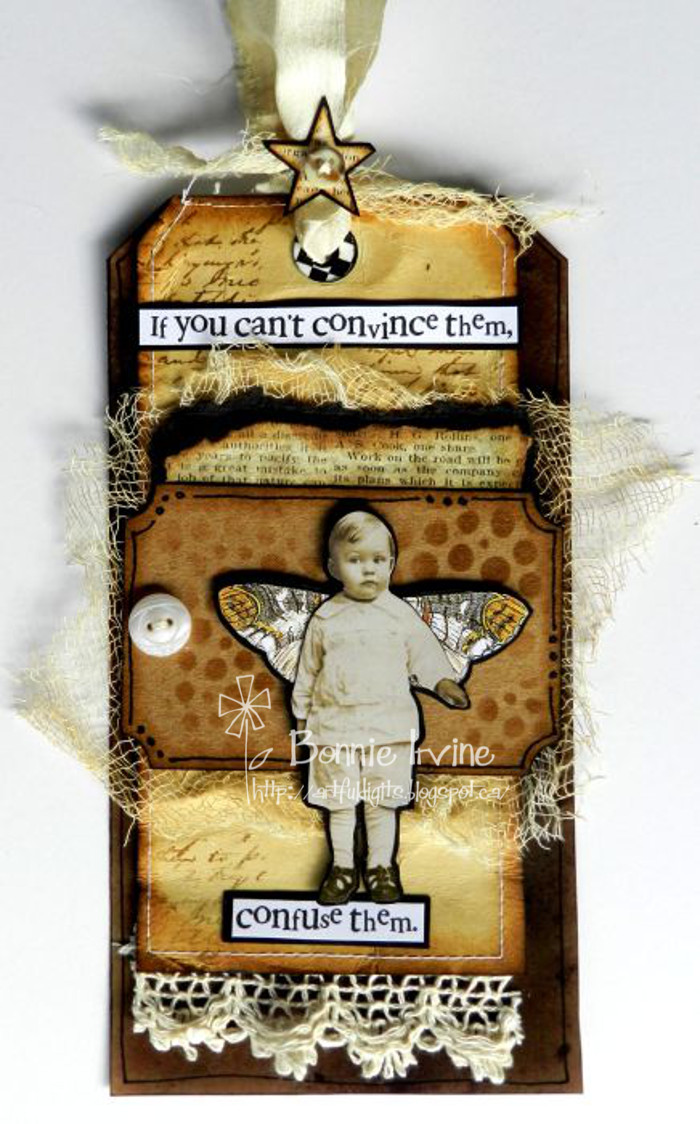
When I begin a project, I often have only a vague idea of what I want to do so I usually start with that and build from there until my mojo kicks in. Then I just let it tell me what to do next. In this case, I knew that I wanted to add wings to three of Tim Holtz’s Paper Dolls so I chose the three images first and then went through my Joggles collage sheets to find the “best” wings for each. In this case, they were all on the same sheet called Flying Things.
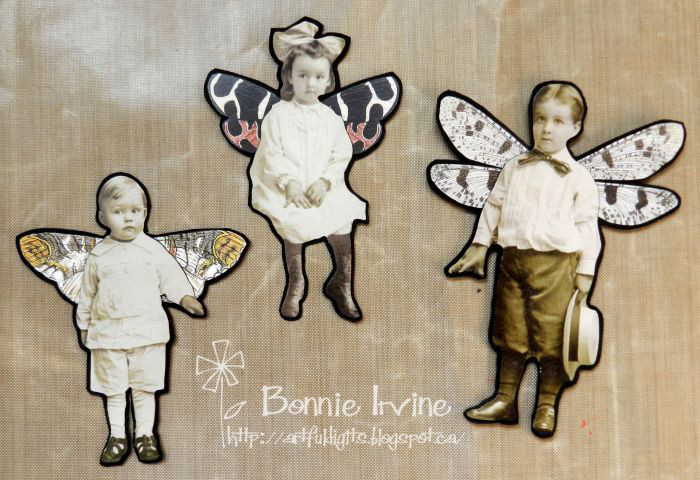
I fussy cut the wings and adhered them to the back of the images, then adhered the newly winged images to black card stock, and fussy cut leaving a narrow black border. I know how I work and therefore knew that the black would help these wee fairies stand out against any busy background I might create.
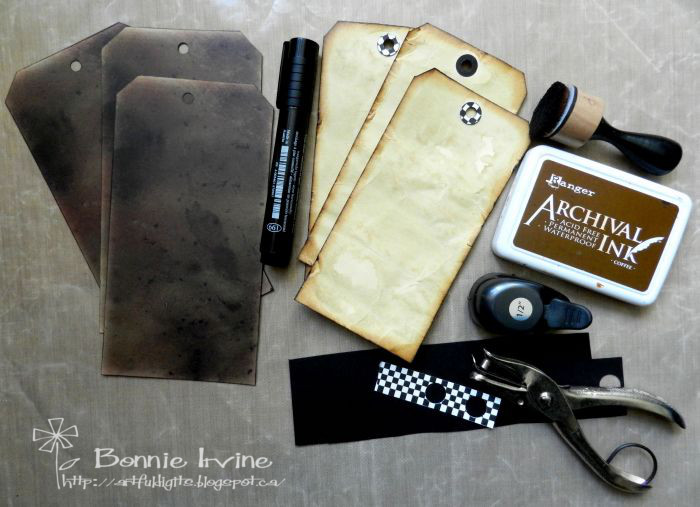
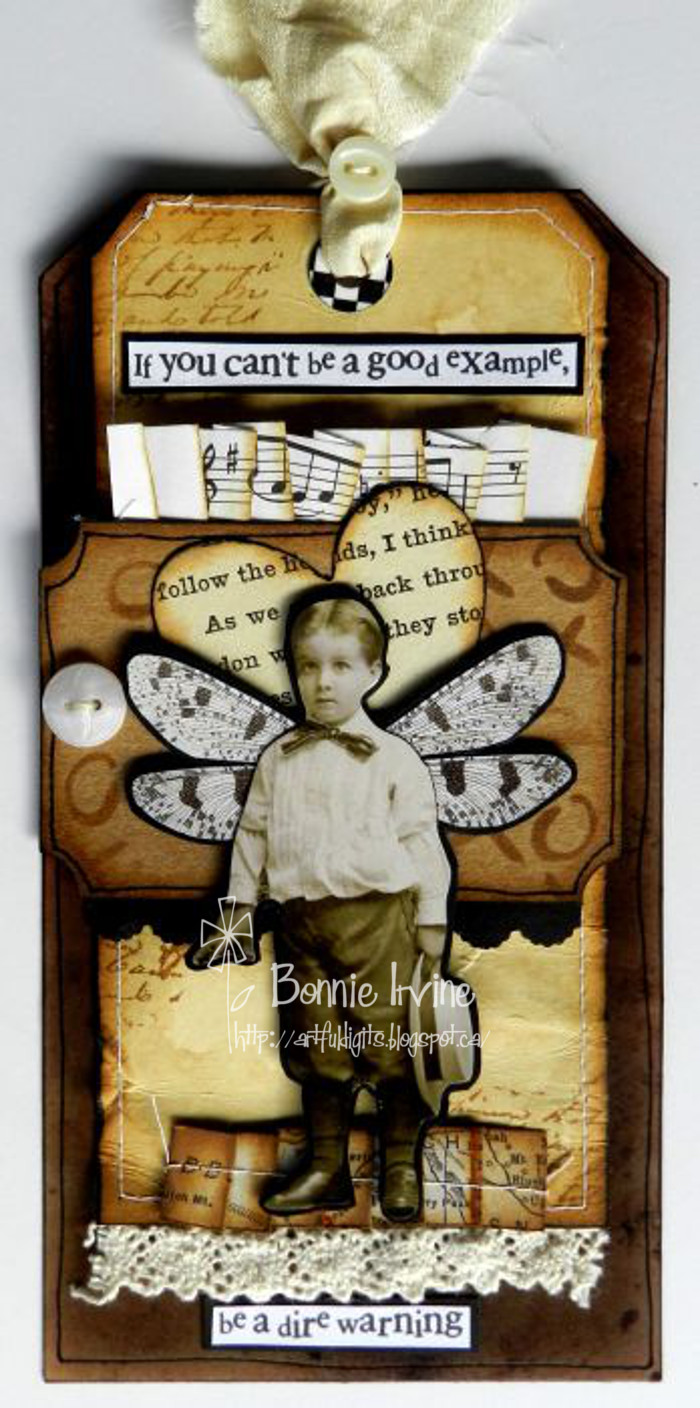
I have been creating a kraft, black, and cream junk journal for a while now so I decided that I would continue with that palette for these tags. That way, I could include them in my journal. For my first layer, I had three brown packaging rectangles from Tim Holtz Layered Stencils…these companies spend a lot of effort to make gorgeous packaging so I always re-use what I can. I also had three coffee dyed #8 size (3 1/8 x 6 1/4 inches) manila tags from a previous coffee bath/baking session. I inked the edges of those three tags with Coffee Archival Ink (how appropriate) and changed out the reinforcement circle to black and white check. I do that by punching a .25 inch hole and then a .5 inch circle around that to make the new ring.
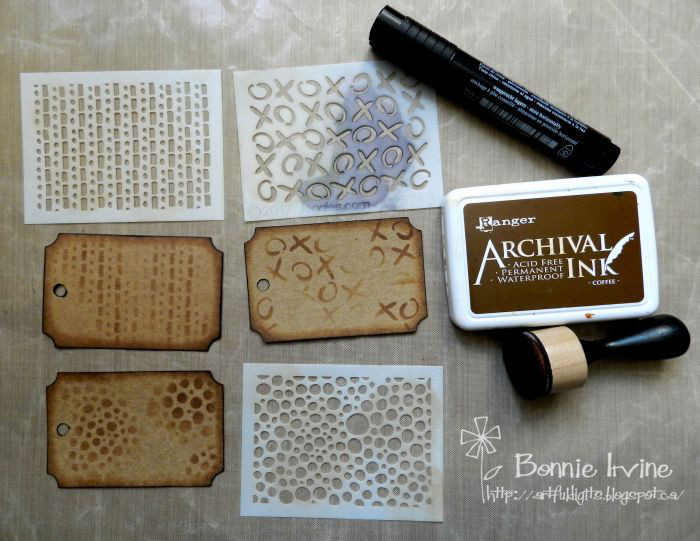
I wanted to layer stencilled kraft tags horizontally over the manila tags. When I find a tag shape I like, I make a template with heavy card stock. I pulled one of these out and cut three from kraft card stock. The edges were inked with Coffee Archival Ink and the same ink was used for stencilling. These Joggles Itty Bitty ATC Stencils, in this case XO, Dot Dash, and Random Dots, are the ideal scale for smaller (2.25 x 3.5 inch) tags. Black Big Brush Pen was used to darken the edges and the holes.

Before adhering the kraft tags to the manila tags, Joggles/Margaret Applin Designs Vintage Correspondence Rubber Stamp was inked with Coffee Archival and applied here and there to add texture and interest to the plain tags. At this point, a quick trip to the sewing machine to stitch around each of the tags added a little more texture and detail.
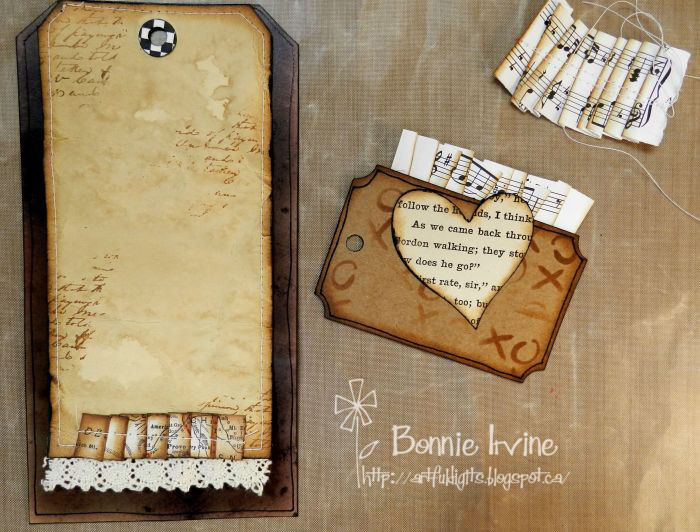
And now the true playing began! I auditioned various elements to see what made me smile. Because I am working on a junk journal, I have collections of elements pre-made from vintage music, book, and map papers to add at will. I adhered crocheted lace to the underside of the manila tag bottom. You can see above two examples of accordion folded and inked map strips and music paper strips, both of which I had stitched on the sewing machine. I also have all kinds of punched or die cut shapes from corrugated card board, or vintage papers like the book text heart on the smaller tag. Often when I want to create something but don’t have a big block of time or a specific idea in mind, I will punch, fold, stitch, and ink a bunch of elements to have on hand for future projects.
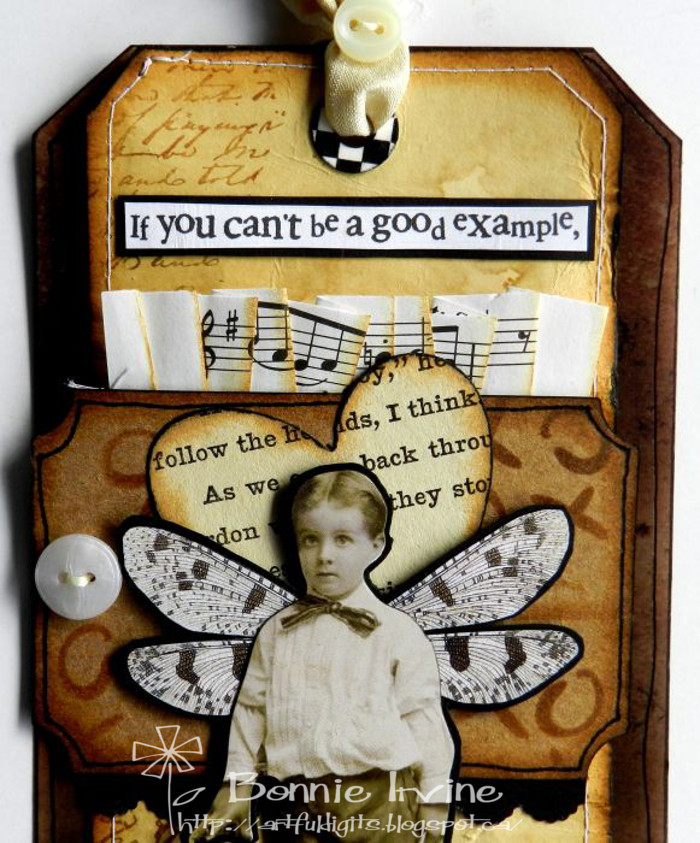
The sayings were printed onto white card stock, cut into segments, and matted with black. Scor Tape was used to adhere them to the manila tags. The kraft tags were given a doodled border with a Fine Black Pitt Pen and a threaded button was used to hide the hole. They were then adhered to the larger stacked tags with Scor Tape. Silk Sari ribbon was used as the tag topper and a button was stitched through it as a final detail.
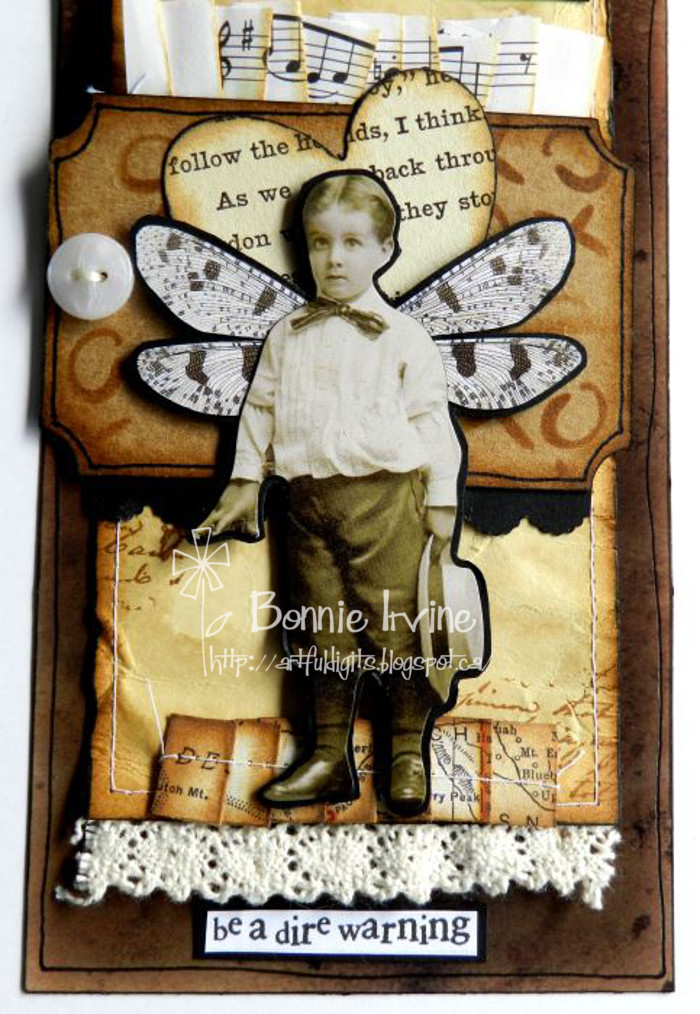
The image was popped up on foam squares and before he was adhered to the background, a black scalloped strip was added to the bottom edge of the kraft tag…had to get that black in there 🙂 A loose border was doodled on the brown packaging layer and black Big Brush Pen was used to ink the edges to finish it off.
And here is the completed first tag!
The other two tags were constructed in much the same way so I will only point out the differences.
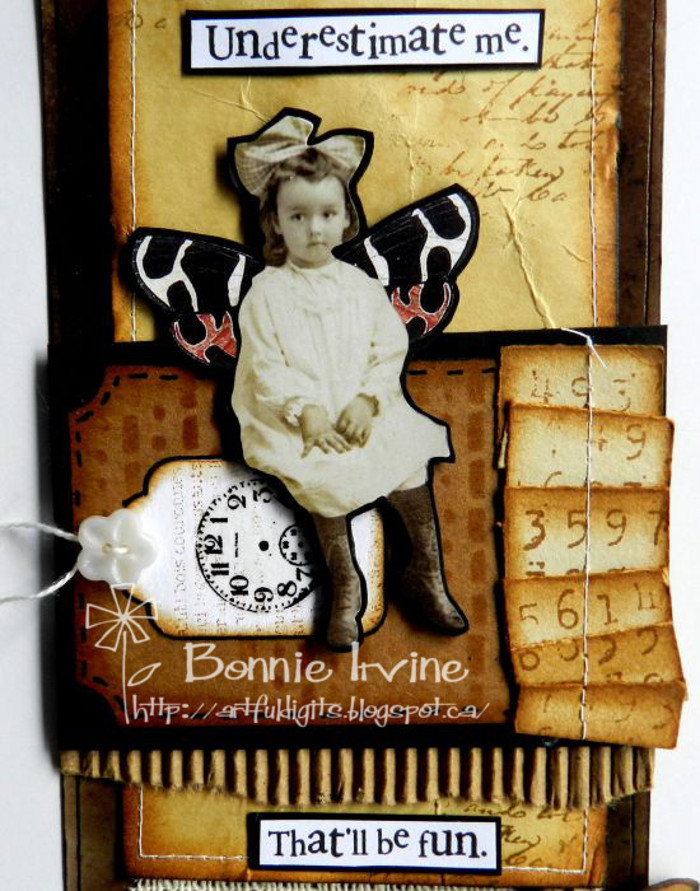
This little darlin’ needed a place to sit so a smaller shipping tag which had been stamped with text and given an Idea-ology rub-on clock was layered over the kraft tag. The tag string was threaded through the white vintage button before the whole thing was adhered to the kraft tag. Another of those accordion folded, stitched and, in this case number stamped, elements was adhered along the right end of the kraft tag. The entire tag was matted with black card stock and a torn piece of corrugated coffee sleeve was layered under the bottom edge of the black before it was adhered to the main tag. A layered punched butterfly was glued onto the edge of the crocheted trim.
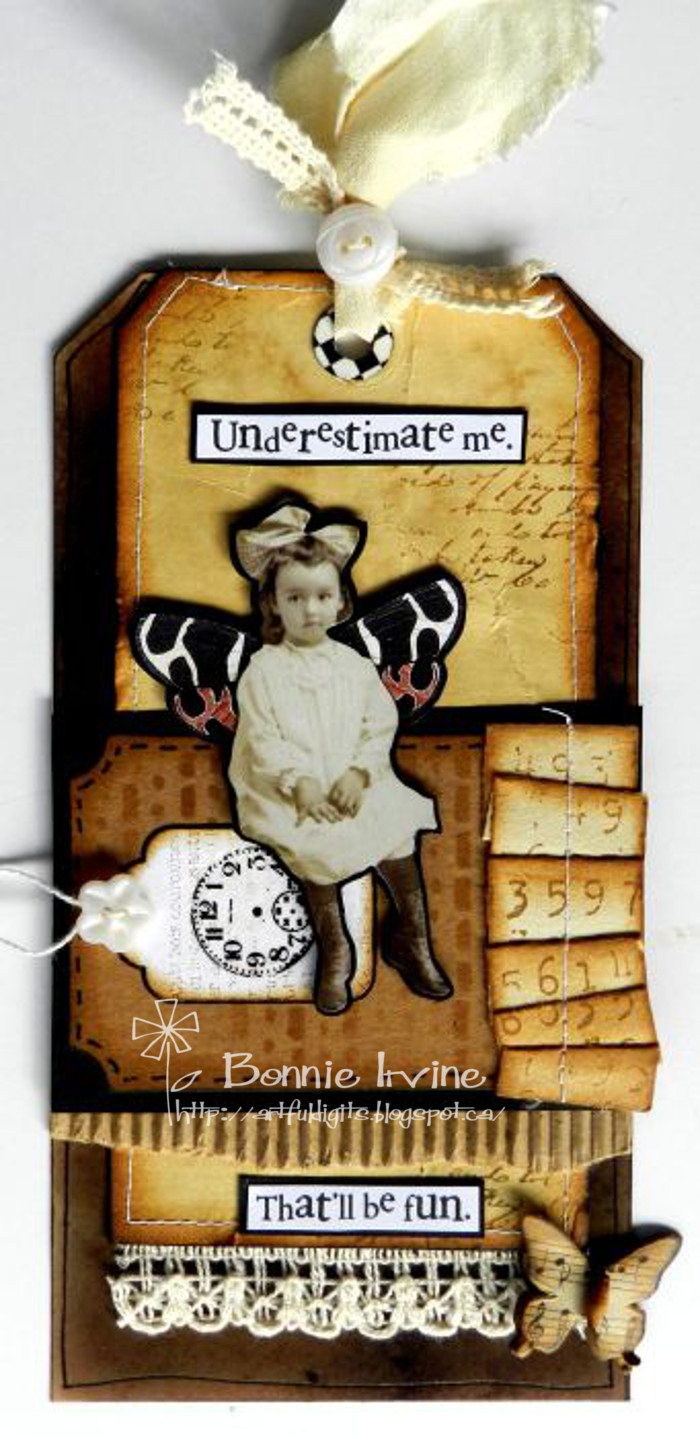
More sari ribbon, tied with a length of crocheted lace and a sewn button, finished the second tag.
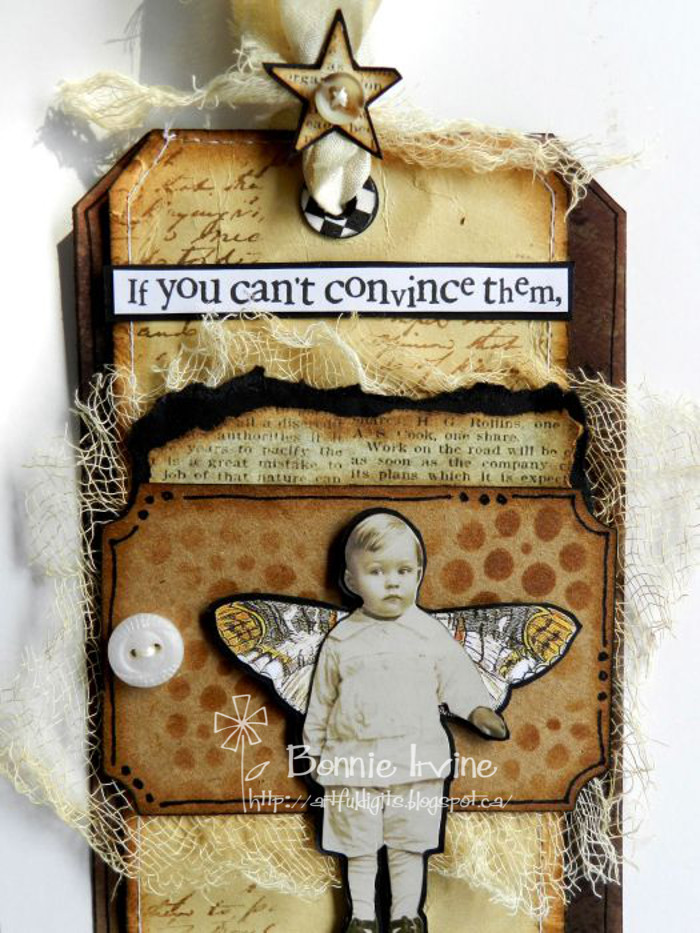
The final tag has a layer of coffee dyed cheesecloth placed under the kraft tag which had been topped by a torn strip of black and of book text paper. His tag topper has a punched and matted book text star with a threaded button center used to tie off the sari ribbon.
In all three tags, you can see that I kept many of the steps similar but varied the details. For example, all kraft tags had a doodled border but each border was slightly different. All had crocheted lace trims but the patterns were all different. All had sari ribbon toppers tied with buttons but different elements were added to change it up. This keeps the look cohesive but makes each one unique and interesting to examine.
Thanks for joining me today. I thoroughly enjoyed creating these whimsical tags and see many more in my future. I hope you see a few in yours, too.
17 Comments
These are so cute!
Thanks so much, Terry!
Bonnie, these are just a riot — definitely cheeky fairies! Actually, they remind me of more than a few second grade students I had when I was teaching…… Thanks for the great chuckle to start my day.
I am a retired teacher as well. These kids were always the ones who gave me the most laughs…while trying to maintain a straight face 🙂 I’m glad you share my sense of humour, Donna.
These are wonderful!! So fun. Thank you.
Thanks, Gracie. I smiled the whole time I was making them. Of course, having the cheeky fairies staring at me from my desk while they awaited their new homes helped that 🙂
Cheeky Bonnie! Thanks for the chuckles and also the techniques.
Bonnie, these are Wonderful!
I can’t begin to tell you how amazing these are. You aren’t just the queen of fussy cutting – you are the queen of exquisite detail. And what is it about tags that is so darn appealing? Love, love, love.
Thanks for the kind words, Sue. I love making tags…don’t do it often enough but each time I return to it, I truly enjoy the process. I also love adding little details to my art…and more is usually better…LOL. Those are the things that make me smile.
I just bought this package of Paper Dolls yesterday. I love what you did on these tags and am going to try and make some. Yours are just outstanding. Thank you so much for a great idea. ~~rita
Rita, I would love to see what you create with them. They are such fun and the possibilities seem endless for them. They all have stories to tell and so much to say. Have fun with them and thanks for the words of encouragement.
Fabulous tags Bonnie, love the vintage colour palette.
Hi Bonnie,
Love these tags! Had to make my own, so posting pics of the ones I made. Thanks for the inspiration!
Not sure why they are sideways!
Number 3! Not quite as fancy as yours!
These are such fun! Definitely inspiring. Where did the sentiments you used come from?