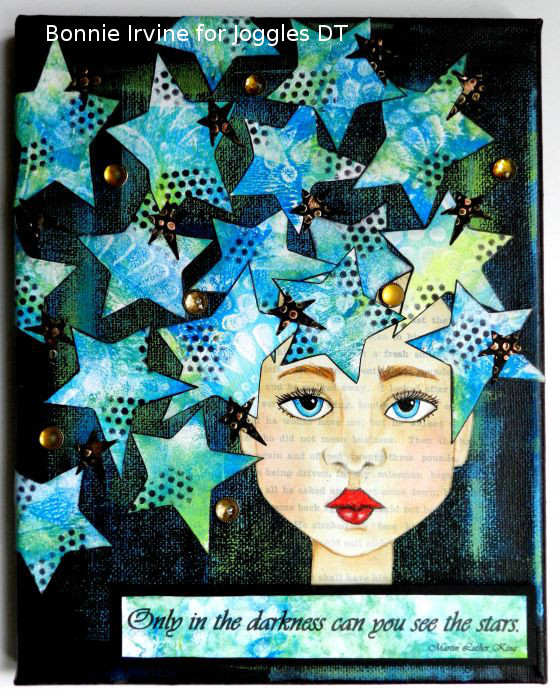
Hi everyone. It’s Bonnie here today with a mixed media canvas featuring a sweet face created with some of the Joggles/Margaret Applin Designs Fearless Face System Stencils and stars created with Joggles Foam Stamps.

Supplies:
Windsor Newton Stretched Cotton Canvas – 8 x 10 inches
Dina Wakley Media White Gesso – 2 oz. tube
Dina Wakley Media Gel Medium – 2 oz. tube
Liquitex Basics Acrylic Paint: Cerulean Blue Hue, Light Blue Permanent, Brilliant Yellow Green
Joggles Foam Stamps: Star Set #1, Teardrops in the Round
Speedball 4 inch Rubber Brayer – Soft
Gel Press Reusable Print Plate – 5 x 7 inches
Faber Castell Gelatos: Blueberry, Cherry, Chocolate, Iced Chai, Peach, Snow Cone, Watermelon
Faber Castell Pitt Big Brush Pen – Black
Joggles Stencil – Punchinella Quintet – Minis
Ranger Inkssentials Mini Ink Blending Tool
Aleene’s Super Thick Tacky Glue – 4 ounce jar
Scrapbook Adhesives 3D Self Adhesive Foam Squares
Faber Castell Pitt Artist Pen – (S) Super Fine – Black
Caran D’Ache Neocolor II Pastels
Other Supplies: brushes, white card stock, Derwent Inktense pencils, scissors, Treasure Gold (substitute Inka Gold by Viva Decor – Copper, Gold, Champagne), gems, embossing folder and tool.
Here is my process:
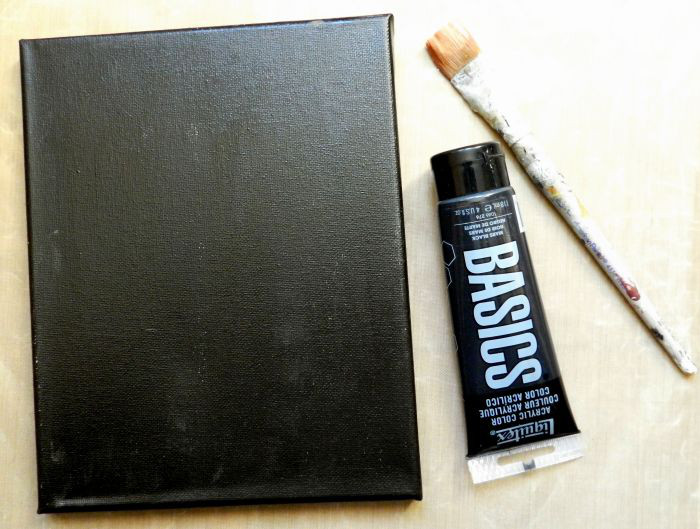
To prep the 8 x 10 inch canvas, I applied Liquitex Basics Mars Black Acrylic paint with a brush. I wasn’t worried about slight imperfections or lighter areas as I knew many layers were to follow.
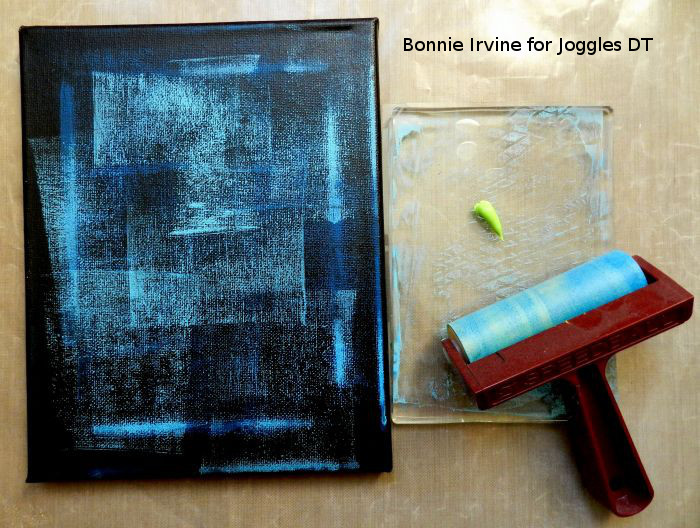
I wanted to apply three colours ( Cerulean Blue Hue, Light Blue Permanent, Brilliant Yellow Green) of Liquitex Basics Acrylic paints lightly with a brayer over the black basecoat because I love the sketchy/scratchy look it creates over the canvas texture. In order to minimize paint waste, I placed dabs of each colour one at a time onto a 5 x 7 inch Gel Press Plate and rolled out the paint with the brayer. Then the brayer was lightly scuffed horizontally and vertically onto the black background.
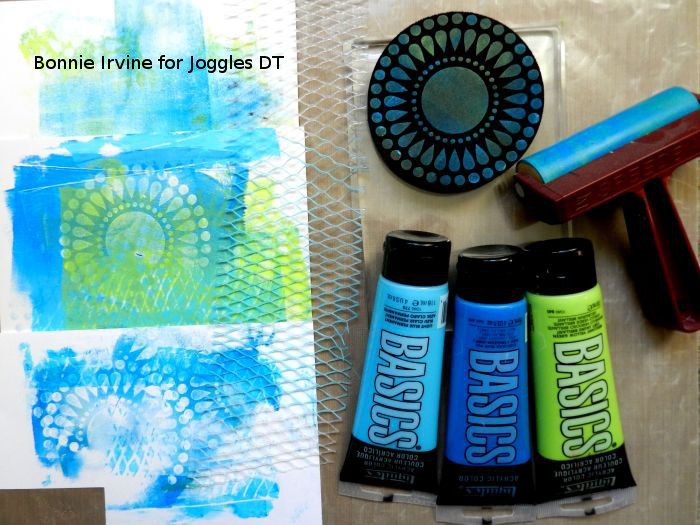
There was still a fair amount of paint on the plate so before switching to the next colour, Joggles Teardrops in the Round Foam Stamp and also some plastic mesh packaging were stamped onto that paint and then off onto extra card stock. Several prints were pulled and layered from each colour for later use. I love having a stack of these extras on hand.
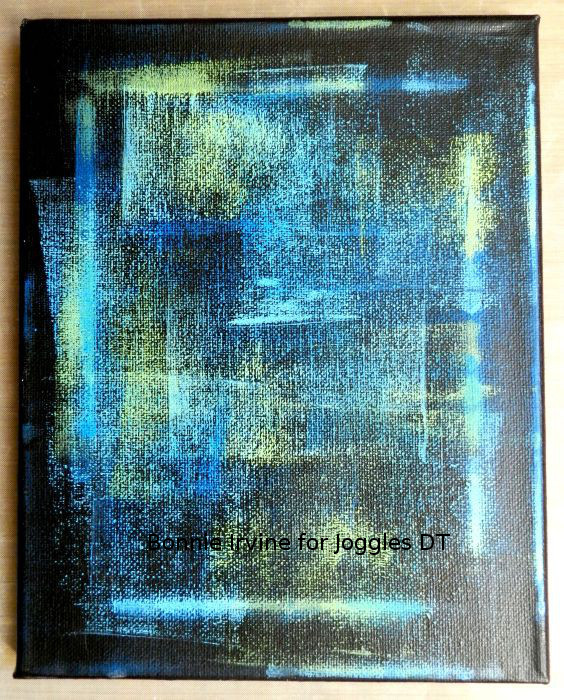
This is the canvas with the brayered layers of the three colours. I added each of the colour layers twice until I was happy with the depth and placement of colour.
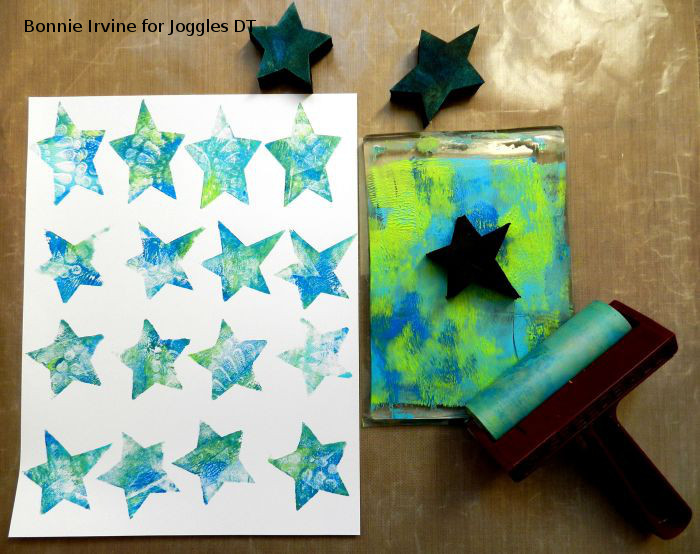
The same three Liquitex Basics paints were added to the Gel Press Plate together this time and brayered out to cover the plate. The Joggles Teardrops in the Round Foam Stamp was again used to pull paint off the plate, leaving a pattern. Then each of the three sizes of the Joggles Star Set #1 Foam Stamps were stamped into the wet paint on the plate and then stamped off onto white card stock many times. When the paint ran low on the plate, I re-loaded, repeated the patterning process, and continued stamping. This is cool because each stamped star was different and the imperfection of the shapes was exactly what I wanted.
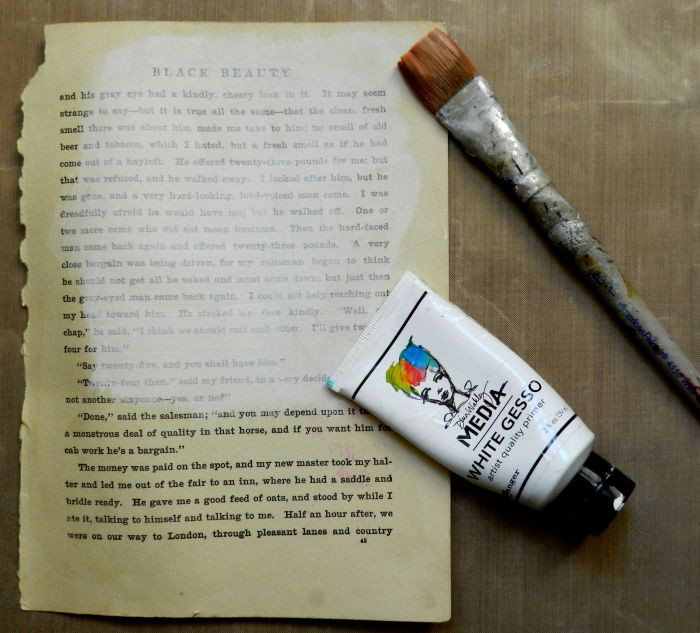
I love using pages from old books and often pick them up at thrift stores. I tore out one of the pages and spread gesso onto enough of the page to accommodate the largest size face from Joggles/Margaret Applin Fearless Face Stencil System.
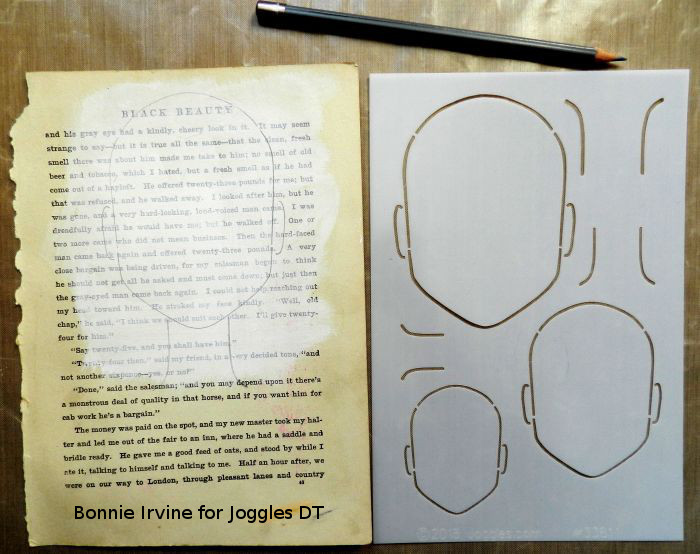
Once the gesso was thoroughly dry, I used a gray water colour pencil to trace the large round face from the Joggles/Margaret Applin Designs Fearless Face Stencil System onto the gessoed book text. I didn’t want a harsh black line but when using this fragile vintage book paper again, I would use a Derwent Inktense Pencil in a medium brown colour. It uses less water to activate, is a softer pencil so it wouldn’t “engrave” the paper, and would be a better shade to blend into the skintones of the face.

The features were added with the same water colour pencil using the Facial Features #2 stencil.
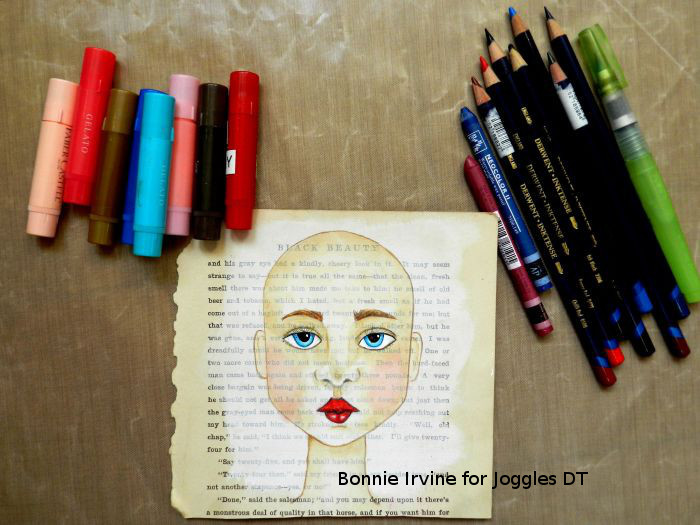
Gelatos were used to add colour to the face. Sometimes the Gelato was added directly to the area like with the skin tones ( Peach, White, Watermelon) and either spread with a water brush or with my finger. Other times a small brush was loaded with water, applied to the Gelato, and transferred to the paper. The shading of the skin (Iced Chai, Chocolate), the lips (Cherry), and the eyes (Snow Cone, Blueberry) were done this way. Further shading and deepening of some colours was done with Derwent Inktense pencils or Neocolor II crayons because the paper, being fragile and old, would only take so much water and the Inktense colour is much stronger, requiring fewer layers. Once dry, a fixative spray was used to seal the face.
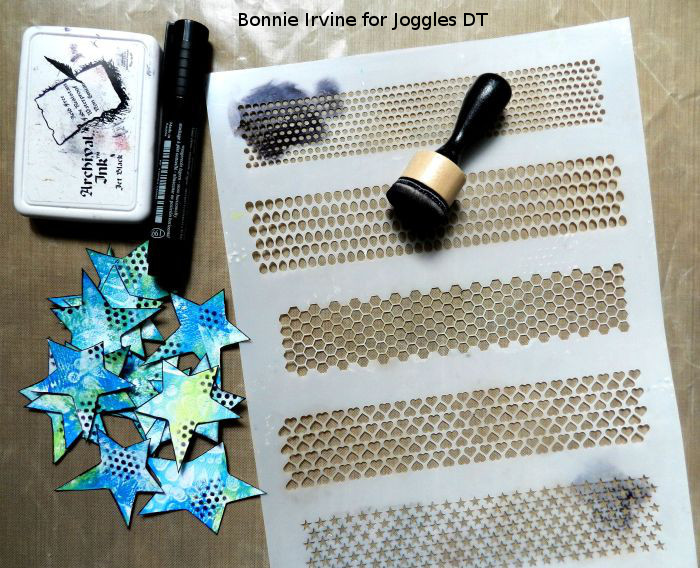
The stars which were stamped earlier were fussy cut and edged with Faber Castell Black Big Brush Pen. They were also stencilled with Jet Black Archival Ink and Joggles Punchinella Quintet- Minis Stencil.
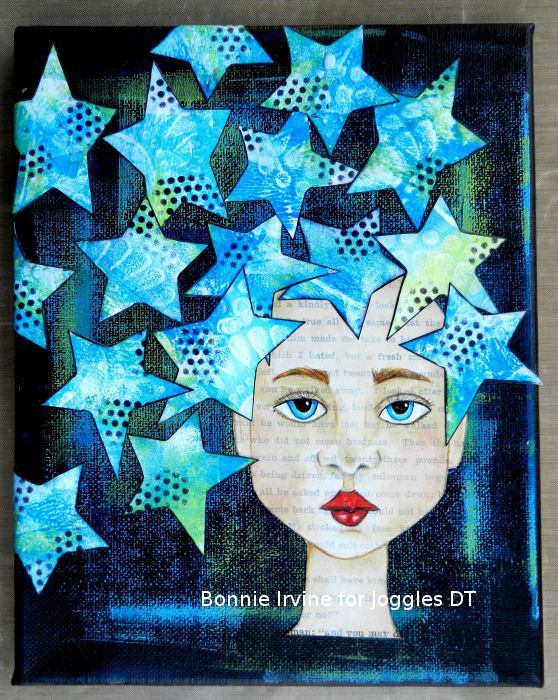
Both the fussy cut head and the stars were adhered to the canvas with Dina Wakley Media Gel Medium.

Small stars were punched and embossed from black card stock. The raised areas were highlighted with three colours of metallic pastes using my finger to apply it. Inka Gold would work well for this step.

These were scattered among the painted stars and added to the canvas using Aleene’s Super Thick Tacky Glue. Sparkly gems were also adhered among the stars.
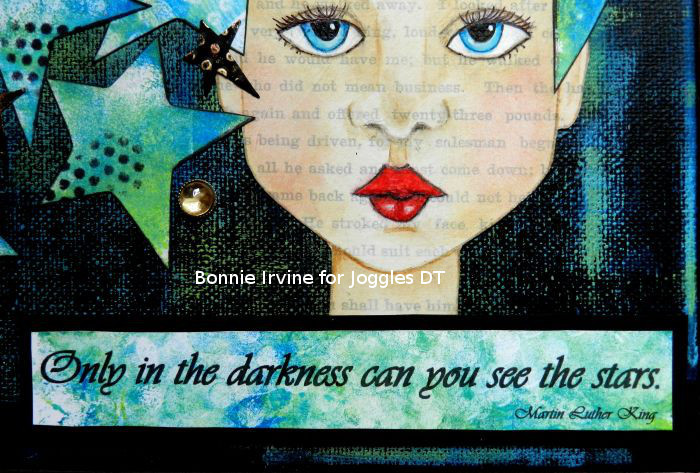
A wonderful quote by Martin Luther King Junior was printed onto a rectangle cut from one of those extra Gel Press Plate prints I pulled earlier. It was cut to size, matted with black card stock, and popped up on foam squares to add dimension. This was adhered across the bottom of the canvas covering part of her neck.
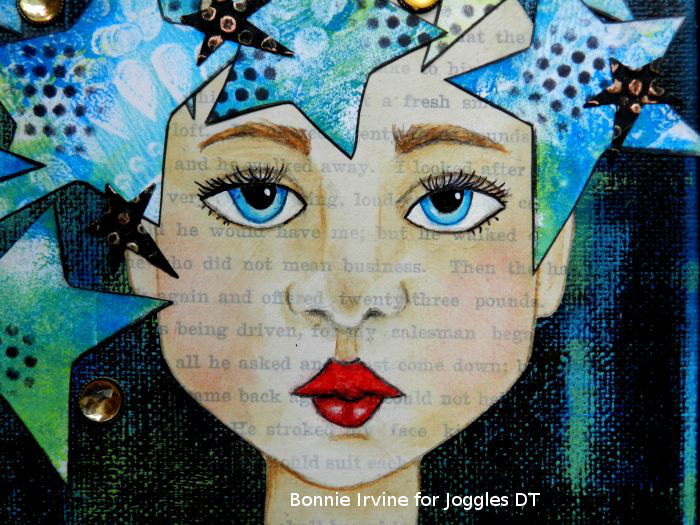
Before calling the canvas finished, I did go back and darken the outlining of her eyes and lashes with a black Super Fine Faber Castell Pitt Artist pen. It made her eyes pop a little more and strengthened them to be a better match for those vibrant red lips 🙂
Thanks for joining me today. My starry friend and I appreciate that. If you haven’t had a chance to get the scoop on the Joggles/Margaret Applin Fearless Face Stencil System, Barb created a fabulous video demoing them here. As far as both the stencil system and the foam stamps go…love ’em and the possibilities they present. Bet you will, too!
2 Comments
What an awesome canvas !! I just LOVE the colors, all the stars and the overall design.
Thank you also for the very detailed tutorial. Fabulous way you created this background. I found your description easy to understand and very inspirational.
Thanks for sharing your lovely art.
Hugs from Monica
Spain
I just found this in my old email! Bonnie you do such beautiful work! The shading of the face is perfection! All the extras you add like embossing the small stars and giving a touch of gold–again just fabulous! Thank you again.