
Good morning, Amy here, and today I’m excited to share with you my journal page using a few of Joggles’ fabulous new foam stamps. They are delightful to play with and give a great crisp impression every time! Not to mention they are so easy to clean up afterwards. The minute I saw the Wonky Layered Circles Small, Wonky Layered Ovals Small and Teardrops In The Round Joggles Foam Stamps, I knew that I wanted to turn them into flowers. Here’s my tutorial on using these fun stamps and vibrant colors on a journal page.
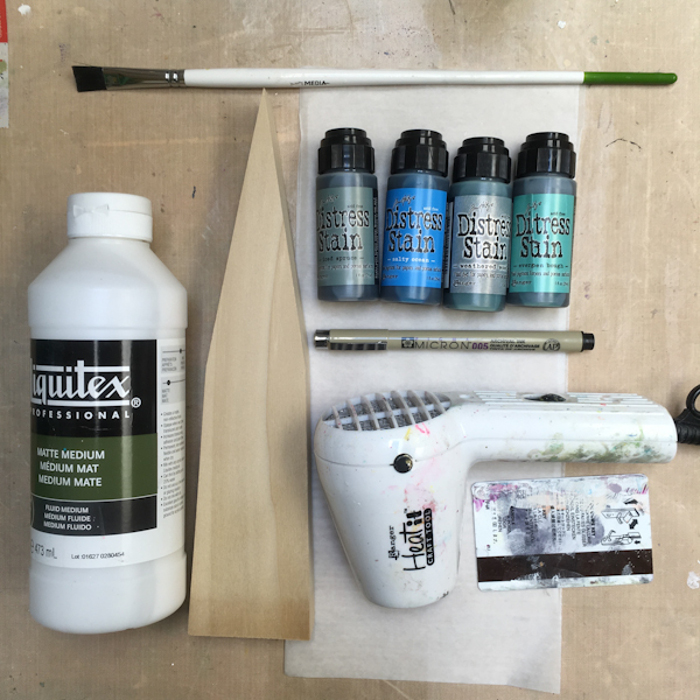
Supplies used:
Dylusions Creative Journal – Large
Joggles Foam Stamps: Teardrops In The Round, Wonky Layered Circles Small, Wonky Layered Ovals Small, Dotted Leaf Small, Bubbles and Wonky Striped Border
Dylusions Paint by Dyan Reaveley: Crushed Grape, Lemon Zest, Squeezed Orange, Postbox Red and Cherry Pie
Archival Ink Pads: Deep Purple, Leaf Green and Magenta Hue
ColorBox Cat Eyes – Frost White
Tim Holtz Mini Distress Ink Pad – Wild Honey
Dina Wakley Media Stencil – Essentials
Ranger Inkssentials Mini Ink Blending Tool and Ranger Inkssentials Mini Ink Blending Replacement Foam
Faber Castell PITT Pens: [F] Fine Tip – Black and Chrome Green Opaque
Faber Castell Stamper’s White Big Brush Pen
Faber Castell Gelatos: Coconut, Snow Cone, Gold and Watermelon
Karat Aquarell 125 Professional Watercolour Pencils: Grey and Purple
Recollections Glass Beads
Golden Matte Medium
Zig 2 Way Glue Pen
Black Cardstock
Scissors
Paper Trimmer
Here is my process:

Start by blending Dylusions Paints in Grape Crush and Lemon Zest onto the Large Dylusions Creative Journal page using the Mini Ink Blending Tool. Quick Tip: I find by drying in between layers/colors – either by air-drying or using a heat tool – you get a smoother transition blending the colors.

Use your fingers to finishing blending the Dylusions paints once you have the color base down that you’re happy with.

Using the Mini Ink Blending tool, apply the Cherry Pie Dylusions Paint onto the Teardrops In The Round Joggles Foam Stamp and stamp onto a spare sheet from the journal. Fussy cut around it leaving a slight border and set this aside. The great thing with Dylusions Paints is that they dry quickly.

I love using stencils for added texture in the background of my journal pages. Using the Mini Blending Tool, apply the Wild Honey Tim Holtz Distress Ink through the Dina Wakley “Essentials” Stencil in random spots around the journal page. Be sure to let this dry before going to the next step or your ink may smear.

Again, using the Mini Blending Tool, apply the Crushed Grape and Squeezed Orange Dylusions Paints onto the Wonky Layered Circles Small Joggles Foam Stamp and stamp towards the bottom half of the journal page – I stamped it twice. Quick Tip: I use different Ranger Inkssentials Mini Ink Blending Replacement Foams for each paint color along with several of the Mini Ink Blending Tools so you are not constantly switching the foam pads and there is no cross contamination in your paint containers.

Now, apply Postbox Red Dylusions Paint onto the Wonky Layered Ovals Small Joggles Foam Stamp and stamp it twice onto the journal page – just a little lower than where the Wonky Layered Circles was stamped in the previous step.
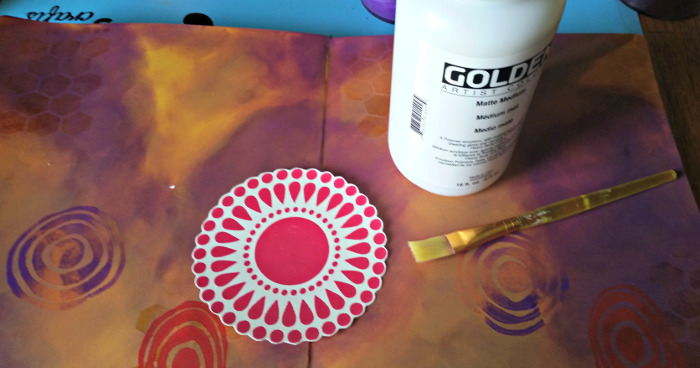
Grab the cutout of the Teardrops In The Round Joggles Foam Stamp from step 3 and glue it onto the center of your journal page using Golden Matte Medium. I placed mine higher than the previous stamps used, as it is larger and I wanted that to be my focal point.

Using the Deep Purple Archival Ink with the Wonky Striped Border Joggles Foam Stamp, stamp a border all along the edges of your journal page. Again, let this dry to prevent smearing.

Now to turn our stamped shapes into flowers! Using a pencil, sketch in some stems for the “flowers” then color the stems in using the Chrome Green PITT Brush Pen.

I decided my background needed a little more texture. So using the Bubbles Joggles Foam Stamp and Magenta Hue Archival Ink, stamp only a portion of the Bubbles image onto random spots of your page, by curling the foam stamp when pressing down for the impression. These foam stamps are very flexible and are great for stamping only a portion of the image.
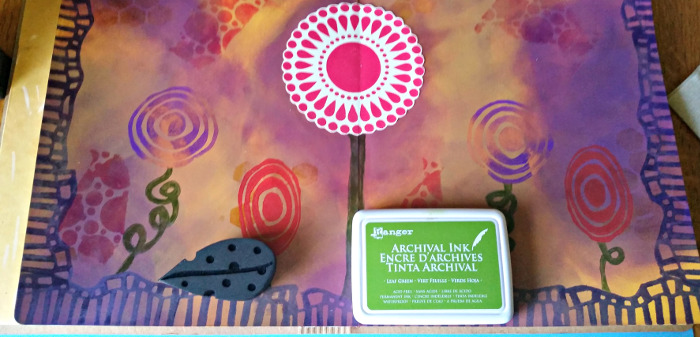
Using the Leaf Green Archival Ink and Dotted Leaf Small Joggles Foam Stamp, stamp leaves onto the stem of the Teardrops In The Round “flower”.

Use the Uni Ball Signo White Pen to highlight/doodle on your “flowers”.

To lend a more whimsical feel to my page, I did a Bokeh Effect Technique using a homemade stencil – which is a piece of acetate with different sized die cut circles – but any stencil with different sized shapes on it will work. Using a make-up foam pad and the Frost White ColorBox Cat Eyes Ink, ink your circles thru the stencil onto your page and layer throughout without re-inking your foam pad. This gives the effect of the bubbles being close-up or further in the distance.

Once the bubbles are dry, highlight them with Gelatos, by blending only one side of the bubble. I used Coconut, Snow Cone, Gold and Watermelon Gelatos.

Use the watercolor pencils in Purple and Grey to highlight the bubbles that overlap each other, by blending the lines with your finger. This gives the overlapping bubbles dimension.

Color portions of the Wonky Striped Border with the White Faber Castell Stamper’s Big Brush Pen to add some more color contrast and dimension to your border.

Print the computer generated word “Bloom” onto some white printer paper and trim around the word with a Mini Paper Trimmer. Then mat it onto black cardstock with the Zig 2 Way glue. Quick Tip: By matting your phrases/sentiments onto some black cardstock, it allows the word to stand out against our vibrant and busy background.
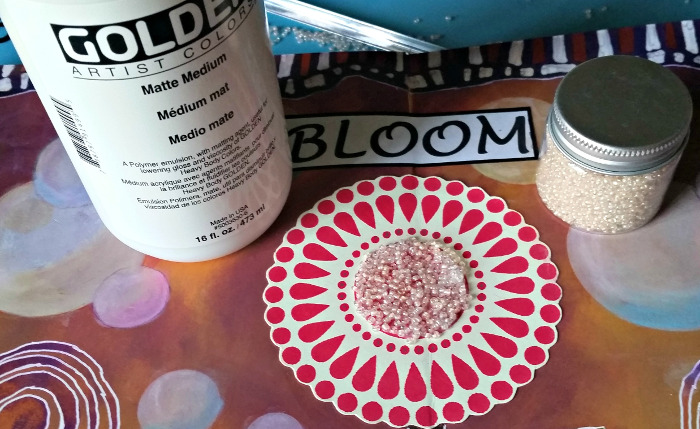
The final step to the journal page is adding some Golden Matte Medium in the center of the Teardrops In The Round “flower” and sprinkling with the Recollections Glass Beads. This just gives some fun and pretty dimension to your focal “flower”.
I sure hope I’ve inspired you to boldly use color and have given you some fun ways to use these wonderful Joggles Foam Stamps in your art projects. Don’t forget to show us your journal pages at the Joggles Art Adventure FB Group; we’d love to see what you make. Thank you for joining me today, and happy craftin’!
8 Comments
Such a fun, fun page. Thanks for all the detail and sharing your process with us.!
Thank you so much Diana, I had a lot of fun making this. :o)
Love how you used all the stamps—your whimsical flowers are so much fun! Great ideas on making the bubbles. Thank you for sharing this creative page!
Thank you Faye, these stamps were a lot of fun to create with. :o)
Loved the bubbles, great idea. I also liked your tip on blending the background. Helps maintain the stronger color while still blending and softening the edges. Thanks for sharing.
Thank you So much Betty Jo! :o)
Wow this is stunning Amy, love the detail you have gone into with how you made it. I love the bokeh effect and you’ve done a great job at blending these into the design. Well done on your 1st post can’t wait to see what else you make!!!! XX
Amy, I love the way you used the Bokeh Effect Technique– it really makes the page look ethereal!