This is an exciting day on the Joggles Blog as it marks the first of our weekly posts by the Joggles Design Team. It’s Bonnie here today to share with you my delightful playtime with some of the Joggles/Margaret Applin fabulous new cling mounted rubber stamps. There is a wonderful range of stamps which work beautifully together and as stand alone images. I created one art journal page for which I have included a tutorial but I couldn’t resist playing a little longer and will also show that second art journal page.
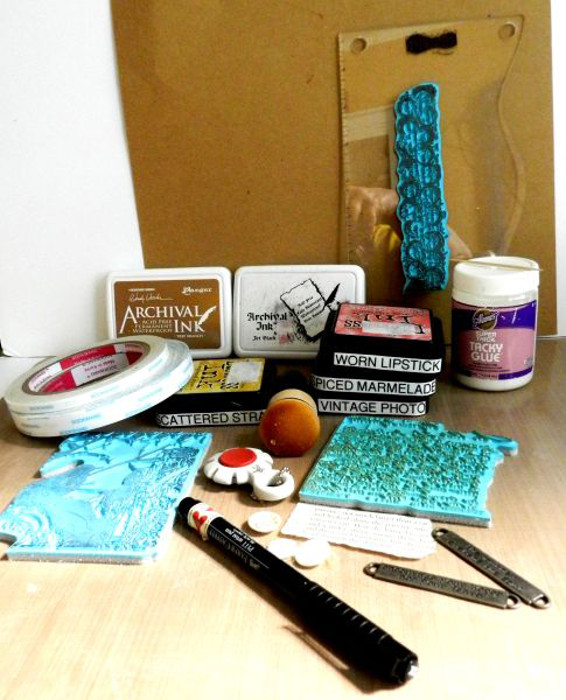
Supplies Used:
Inkssentials NonStick Craft Sheet
Joggles/Margaret Applin Cling Mounted Rubber Stamps – Vintage Correspondence; Grunge Spots Border; Bird Collage (Project #2 : Grunge Stars Border, Skeleton Flower #1, Skeleton Flower #2, Tropical Re-Leaf)
Archival Ink Pad – Tree Branch; Jet Black;
Ranger Inkssentials Mini Ink Blending Tool
Tim Holtz Distress Ink Pads – Spiced Marmalade; Scattered Straw; Worn Lipstick; Vintage Photo
Tim Holtz/Tonic Tools Paper Distresser
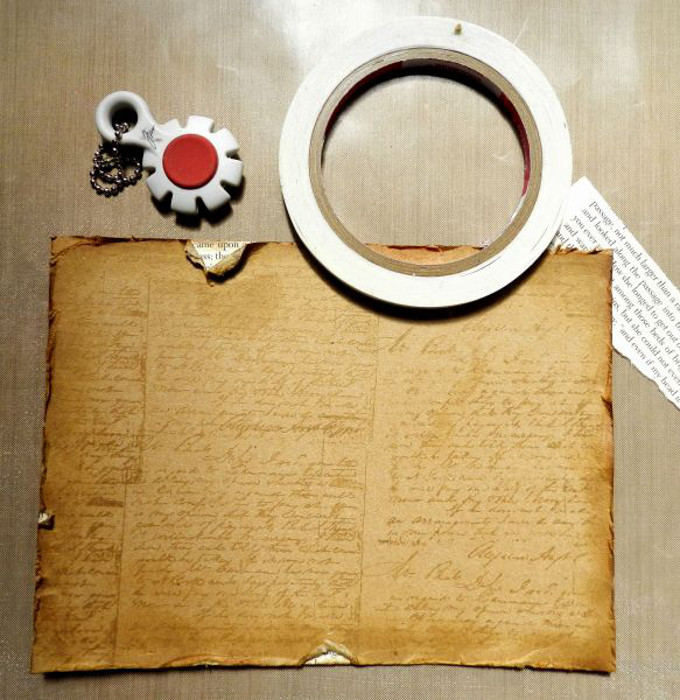
Scor Tape: .25 inch, .5 inch
Aleene’s Super Thick Tacky Glue
Idea-ology by Tim Holtz – Metal Word Bands
Faber Castell Pitt Artist Pen – (S) Super Fine Tip – Black
Other:6 x 8 and 4 x 6 inch pieces of kraft paper plus a 6 x 2 inch scrap; scraps of burlap and cheesecloth; 4 inch doily; cream buttons; fine hemp cord; toothpick; two silver brads; book text or music paper; scissors; ruler; black cardstock; cream thread
Here is my process:

I started with a 12 x 12 sheet of kraft cardstock which I cut in half giving me two 6 x 12 inch pieces. Both were cut off at the 8 inch mark leaving me with two 6×8 inch pieces and two 4×6 inch pieces. I only need one of each but I prepared the other set for a ready background for another project.
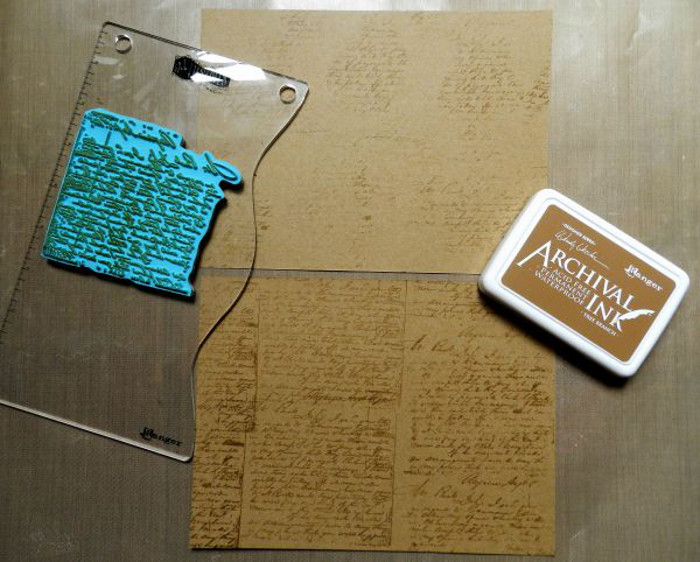
Using Tree Branch Archival Ink and Joggles/Margaret Applin Cling Mounted Rubber Stamp – Vintage Correspondence mounted on the Dylusions Journal Block, i applied the image repeatedly to the 6 x 8 inch kraft background, re-inking as necessary to cover the surface. For the other 6×8 inch background, I removed the stamp from the block and rolled it onto the background to get imperfect impressions randomly spaced. I was curious to see how it looked that way as well.
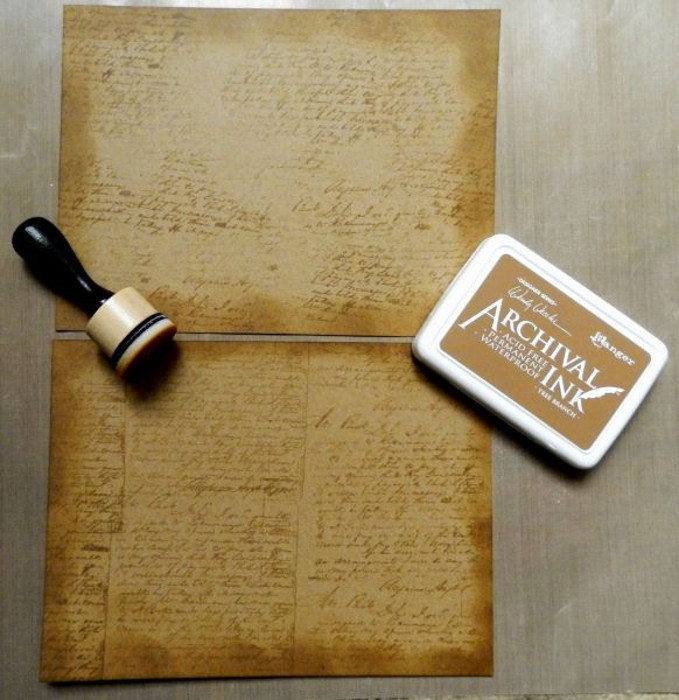
Using a Ranger Inkssentials Mini Ink Blending Tool, I applied Tree Branch Archival Ink around the edges of the backgrounds using a circular motion and beginning on the craft sheet to avoid harsh lines.
Using a Tim Holtz/Tonic Studios Paper Distresser, the outside edges of the 6 x 8 inch backgrounds were torn and tattered for a grungy look. I was quite rough here making sure that I had several small tears around the pages. These tears were rolled onto the page on an angle so that they opened up V shapes. I wasn’t looking for neat or perfect here. Behind each of the small Vs, text paper scraps from an old book page were adhered with Scor Tape so that the text showed through the rips. On the second background, I substituted old music paper.

On the 4 x 6 inch pieces of kraft paper, with a Mini Blending Tool, Scattered Straw, Spiced Marmalade, Worn Lipstick, and Vintage Photo were applied, overlapping and blending each colour where it touched another. I added more Vintage Photo Distress Ink around the edges to frame the pieces and allow to dry them to dry thoroughly. (if you are wondering what the little white squares are on my Distress Pad lids, they are velcro squares which I use to attach the sponge for that colour).
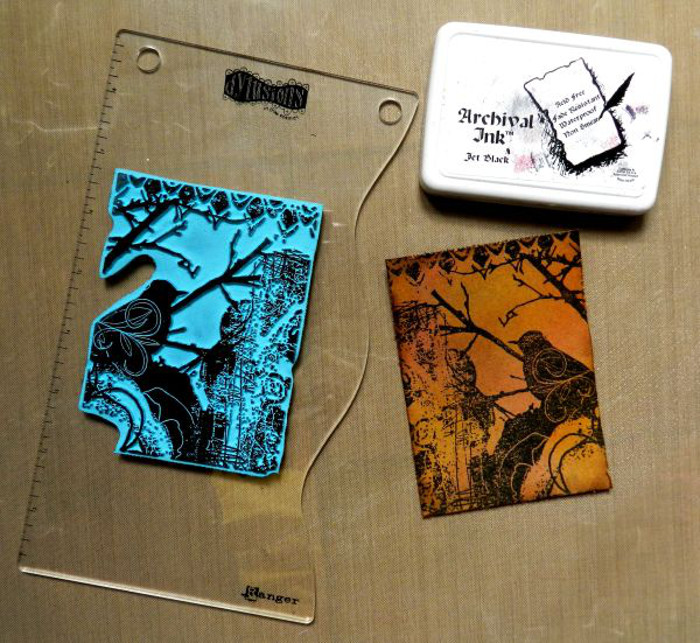
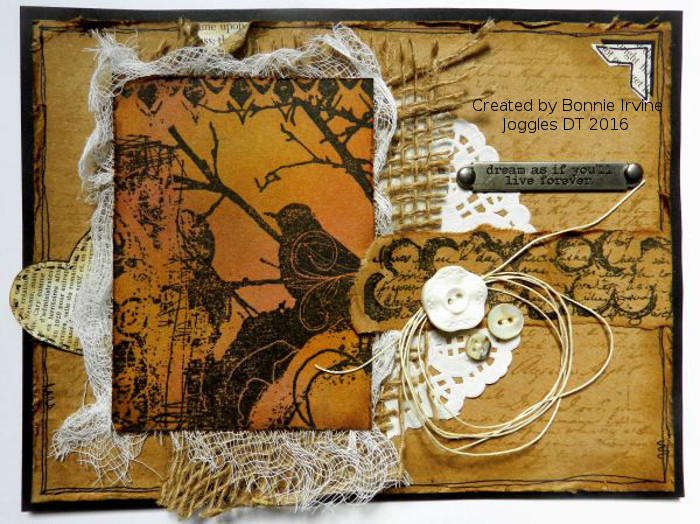
I chose one of the two Distress Inked pieces for my focal image background. I applied Joggles/Margaret Applin Cling Mounted Rubber Stamp – Bird Collage to the Dylusions Journal Block and inked it with a Jet Black Archival Ink Pad, stamped, and let it dry. Then I trimmed close to the stamp and distressed the edges with the Distresser Tool.
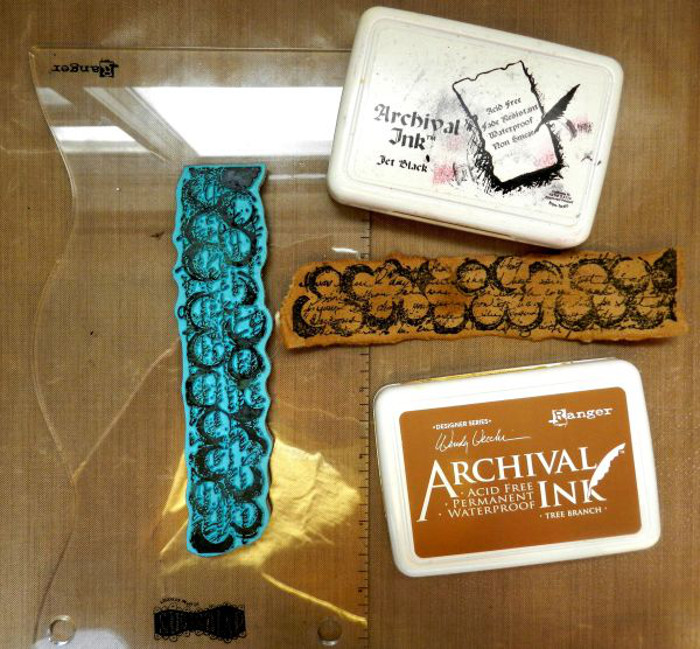
On the 2 x 6 inch scrap of kraft cardstock, Joggles/Margaret Applin Cling Mounted Rubber Stamp – Grunge Spots Border was stamped using Jet Black Archival Ink and the Dylusions Journal Block. Once this was dry, the paper was torn close to the stamped image on both sides and one end. The edges were inked with Tree Branch Archival Ink.
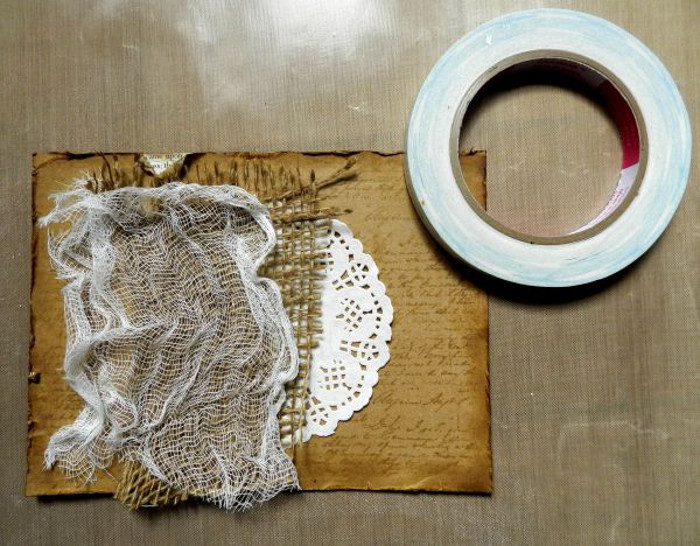
One of the two finished backgrounds was chosen to continue. I selected the one with the stamp applied using a block because I wanted the more solid pattern. A length of burlap (from a garden roll) and a slightly larger rectangle of cheesecloth (from the kitchen) were cut to adhere behind my bird collage image with short pieces of .5 inch Scor Tape placed where they would not show. A 4 inch paper doily was cut in half and one piece was tucked under the burlap and secured with Scor Tape.

The Bird Collage rectangle was Scor Taped over the cheesecloth which was tucked under the image to give a more uneven edge. The stamped border piece was adhered horizontally so that it slightly overlapped the Bird Collage. The excess was trimmed off even with the edge.

To create the little cluster of embellies which overlapped the border stamp, a length of fine hemp cord was looped into a circle. I used a small piece of washi tape to hold it together at the top where I knew the button would cover it. It was then glued in place using Aleene’s Super Thick Tacky Glue. The three buttons from my grandmother’s button box were threaded with cream thread and adhered with the same glue. Using two silver brads, the Idea-ology Word Band was attached to the background above the border stamp.
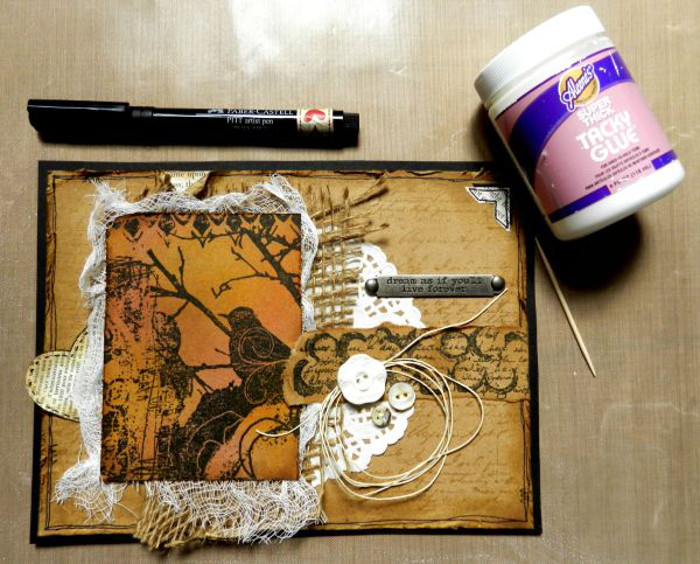
At this point, I always take a look at composition and audition a few things to finish off the page. I decided that I wanted a bit more text paper to tie in with the ones peeking through the tears at the edges. I added a heart cut from text to the left side of the Bird Collage and a photo corner offset with black cardstock to the upper right corner with more of Aleene’s Super Thick Tacky Glue applied with a toothpick. A black Super Fine Faber Castell Pitt Artist Pen was used to add a border around the edges, faux stitching to the heart, and outlining to the photo corner.

The finishing touch was to adhere, with Scor Tape, a black cardstock mat to the back of the piece which framed it, added contrast, and drew the eye into the page.
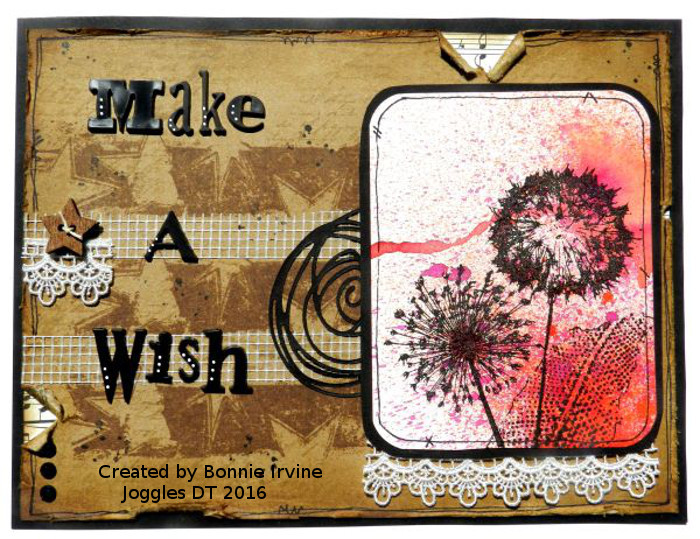
This last photo , above, is the extra art journal page I created with the second background and Joggles/Margaret Applin Cling Rubber Stamps – Skeleton Flower #1 and #2, Tropical Re-Leaf, and Grunge Stars Border.Bits of lace, drywall mesh, a wooden button, and black rhinestones completed the page.
Thanks so much for visiting today. I had a blast creating with these fabulous stamps. Be sure to tune in again next Friday when two more of the Joggles Design Team show us their amazing projects featuring some of the many Joggles Stencils available in the shop.
18 Comments
This is outstanding Bonnie. I just love it. I have looked at it many times, taking in all the details and having such fun doing it. Dry wall mesh? Do you have dry wall mesh?
I think I might take a stab at it using supplies that I have.
Thank you so much for this journal page.
Thanks so much, Ginnie. Yes, I use drywall mesh from the hardware store all the time. It’s fabulous to add texture and the best part is, it’s sticky on one side so no extra gluing required to add it to my pages. I’m glad you liked my page. It’s a little more subdued colour-wise than I usually do but I love earth tones and they seemed to suit the bird collage stamp. I’d love to see what you create.
I very recently found this site. Love it! Thank you for sharing such wonderful talent!
Thank, Yvonne. I’m so glad you have found us. Have you checked out the Art Journal Adventure posts and the Facebook group yet? Both are lots of fun and great sources of inspiration.
FABULOUS! I have all but one of the stamps and will see what I can do! Love all of your ideas. I have dry wall mesh and just discovered a product similar to this called easy joint tape. It has holes in it so it resembles sequin mesh. It is paper so it can painted, sprayed, etc. and has an adhesive back. Great fun to use. I love using old buttons, lace, ribbons; adds so much to the pages. Thanks for sharing!
Awesome journal pages! Thanks Bonnie for sharing all your details…my favorite is the surprise tucked paper behind the torn edges.
Thanks Janj. I love little tiny details that you might not notice right away but when you do they make you smile. Plus I love using scraps!
Thank you soooo much Bonnie – you sure are inspirational and I appreciate the boost. I’m very interested in checking out “dry wall mesh” and the “easy joint tape” mentioned above.
Thanks, Barbara. Definitely check out the hardware store …there are all kinds of cool things that I use from there in my art journal. I love both those tapes. There is also a silver tape that embosses beautifully and has a sticky back 🙂
Ohhhh Yes Maam – that wonderful silver tape (Plumbers Tape) is VERY FUN. Emboss it and use TH inks to color. MUST get to the hardware store today … HAVE to play.
Very nice Bonnie. I love the vintage Victorian feel. I liked the way you rolled the text stamp for the random effect and the peek-a-boo paper around the edges.
Also liked the coarse burlap you used. Trick must be that you got it at your garden center. Looking forward to seeing more of your creations.
Yes, that’s exactly where the coarse burlap came from. I had a roll of it in the garage with my gardening things and brought some in for my art journal. I love the texture and how wonky the weave is. I love texture and adding little details like the peekaboo paper. Thanks for your kind words.
Absolutely love them. And as usual a concise and easy to follow tutorial. I so appreciate that on projects.
Thanks, Trish. It’s always great to hear that my tutorial is easy to follow. I like that in a tutorial myself…kind of a cut to the chase kind of person 🙂
Love your pages, Bonnie. I have to go through my stash of textiles, yarn and beads; your work is inspiring me to look for different media. Thanks!
Bonnie — great job! I LOVE those Margaret Applin Cling Mounted Rubber Stamps, especially the Grunge Spots Border. I also really liked the combination of Distress Ink Pads you chose!
So much fun, I just had to play. I mounted mine on 8×10 mat board so I can frame them. Thanks for the ideas.
Very nice pages! Love that bird collage stamp. It’s interesting to see the unexpected treasures each artist has on hand (Grandma’s button box, e.g.).