Hello, it’s Jana again, and welcome to Week #37 of the Art Journal Adventure, where I introduce you to “Trash to Treasure” as your prompt for the week! I’m a consummate recycler, re-purposer and re-user of things, and when it comes to making art, I’m no different! This week I will show you how to create a great spread out of what most consider “trash” and challenge you to find your “treasure” in the worn, used and otherwise discarded.
 It was easy to collect materials for this prompt. Before putting something in the trash or recycling bin, I pondered its usefulness in creating art. My eye was on things that could be used to create a substrate, make marks, leave patterns, collage fodder, etc. I came up with a pile of plastic bags, cardboard, card stock packaging, a paper towel tube, bubble wrap, envelopes, flyers, catalogs, a used gift card, index card with notes on it, a used cosmetic sponge, coffee cup, water bottle, everything but the kitchen sink!
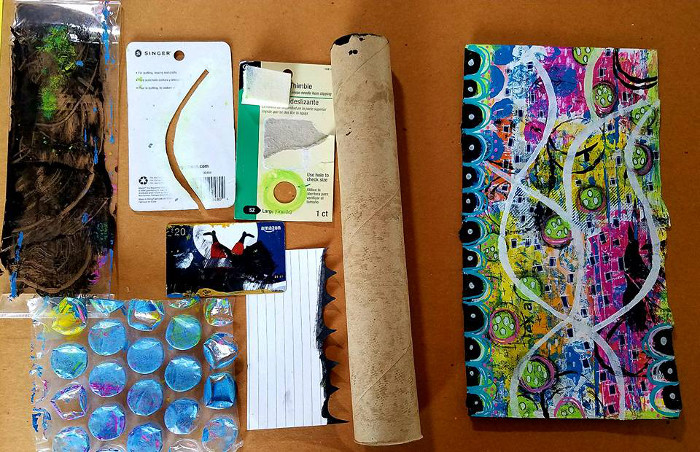
Look around, you’ve got a wonderful range of tools that are in your recycling bin or about to be repurposed …

I chose a piece of junk mail – a large postcard mailer – as my substrate. I had two of these postcards and glued them together using a glue stick. I wanted a heavier substrate to be able to hold up to the collage and paint and whatever else I was going to throw at it.
A rough coat of gesso prepped the surface for the initial layering elements.
Pieces of junk mail and other “recycled” paper were used to create the background; fluid matte medium was used to cement and build that first layer. Once the initial layer of collage was glued down and dry, I knocked back the background with white gesso and a palette knife, skimming over the edges of the papers and where they intersect. I didn’t worry much about making this even – more texture is always better for me!
Bright drops of color were squeezed directly from the paint tubes onto the page. I spread the paint using a recycled gift card and purposely went in different directions to build additional texture.
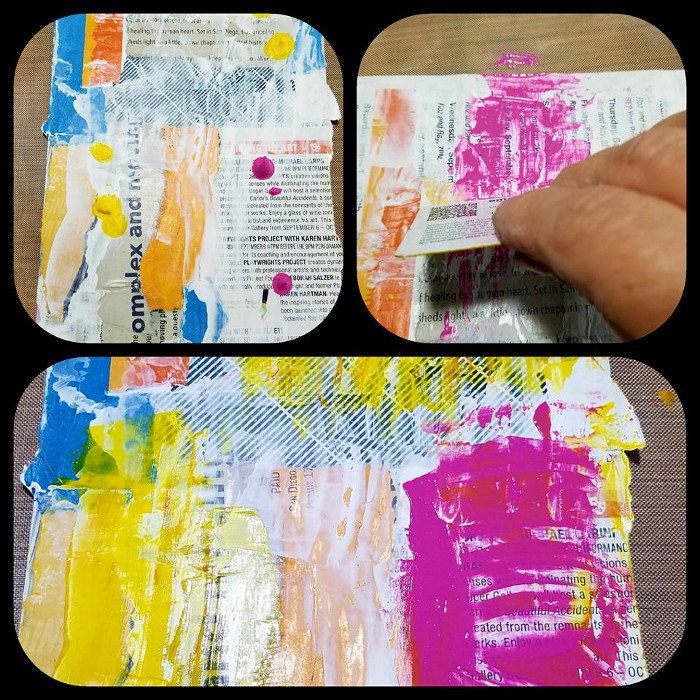
Thanks to those bright colors and texture, the piece was really taking on a bold, vibrant personality!
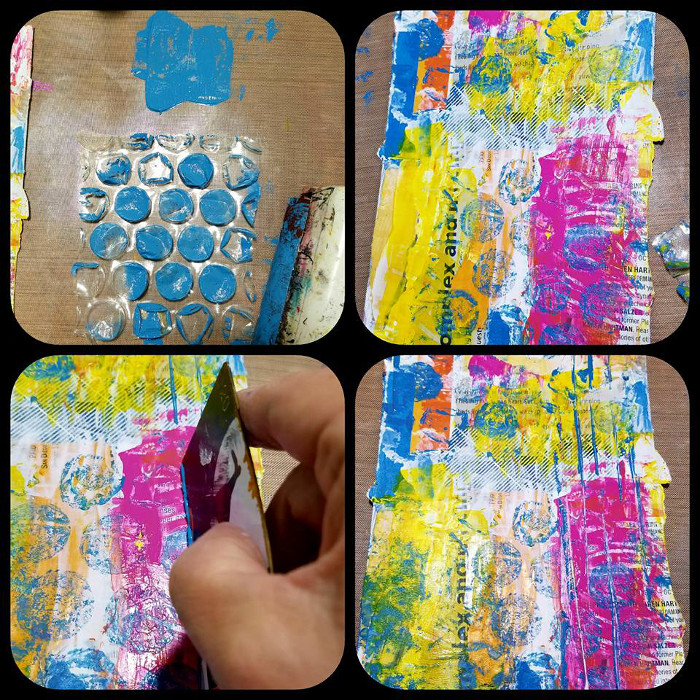
Bubble wrap is a great way to make circle marks and add texture. I squeezed out blue paint onto my craft mat and using the brayer, I spread the paint on a piece of bubble wrap. Once I pressed the paint-laden bubble wrap onto my page, it imparted a yummy series of blue circles. Have fun with this – move the bubble wrap around your page and don’t be afraid to go off the page’s margins.
I mopped up the left-over paint with my gift card and used it to “draw” stripy marks up and down my page.
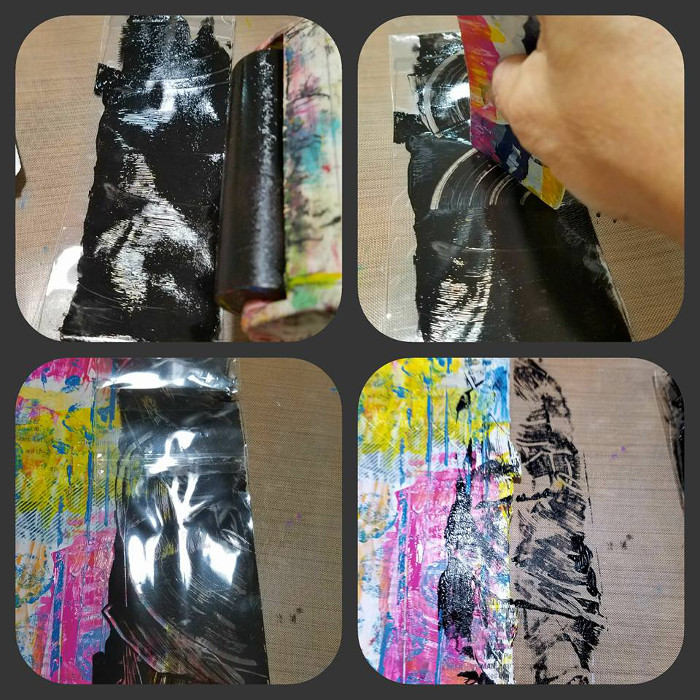
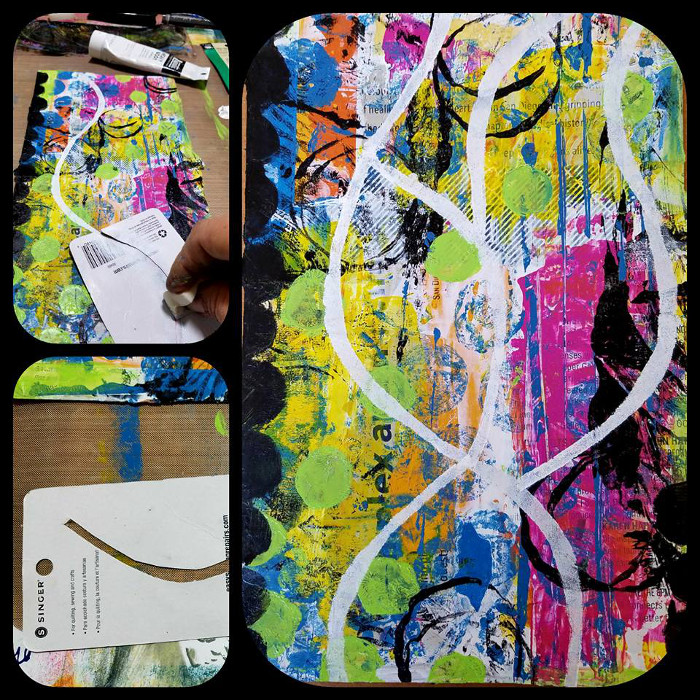
I continued to use my “trash” to build up the background and decided to use a clear plastic envelope packaging thingie (technical term) to make a monoprint. You can use a plastic grocery sack or a bread bag to do the same. Start by spreading paint over the surface with a brayer, and then draw shapes into the paint. I made “fan” shapes with an old gift card. Invert the plastic over the page and rub your hand over it, leaving the “print” behind.
There are so many ways to make your own stencils! I used the card stock backing from a sewing notions package. Since it contained a thimble originally, there was a nice round hole in it and made lovely bright green circles on my page. Circles a-go-go!
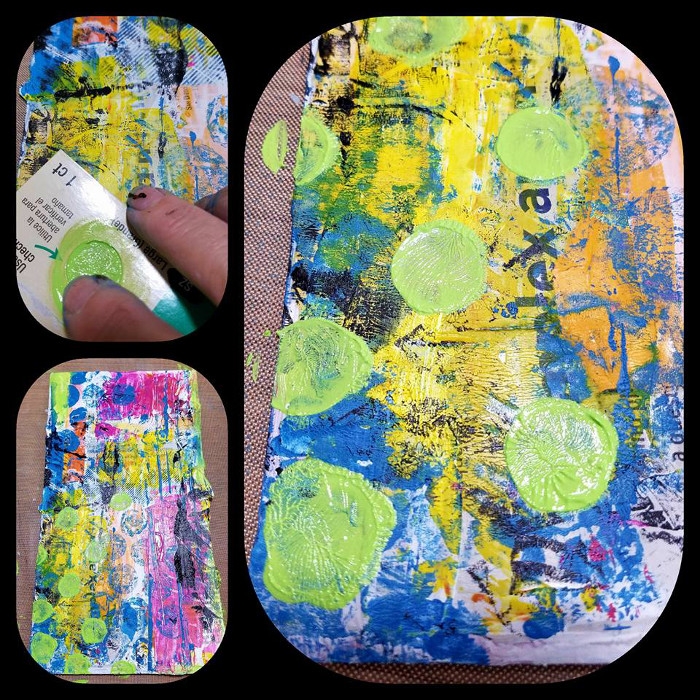
Add some black circles courtesy of the cardboard tube from a roll of paper towels. You could use the lid to a jar, an empty soup can, or any other object with a round edge. I watered down the black acrylic paint enough that I could use the tube as a stamp. I stamp twice, slightly outside the first circle, to create greater visual interest. Easy-peasy mark making!

Use cereal boxes or other card stock packaging to create your own stencils! The first stencil is a scallop, cut from an old list written on an index card. This stencil was used to create a scalloped border along one side of the page with black acrylic paint.
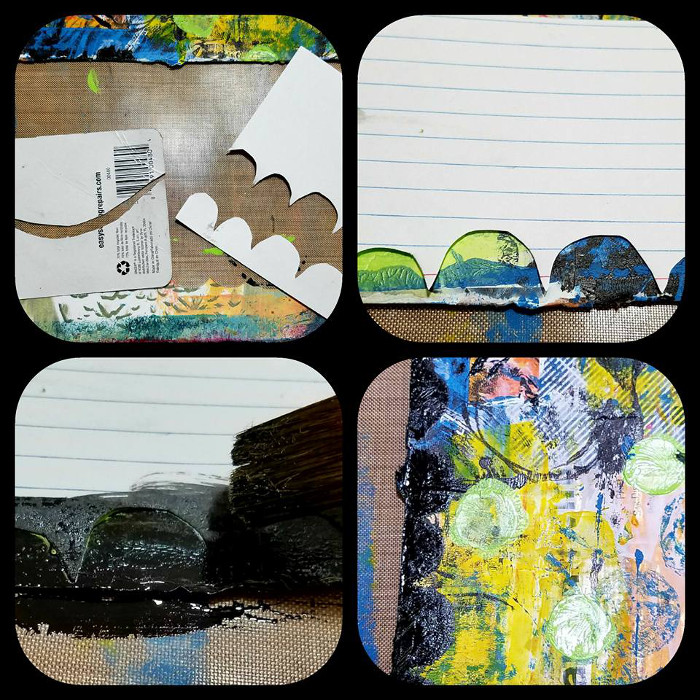
I cut out a curvy line on card stock packaging to create another stencil and with white paint, it left a sinewy mark on my page!
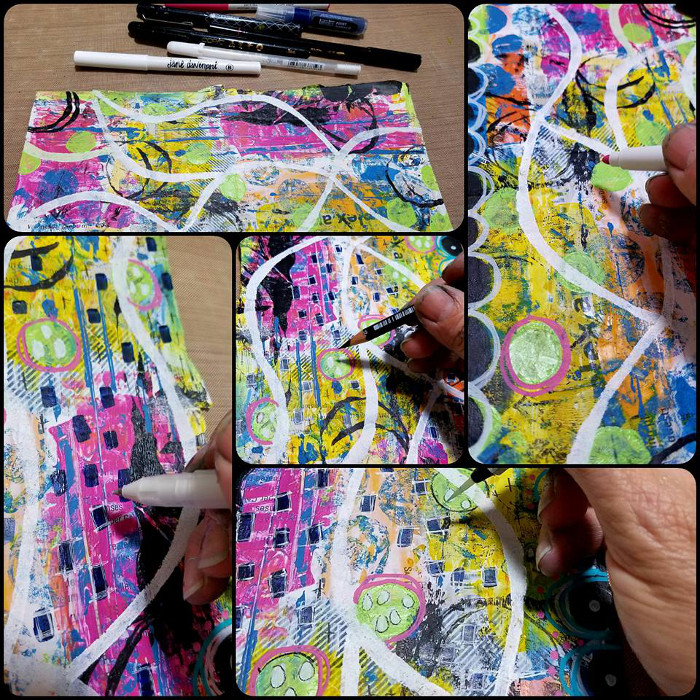
I was thrilled with the color, texture and variety of shapes on my page! It was time for some merry mark-making using some of my favorite pens! Using a combination of paint markers, permanent pens, aquarelle pencils and a water brush, I created additional texture and shading, and visual interest! Doodle until you drop!
I’m quite pleased with the ability to create a lively and interesting base page with nothing but trash! Who would have thought?! Look at what’s been done so far and with so little!
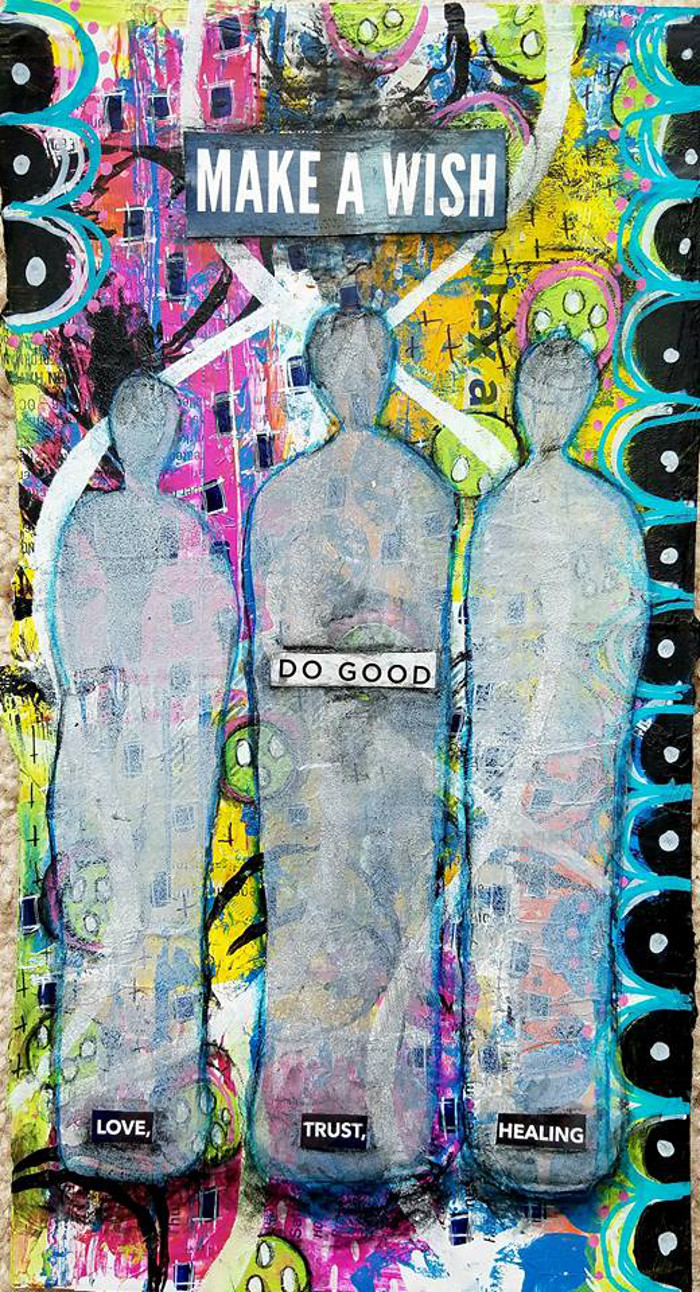
I could have left the page as is, and called it done, but I wanted to give the page a focal point. I decided to pull a stencil from my existing stash, but I was conflicted because I really wanted that luscious background to be the star of the show. I mixed a light gray paint, with white, and then proceeded to use an old make-up sponge to lightly dab on the color. This made way for the silhouette images without obliterating the background, and provided a focal point and visual relief.
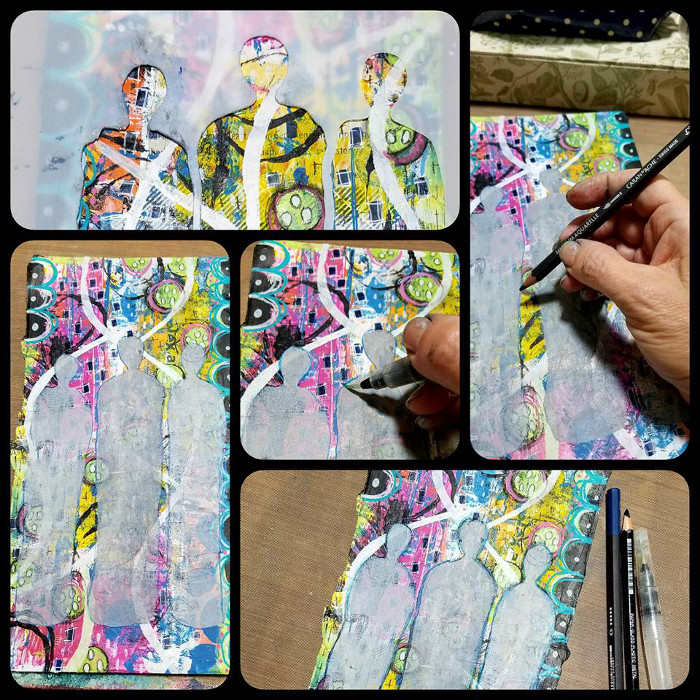
Using words or a spoken theme is not something I always include in my art … this piece called for something more, so I went back to my trash heap and cut out a few meaningful words from a catalog. I used a glue stick to adhere the cut out words to the page. Using a Stabilo Marks-All pencil and water-brush, I outlined the words to take off the “edge” of the newly collaged pieces. I used the same process to blend the edges of the stenciling, providing depth and continuity.
Hopefully, this week’s prompt will help you discover that with a minimum of supplies and a curiosity to create tools from scratch, you will always have plenty to keep you creating! Recycle, re-use, re-purpose!
Can’t wait to see your “Trash to Treasure” make-over!
Artfully,
Jana Freeman
Supplies used for this prompt:
Golden Brand Gesso – white
Liquitex Basics Acrylic Paints – pink, yellow, green, black, gray and white
Elmer’s Glue Stick (glue sticks are temperamental tools – find the one that works best where you live and for your climate!)
Stabilo Marks All pencil – Black
Caran d’Ache Aquarelle pencil – Permanent Blue
Liquitex Paint Marker – Prussian Blue
Jane Davenport Paint Over Markers – white, turquoise and pink
Donna Downey Signature Stencil – Silhouette Trio
Jana Freeman is a mixed media artist, living in San Diego and is the owner of Way Art Yonder Studio (www.wayartyonder.com). She hosts a variety of art workshops at her private studio and can be followed on Instagram @janamfreeman and @wayartyonder.
6 Comments
I love this style! And the reusing of something that would otherwise be recycled.J
It’s amazing what you can do with so little! I hope it inspires you to look at your “trash” with an eye toward, “how can I re-use this”!
Love this, Jana! Great use of recycled materials.
Thanks, Diana! As a huge fan of your work, that’s a mighty sweet compliment!
I just LOVE it! xx
Thanks, Sharon! Happy “treasure” hunting!